Remote Library web part (Part II - Implementation)
This blog posting applies to Microsoft Office SharePoint Server 2007.
This topic discusses using a DataForm web part to show a view of a document library on another site. This section gives instructions for creating the web part. For a high-level description of this web part, see https://blogs.msdn.com/markarend/archive/2006/07/16/667490.aspx
Many thanks to Bryan Hart and Iyaz Allah Baksh who helped me figure out details of making this work.
There are two ways of getting at a document library from a DataForm web part.
- Set DataSource to the SharePoint Library that you want to show. This is very simple to do, but it only works in one special case: when the Library’s on the current site. In this case it’s just better to use a Document Library web part. But the Remote Library web part will work in this scenario also.
- Set DataSource to an XML web service. This works when the library you want to show is on another site. Unfortunately it’s a little more complicated.
Set DataSource to an XML web service
The URL to access a web service is
https://Virtual_Server/[sites/][Site_Name/][Subsite_Name/]_vti_bin/Service_Name.asmx
(from the WSS v3b2 SDK topic "Introduction to the Windows SharePoint Services Web Service")
We will use https://moss2moss:8088/_vti_bin/Lists.asmx to gain access to all the lists on this site.
This technique will use the GetListItems.asmx web service as the Service_Name.
Configuring the DataForm Web Part
Filtering can be done in several ways.
- Set a clause on the data source. This is preferred because it will reduce the size of the response, filtering the items that it is calling for.
- viewName – Name of view on remote list to use
- query – CAML formatted query string
- Set a clause on the DataForm. This filters the items after they’ve all been downloaded, which might be preferable in the future for dynamic filtering, but these should be avoided now because of difficulty specifying them.
- Filter clause
- Parameters
The most promising of these is the viewName method. This requires that a specific view be created on the repository list, defining the filters and other options desired to appear in the DataForm. While it separates the view definition from the part that is showing it, it has the following benefits:
- Can use SharePoint UI to specify detailed filters, and thus also to preview the filter.
- Can use web part connections to specify which filter should be used.
In this way, the local site administrator would need the right to manage their view of the repository, but otherwise would be able to specify everything about the view and the web part using SharePoint UI entirely.
Filter the Data Source
The next figure shows the properties page of the data source. In this case, the data source is an XML Web Service described at https://moss2moss/_vti_bin/Lists.asmx?WSDL. This points us to the site containing the document library we want to remote. We enter the name of that library in the Parameters field “listName.”
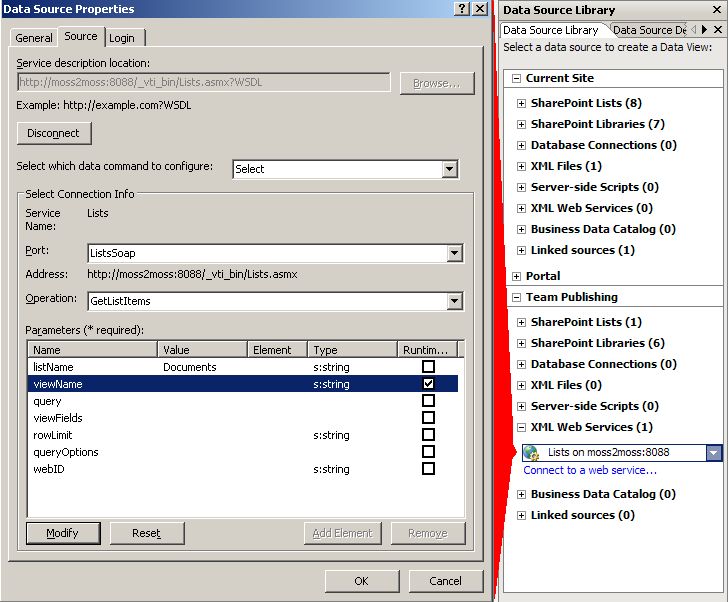
If it doesn't work by using the name of the library, use its GUID in the form {xxxx-xxx-xxx-xxxxxx}. Also, if the library you want is on a subsite, then include the server relative path to the subsite here, even with the GUID.
Next, it’s important for our example to check the “Runtime Parameter?” box for viewName parameter. This is done by clicking Modify and then checking the "The value of this parameter can be set via a Web Part connection” box. This allows us to choose the viewName that we want to display at runtime, from another web part set up for a connection. The viewName is actually the GUID of the list that we want to display. For a more detailed discussion of these fields, see the Lists.GetListItems Method topic in the WSS v3b2 SDK.
Finally, click the Login tab and set either “Use Windows authentication” or “Save this username and password in the data connection.” Using Save the username and password may be required to ensure the Remote Library has access to retrieve information from the target site.
Modifying the XSLT
Three modifications were made to the XSL for the DataForm web part for this example.
1. Render a hyperlink to open a document when its title is clicked. Replace <xsl:value-of select="@ows_LinkFilename"/> with the following.
<!--MBA Mod: Clean up link returned (has drop-down index in it, strip after # char-->
<a><xsl:attribute name="href">https://moss2moss:8088/<xsl:value-of select="substring-after(@ows_FileRef,'#')" /></xsl:attribute>
<xsl:value-of select="@ows_LinkFilename"/>
</a>
<!--End Mod-->
2. Show document icons instead of file extensions. Replace <xsl:value-of select="@ows_DocIcon"/> with the following
<!--MBA Mod: Show document icons-->
<a><xsl:attribute name="href">https://moss2moss:8088/<xsl:value-of select="substring-after(@ows_FileRef,'#')" /></xsl:attribute>
<xsl:if test="substring-after(@ows_FSObjType,'#')='1'"><img src="https://blogs.msdn.com/_layouts/images/folder.gif" border="0"></img>
</xsl:if>
<xsl:if test="substring-after(@ows_FSObjType,'#')='0'">
<xsl:choose>
<xsl:when test="@ows_DocIcon='asp'">
<img src="https://blogs.msdn.com/_layouts/images/asp16.gif" border="0" /></xsl:when>
<xsl:when test="@ows_DocIcon='aspx'">
<img src="https://blogs.msdn.com/_layouts/images/aspx16.gif" border="0" /></xsl:when>
<xsl:when test="@ows_DocIcon='bmp'">
<img src="https://blogs.msdn.com/_layouts/images/bmp16.gif" border="0" /></xsl:when>
<xsl:when test="@ows_DocIcon='chm'">
<img src="https://blogs.msdn.com/_layouts/images/chm16.gif" border="0" /></xsl:when>
<xsl:when test="@ows_DocIcon='css'">
<img src="https://blogs.msdn.com/_layouts/images/css16.gif" border="0" /></xsl:when>
<xsl:when test="@ows_DocIcon='doc'">
<img src="https://blogs.msdn.com/_layouts/images/doc16.gif" border="0"/></xsl:when>
<xsl:when test="@ows_DocIcon='htm'">
<img src="https://blogs.msdn.com/_layouts/images/htm16.gif" border="0" /></xsl:when>
<xsl:when test="@ows_DocIcon='gif'">
<img src="https://blogs.msdn.com/_layouts/images/gif16.gif" border="0" /></xsl:when>
<xsl:when test="@ows_DocIcon='jpg'">
<img src="https://blogs.msdn.com/_layouts/images/jpg16.gif" border="0" /></xsl:when>
<xsl:when test="@ows_DocIcon='mdb'">
<img src="https://blogs.msdn.com/_layouts/images/mdb16.gif" border="0" /></xsl:when>
<xsl:when test="@ows_DocIcon='ppt'">
<img src="https://blogs.msdn.com/_layouts/images/ppt16.gif" border="0" /></xsl:when>
<xsl:when test="@ows_DocIcon='pub'">
<img src="https://blogs.msdn.com/_layouts/images/pub16.gif" border="0" /></xsl:when>
<xsl:when test="@ows_DocIcon='rtf'">
<img src="https://blogs.msdn.com/_layouts/images/rtf16.gif" border="0" /></xsl:when>
<xsl:when test="@ows_DocIcon='tif'">
<img src="https://blogs.msdn.com/_layouts/images/tif16.gif" border="0" /></xsl:when>
<xsl:when test="@ows_DocIcon='tiff'">
<img src="https://blogs.msdn.com/_layouts/images/tiff16.gif" border="0" /></xsl:when>
<xsl:when test="@ows_DocIcon='txt'">
<img src="https://blogs.msdn.com/_layouts/images/txt16.gif" border="0" /></xsl:when>
<xsl:when test="@ows_DocIcon='vsd'">
<img src="https://blogs.msdn.com/_layouts/images/vsd16.gif" border="0" /></xsl:when>
<xsl:when test="@ows_DocIcon='xls'">
<img src="https://blogs.msdn.com/_layouts/images/xls16.gif" border="0" /></xsl:when>
<xsl:when test="@ows_DocIcon='xsl'">
<img src="https://blogs.msdn.com/_layouts/images/xsl16.gif" border="0" /></xsl:when>
<xsl:when test="@ows_DocIcon='xml'">
<img src="https://blogs.msdn.com/_layouts/images/xml16.gif" border="0" /></xsl:when>
<xsl:otherwise><img src="https://blogs.msdn.com/_layouts/images/icgen.gif" border="0" /></xsl:otherwise>
</xsl:choose>
</xsl:if>
</a>
<!--End Mod-->
3. Clean up the “Modified by” name to strip out the delimiter characters. Replace <xsl:value-of select="@ows_Editor” /> with the following.
<!--MBA Mod: Clean up Editor name returned (has drop-down index in it, strip after # char-->
<xsl:value-of select="substring-after(@ows_Editor,'#')" />
<!--End Mod-->
Adding the View Selector
The control to select the view is a Form web part with modifications to its XSL to change it to a drop-down menu of views. For this example, the list is static and hardcoded, including the GUIDs of the views that can be selected, so it would be nice to make a control that populates itself dynamically with this information.
XSL of default Form web part:
<div onkeydown="javascript:if (event.keyCode == 13) _SFSUBMIT_">
<input type="text" name="T1"/>
<input type="button" value="Go" onclick="javascript:_SFSUBMIT_"/>
</div>
XSL of modified Form web part:
<div onkeydown="javascript:if (event.keyCode == 13) _SFSUBMIT_">
<SELECT NAME="T1" ONCHANGE="javascript:_SFSUBMIT_">
<OPTION VALUE="59780691-1020-428B-A21F-D41425A548C8">Default
<OPTION VALUE="3D8C2231-93B8-470F-A03D-5333CA9187E6">SiteView1
</SELECT>
</div>
Yes, I hardcoded GUIDs for the lists in here... it's just a prototype!
Then, you must connect it with the DataForm web part using the properties menus in SharePoint Designer, because these give more control over copying of parameters. To configure web part connections in SharePoint Designer:
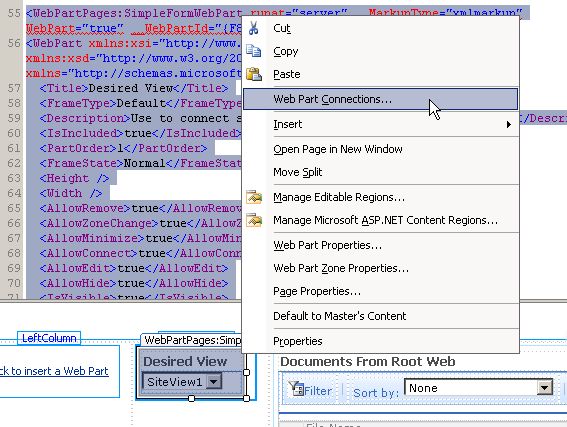
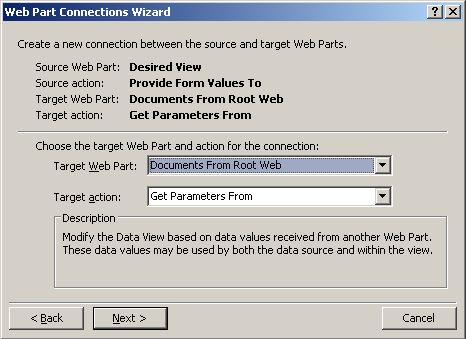
The choice for most properties in the wizard is self explanatory, but it’s important to get them right. Choose “Get Parameters From” instead of “Get Filter Values From”
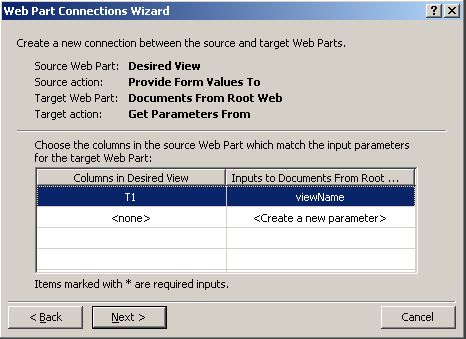
Then make sure the correct form field and web service parameters are selected:
Summary
At this point, you should have a page that displays a view of a document library from another site. This technique also works to display lists from other sites, but you would want to modify the XSL slightly for that.