Command Line Access to Azure VMs – PowerShell Remoting
Every so often I deploy a service to Azure which requires some sort of manual intervention during its execution. That typically involves issuing a few commands from the machine hosting the service or maybe even updating configuration files. The regular way to do this is to setup Remote Desktop on the service and connect to the VM just to open a command line window to issue the required command(s).
Although that is a fine solution it would be nice to be able to issue remote commands from my local machine.
Turns out you can do exactly that using PowerShell Remoting.I am not going to cover the details of PowerShell Remoting in this post, I’ll just show the configuration needed to make it work for the simple case. PowerShell Remoting is very flexible, I encourage you to read more about it if you are not familiar with all it can do.
Prerequisite
You need a user account to remote access a VM. When you configure Remote Desktop an account is automatically created for you. Since we are not going to use Remote Desktop we need to create an account manually and because the setup steps require an Administrator account we will add it to the Administrator’s group.
An account can be created with these two commands. Simply run them as part of a startup task with elevated privileges.
 net user <username> <password> /add
net localgroup Administrators <username> /add
Configuration
PowerShell Remoting needs the correct network configuration to allow for remote connectivity. Since we will be accessing the VM over the web we are required to use HTTPS to secure the communication channel. Skipping over the details of Windows Remote Management which is used by PowerShell Remoting, I will just say the default HTTPS port is 5986.
To allow connectivity to the VM this endpoint must be added to the ServiceDefinition.csdef:
<endpoints>
  <inputendpoint localport="5986" port="5986" protocol="tcp" name="WinRM" />
</endpoints>
With the proper port open it is just a matter of enabling PowerShell Remoting. Two issues need to be resolved before enabling it.
The first is using the correct user account to setup Remoting. You must use the account previously created to run the script to setup Remoting[1]. With these commands the user you previously created will execute the script e:\approot\StartRemotingListener.ps1:
 schtasks /CREATE /TN "StartRemotingListener" /SC ONCE /SD 01/01/2020 /ST 00:00:00
              /RL HIGHEST /RU <username> /RP <password>
              /TR "powershell -ExecutionPolicy unrestricted
                              -Command e:\approot\StartRemotingListener.ps1 -Force" /F
schtasks /RUN /TN "StartRemotingListener"
The second issue is configuring the certificate needed for the HTTPS connection. Acquiring a certificate might not be a problem for a production environment. You might already have one for your service and could reuse it. It can be a problem if your service doesn’t require a certificate for normal operation or for non-production environments.
Fortunately it is possible to generate a certificate using a PowerShell script[2]. This script generates a certificate associated with the hostname of the VM. If you are going to use this script in production you should change $certId the fully qualified URL of your service.
 function Create-Certificate($hostname) {
  $name = new-object -com "X509Enrollment.CX500DistinguishedName.1"
   $name.Encode("CN=$hostname", 0)

    $key = new-object -com "X509Enrollment.CX509PrivateKey.1"
   $key.ProviderName = "Microsoft RSA SChannel Cryptographic Provider"
 $key.KeySpec = 1
    $key.Length = 1024
  $key.SecurityDescriptor =
                 "D:PAI(A;;0xd01f01ff;;;SY)(A;;0xd01f01ff;;;BA)(A;;0x80120089;;;NS)"
  $key.MachineContext = 1
 $key.Create()

  $serverauthoid = new-object -com "X509Enrollment.CObjectId.1"
   $serverauthoid.InitializeFromValue("1.3.6.1.5.5.7.3.1")
 $ekuoids = new-object -com "X509Enrollment.CObjectIds.1"
    $ekuoids.add($serverauthoid)
    $ekuext = new-object -com "X509Enrollment.CX509ExtensionEnhancedKeyUsage.1"
 $ekuext.InitializeEncode($ekuoids)

 $cert = new-object -com "X509Enrollment.CX509CertificateRequestCertificate.1"
   $cert.InitializeFromPrivateKey(2, $key, "")
 $cert.Subject = $name
   $cert.Issuer = $cert.Subject
    $cert.NotBefore = get-date
  $cert.NotAfter = $cert.NotBefore.AddDays(180)
   $cert.X509Extensions.Add($ekuext)
   $cert.Encode()

 $enrollment = new-object -com "X509Enrollment.CX509Enrollment.1"
    $enrollment.InitializeFromRequest($cert)
    $certdata = $enrollment.CreateRequest(0)
    $enrollment.InstallResponse(2, $certdata, 0, "")
}

function Find-Certificate($hostname) {
    foreach ($cert in Get-ChildItem cert:\LocalMachine\My) {
       if ($cert.Subject -eq ("CN=" + $hostname)) {
            return $cert
        }
   }
}

# Using the machine name - ok for staging deployments
# In a production environment this should be set to the public URL
$certId = $env:computername

Create-Certificate $certId
$cert = Find-Certificate $certId

winrm create winrm/config/listener?Address=*+Transport=HTTPS
      `@`{Hostname=`"($certId)`"`;CertificateThumbprint=`"($cert.Thumbprint)`"`}

Set-Item WSMan:\localhost\Shell\MaxMemoryPerShellMB 2000
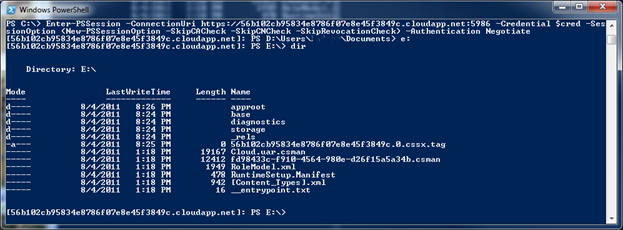
After you deploy a service you can use any of the remoting enabled cmdlets or start a remote session using:
 Enter-PSSession -ConnectionUri https://<service id>.cloudapp.net:5986
                     -Credential $cred -SessionOption (New-PSSessionOption -SkipCACheck
                     -SkipCNCheck -SkipRevocationCheck) -Authentication Negotiate
You should then be connected to the VM and able to run any command on the remote machine.
Limitations
This method will only allow connections to services with a single instance because there is no way to target a specific VM in a service. This limitation probably means this technique is mostly useful for non-production services.
Another problem that might affect you are timeouts. Azure will close inactive connections after a period of time. If you leave your PowerShell window inactive too long you will need to reconnect.
Sample Project
You can download this project to see it all working. Before you publish it you will need to edit the EnablePSRemoting.cmd file and add a username and password in the first two lines. Make sure the password is complex enough otherwise the user creation will fail.