Easy Table Partitions with SQL Server 2008
I am glad to see people realizing the value of SQL Server 2008 platform and they are happily migrating to the SQL Server 2008 platform.
Thank you very much for visiting this article. In case if you are not on the MSDN blogs then I would request you to please visit my blog at https://blogs.msdn.com/manisblog because at times I improve the existing articles after reading emails from people who enthusiastically provide their feedback. These improvements might not be reflected on the other blog sites who have indexed this article.
Hmm.. what am I going to cover today.... it is something that we all expect from a SQL Server database i.e. performance and I am going to write it in the same fashion that you like most i.e. simplify the contents, make it easy to understand and provide the steps with pictures.
Introduction
We all know we have to work with loads of data every day and over the time with the growth of the organization the data bank also grows tremendously. We see there is a performance degradation after few years or months. Is it the same SQL Server that was working efficiently in past is now getting slower, it is not the SQL Server binaries that have changed, it is still the same efficient SQL Server but the growth of data and the way it is structured plays a big role in the performance.
In my experience I have seen that an inefficient query, badly built index, poorly structured database can eat up the entire resources on the server. If the best practices are followed then you will get good performance from the SQL Server. For the best practices on Physical Design of SQL Server Database visit: https://www.microsoft.com/technet/prodtechnol/sql/2005/physdbstor.mspx
Today I am going to discuss how easy it is for us to partition our tables for better performance with SQL Server 2008 (Katmai). I am not going to cover what is the criteria for partitioning your data because it is a long conversation topic. I am just going to highlight the SQL Server 2008 Management Studio's feature for table partitioning.
Partitioning Steps
You should partition your tables that has accumulated a lot of data over the time and you find that the performance is slowing down. It would not be a very good idea to partition a table it has just a couple of hundred rows for example : Product Category table. You could partition your tables that contains a lot of transactions like Purchase Order tables, Sales Order tables, General Ledger Tables etc.
Step 1:
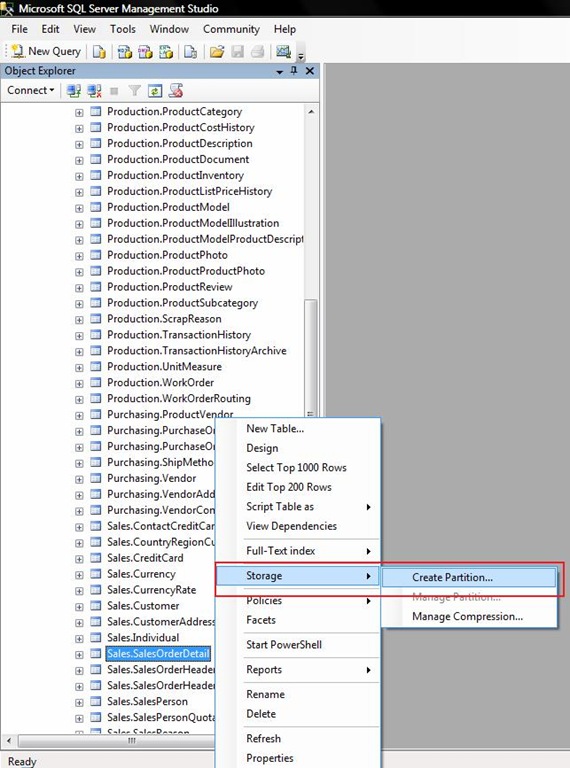
Open the SQL Server 2008 management studio and select the appropriate table that needs to be partitioned. Right click on the table and in the context menu select Storage >> Create Partition.
Step 2:
I am using the [Purchasing.WorkOrder] table in the 'AdventureWorks' sample database. When you select the above option a wizard dialog box appears, press the next button once.
You will see a dialog box with the columns available for partition with data type, length etc. Select the column on which you would like to create a partition and press next.

Step 3:
Provide the name of the partition function and press Next.

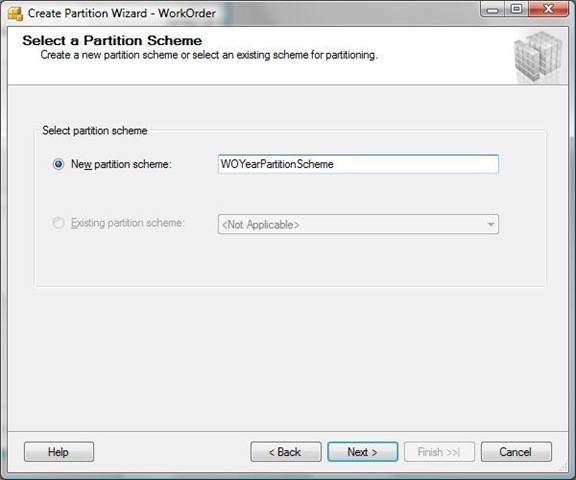
Step 4:
Provide the name of the partition scheme and press next.
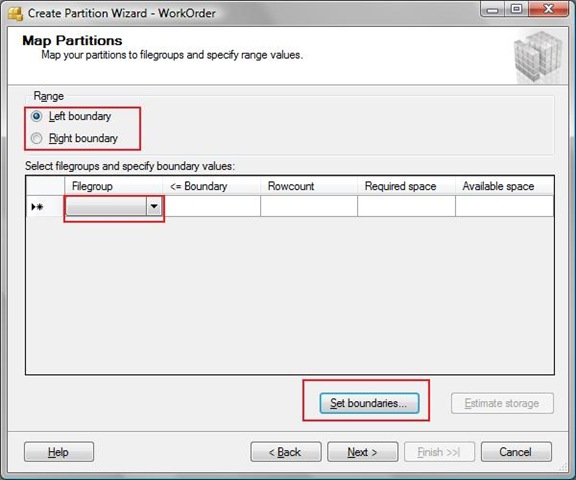
Step 5:
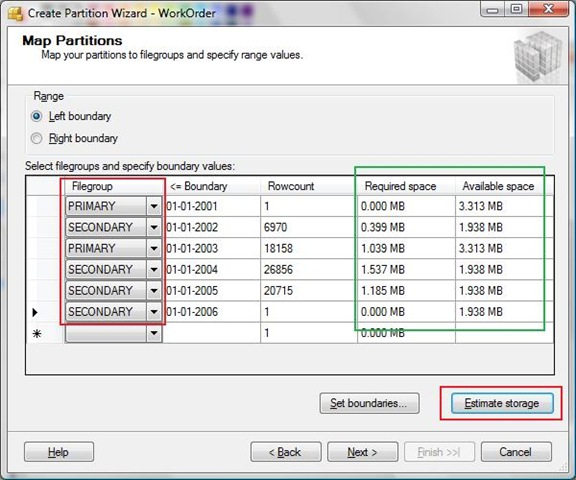
You have to select the option Left Boundary or Right Boundary and then click the button that says Set Boundaries.
Left boundary
The Boundary column label in the grid will dynamically display <= Boundary when you select Left boundary.
Right boundary
Select to include range values up to the specified value in the Boundary column for each filegroup selected. The specified value will be the starting value for the range values of the filegroup on the next row. The Boundary column label in the grid will dynamically display < Boundary when you select Right boundary.
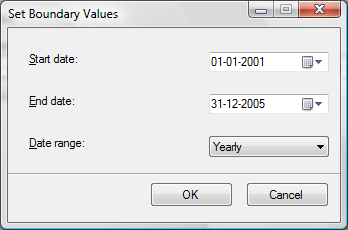
A small dialog box appears with the caption "Set Boundary Values". Select the starting and ending date and select the Date Range from Monthly, Yearly, Quarterly, Half-Yearly , Daily and press OK. I am using End Date field for the partition in this demo.
The above option will create the partition ranges for you. Select the appropriate File Group for each partition in the grid and then click on the 'Estimated Storage' button which will give you the details of the required space. Once you are happy with the results, please press 'Next'.
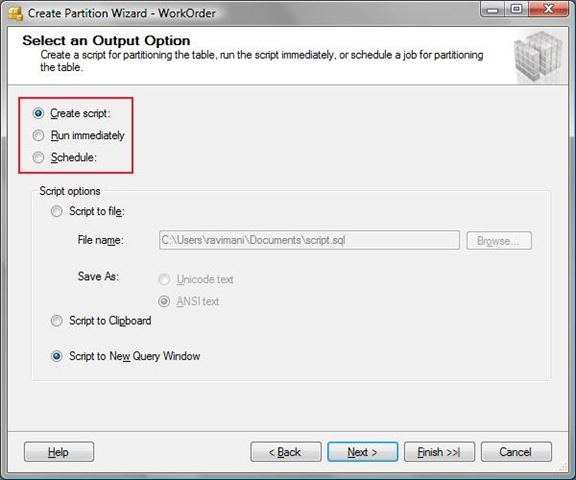
Step 6:
After pressing the 'Next' button you will get the option to create a script or to run it immediately or to schedule it for a later time. Depending on your requirements you can select the option and press the finish button.
See it's so easy to partition your tables and achieve better performance. Please keep a track of my blogs because I will soon come up with more blog posts, if you have any feedbacks or if you liked this article then please drop me an email. Thank you.