SQL Server 2008 - Auditing
Hi Friends, I am back again with one more blog post on SQL Server 2008 Auditing.
As we all know that SQL Server 2008 is coming up with *Cool* enhancements that will help the End Users, DBAs, Developers in improving their productivity. Today I am going to blog about a feature which would be liked by people who maintain the compliance with the Security Standards.
Before the advent of SQL Server 2008, auditing was done using SQL Server Traces and Profiler. Now Auditing is an integral object in SQL Server 2008.
So what is Auditing in SQL Server..
Auditing an instance of SQL Server or a SQL Server database involves tracking and logging events that occur on the system. Based on the information accumulated we would be able to track the changes to the database, access to the database etc. An audit is the combination of several elements into a single package for a specific group of server actions or database actions. The components of SQL Server Audit combine to produce an output that is called an audit, just as a report definition combined with graphics and data elements produces a report. SQL Server Audit uses Extended Events to help create an audit.
While we are working with SQL Server 2008 auditing we need to keep four things in mind:
- SQL Server Audit
- Server Audit Specification (Events to capture on the Server Instance Level)
- Database Audit Specification (Events to capture on a specific database)
- Target (Where would be the events be logged)
Note: I will be using the definitions In Books Online to explain you these 4 objects because I think they are perfect and very easy to understand.
SQL Server Audit
The SQL Server Audit object collects a single instance of server or database-level actions and groups of actions to monitor. The audit is at the SQL Server instance level. You can have multiple audits per SQL Server instance. When you define an audit, you specify the location for the output of the results. This is the audit destination. The audit is created in a disabled state, and does not automatically audit any actions. After the audit is enabled, the audit destination receives data from the audit.
Server Audit Specification
The Server Audit Specification object belongs to an audit. You can create one server audit specification per audit, because both are created at the SQL Server instance scope. The server audit specification collects many server-level action groups raised by the Extended Events feature. You can include audit action groups in a server audit specification. Audit action groups are predefined groups of actions, which are the atomic events exposed by the Database Engine. These actions are sent to the audit, which records them in the target.
Server-level audit action groups are described in the topic SQL Server Audit Action Groups and Actions.
Database Audit Specification
The Database Audit Specification object also belongs to a SQL Server Audit. You can create one database audit specification per SQL Server database per audit. The database audit specification collects database-level audit actions raised by the Extended Events feature. You can add either audit action groups or audit events to a database audit specification. Audit events are the atomic actions that can be audited by the SQL Server engine. Audit action groups are predefined groups of actions. Both are at the SQL Server database scope. These actions are sent to the audit, which records them in the target. Database-level audit action groups and audit actions are described in the topic SQL Server Audit Action Groups and Actions.
Target
The results of an audit are sent to a target, which can be a file, the Windows Security event log, or the Windows Application event log. (Writing to the Security log is not available on Windows XP.) Logs must be reviewed and archived periodically to make sure that the target has sufficient space to write additional records. Writing to the Windows Security log requires the SQL Server service account to be added to the Generate security audits policy. By default, the Local System, Local Service, and Network Service are part of this policy. This setting can be configured by using the security policy snap-in (secpol.msc). Additionally, the Audit object access security policy must be enabled for both Success and Failure. This setting can be configured by using the security policy snap-in (secpol.msc). In Windows Vista or Windows Server 2008, you can set the more granular application generated policy from the command line by using the audit policy program (AuditPol.exe). For more information about the steps to enable writing to the Windows Security log,see How to: Write Server Audit Events to the Security Log. For more information about the Auditpol.exe program, see Knowledge Base article 921469, How to use Group Policy to configure detailed security auditing. The Windows event logs are global to the Windows operating system. For more information about the Windows event logs, see Event Viewer Overview. If you need more precise permissions on the audit, use the binary file target. For more information about the audit records written to the target, see SQL Server Audit Records.
NOTE: Any authenticated user can read and write to the Windows Application event log. The Application event log requires lower permissions than the Windows Security event log and is less secure than the Windows Security event log.
Step By Step Walk Through
Now when you have understood Auditing Objects in SQL Server 2008, let me walk you through the process of creating an Audit in SQL Server 2008. I bet that it will be a good fun learning this feature in spite of the seriousness of the role of Auditing. In SQL Server 2008, the product team has made sure that the features are simple to use for the end users in spite of the underlying complexity. So let's start and explore.
Note: You can click on the images below to maximize.
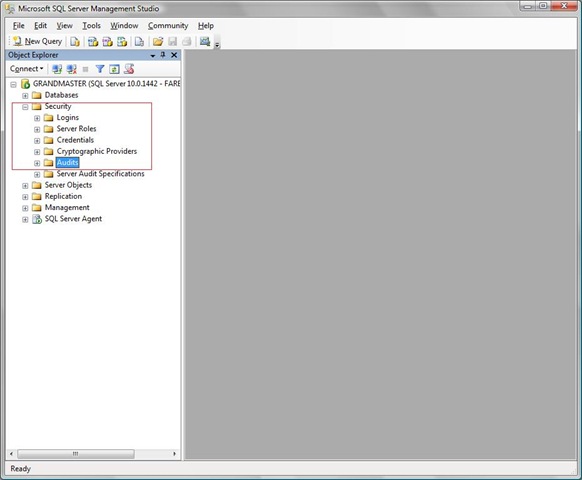
Step 1:
Click open SQL Server 2008 Management Studio and log into it.
Step 2:
Explore the Security node in Object Explorer and select the Audit node.
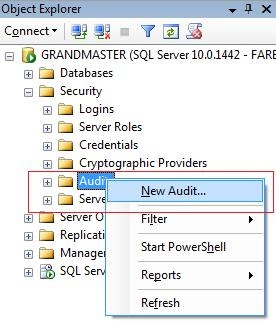
Step 3:
Right click on the Audit node and select the option "New Audit" from the menu.
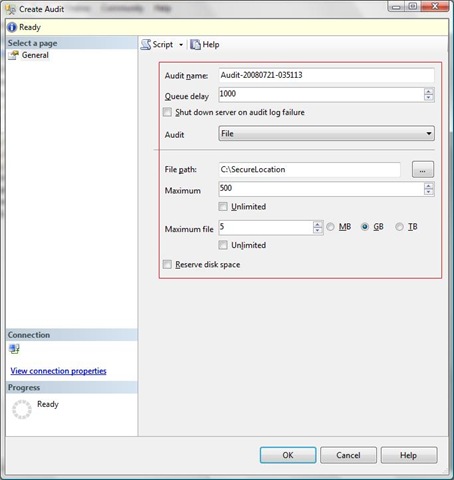
Step 4:
Now SQL Server 2008 will open up a dialog box "Create Audit" with a few fields. It is important to understand the significance of each of these fields. The details of these fields are provided below.
Audit name
The name of the audit. This is generated automatically when you create a new audit but is editable.Queue delay (in milliseconds)
Specifies the amount of time in milliseconds that can elapse before audit actions are forced to be processed. A value of 0 indicates synchronous delivery. The default minimum value is 1000 (1 second). The maximum is 2,147,483,647 (2,147,483.647 seconds or 24 days, 20 hours, 31 minutes, 23.647 seconds).Shut down server on audit failure
Forces a server shut down when the server instance writing to the target cannot write data to the audit target. The login issuing this must have the SHUTDOWN permission. If the logon does not have this permission, this function will fail and an error message will be raised.As a best practice, this should only be used in cases where an audit failure could compromise the security or integrity of the system.
Audit destination
Specifies the target for auditing data. The available options are a binary file, the Windows Application log, or the Windows Security log. SQL Server cannot write to the Windows Security log without configuring additional settings in Windows. For more information, see How to: Write Server Audit Events to the Security Log.Note: Writing to the Security log is not available on Windows XP.
File path
Specifies the location of the folder where audit data is written when the Audit destination is a file. Clicking the button beside this field opens the Browse For Folder dialog to specify a file path or create a folder where the audit file is written.Maximum rollover files
Specifies the maximum number of audit files to retain in the file system. When the setting of MAX_ROLLOVER_FILES=UNLIMITED, there is no limit imposed on the number of rollover files that will be created. The default value is UNLIMITED. The maximum number of files that can be specified is 2,147,483,647.Maximum file size (MB)
Specifies the maximum size, in megabytes (MB), for an audit file. The minimum size that you can specify is 1024 KB and the maximum is 2,147,483,647 terabytes (TB). You can also specify UNLIMITED, which does not place a limit on the size of the file. Specifying a value lower than 1024 KB will raise the error MSG_MAXSIZE_TOO_SMALL. The default setting is UNLIMITED.Reserve disk space
Specifies that space is pre-allocated on the disk equal to the specified maximum file size. This setting can only be used if MAXSIZE is not equal to UNLIMITED. The default setting is OFF.
Now after filling up appropriate values in the dialog box, press OK to create an Audit.
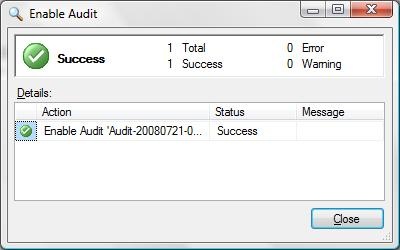
Step 5:
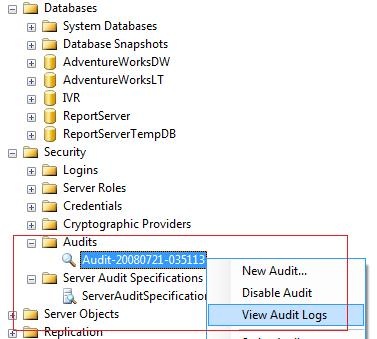
Now once the Audit is created, it could be found under the Security>>Audit node. Now to enable the Audit, just right click on the Server Audit that we have just created and from the menu select "Enable Audit".

You would see a dialog box with the success message, if the operation succeeds.
Step 6:
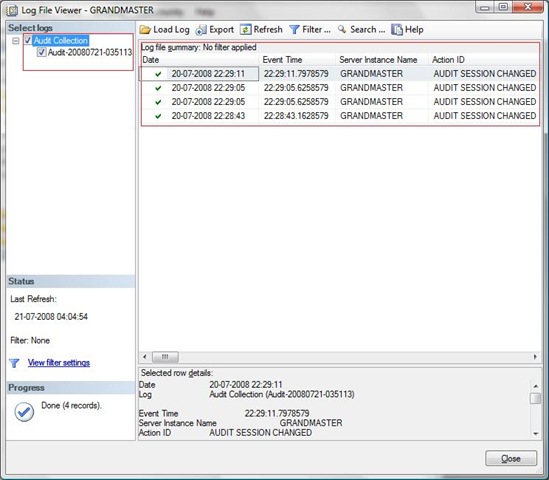
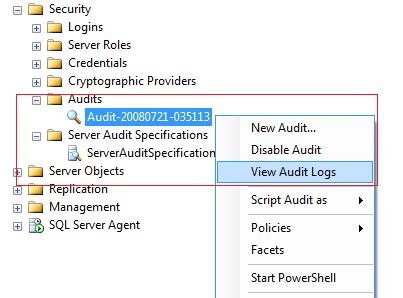
You can right click on the Audit just created and select the option "View Audit Logs". This opens up a dialog box that contains the audit logs.
You can also script the created policy. Right click on the Audit, select "Script Audit As" >> "Create To" >> (File/ Clipboard / Agent Job).

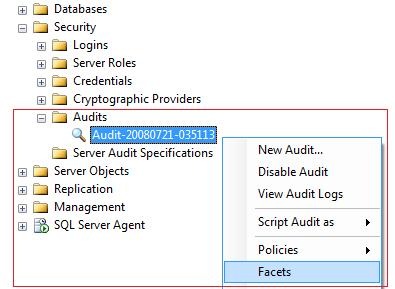
As we know that Policy Based Management is now an integral part of the SQL Server 2008 so if you would like to create a policy for this Audit then it is very easy to do that. You have to right click on the Audit just created, select the option "Facets" from the menu.
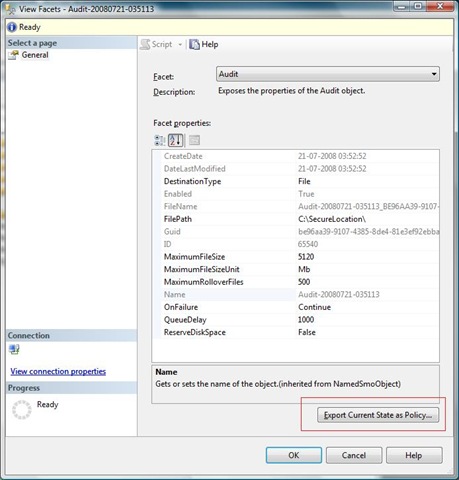
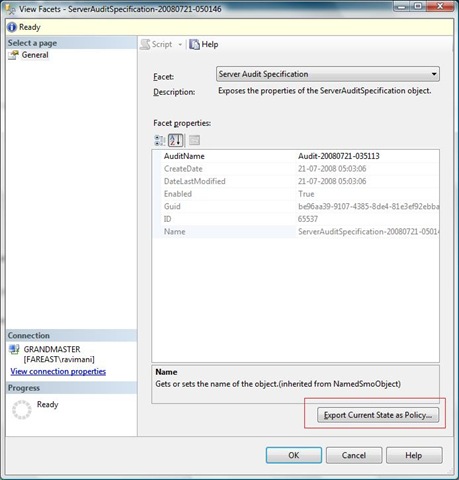
It brings up a dialog box that provides you with the status of the Audit. On the lower right corner of this dialog box you would find a button "Export Current State as Policy".
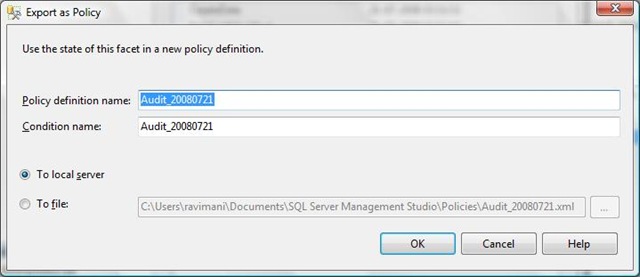
When you click on the button "Export Current State as Policy", it brings up another dialog box that shows the Policy Name and the condition name which is editable. You can select the appropriate option below these fields to apply this policy on the local server or to save it as a Policy file. If you select the "local server" option, you would see that a Policy and a Condition has been created with the name you have specified in the dialog box.
Step 7:
Now we will create the Server Audit Specification.
Before continuing further I would strongly recommend you to visit the TechNet Article : Server Audit Action Groups and Actions.
Once you have understood the Server Audit Action Groups, explore the node Security >> Audits >> Server Audit Specifications in the Object Explorer in the SQL Server 2008. Right click on the Server Audit Specifications and select "New Server Audit Specification".
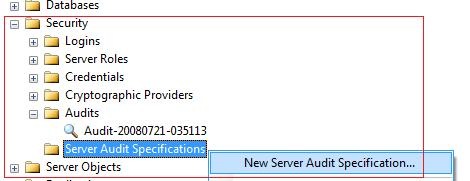
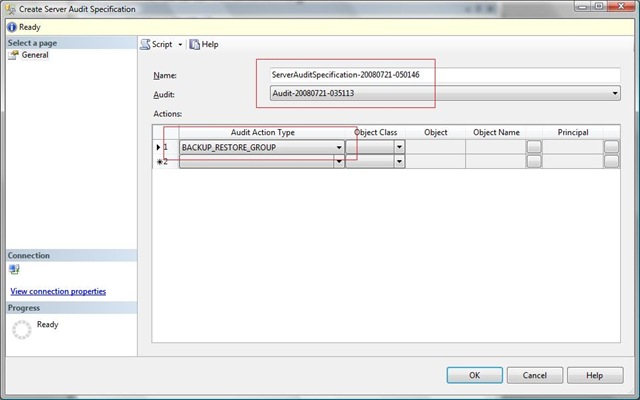
When you select this option a dialog box appears in which you would specify Server Audit Specification Name and "Server Audit" that you have created in the Step 6. Thereafter you would specify the Audit Action Groups in the grid below. Once you have selected all the required Audit Action Groups, you would press OK and you would see an Audit Specification created for the server. In this Step I have selected the Audit Action Group "Backup Restore Group" and this event is raised whenever a backup or restore command is issued.
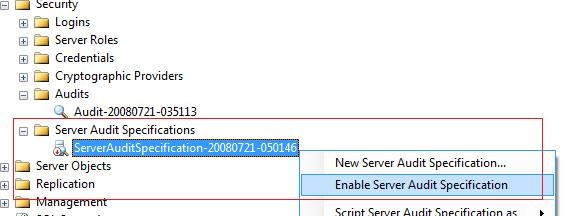
Once it is created, you would see that the Audit Specification is in the disabled state. You have to right click on the Audit Specification that you have just created and select "Enable Server Audit Specification" from the menu.
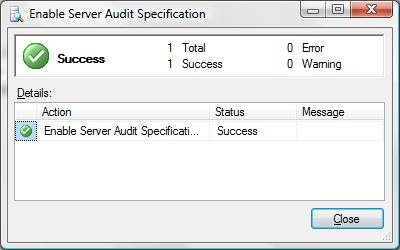
Just after that, you would see a dialog box saying, "The operation was successful" unless you have done something funny to make it fail. :-)
You may right click on the Server Audit Specification and select Facets from the menu. This brings up a dialog box with a button on the right bottom saying "Export Current State as Policy". Click on that button to create a policy as we have done above.
Step 8:
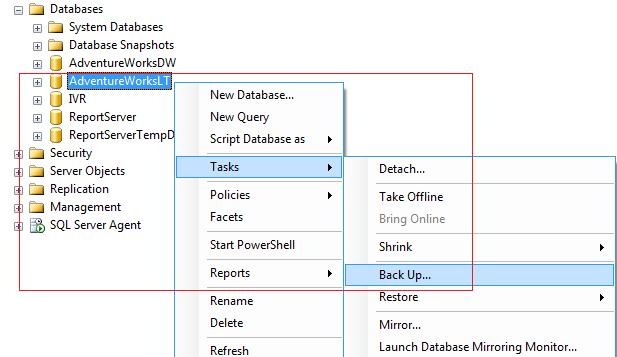
Now let's try backing up a database on the server. I have used AdventureWorksLT database for the demonstration. Then we will see the logs to assure that our Audit is working.
Explore the nodes in the Object Explorer, Databases >> AdventureWorksLT. Right click on the AdventureWorksLT database and select Tasks >> Backup.
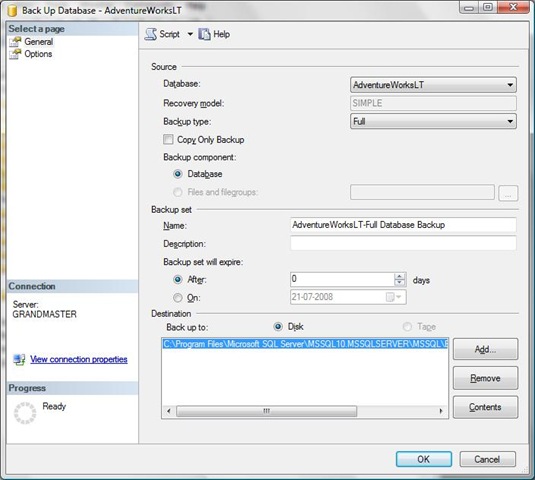
This brings up the following dialog box to create a backup of the database. Please fill in appropriate values in the fields of this dialog box and press the button OK. For more information or help on taking backup please visit Books on Line.
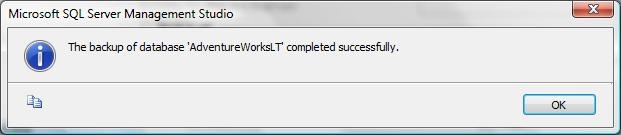
You would see the backup successfully completes.
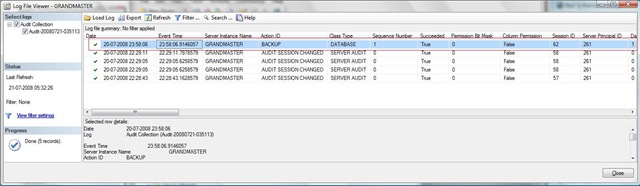
Now right click on the Server Audit we created in the Object Explorer and select the option View Audit Logs from the menu.
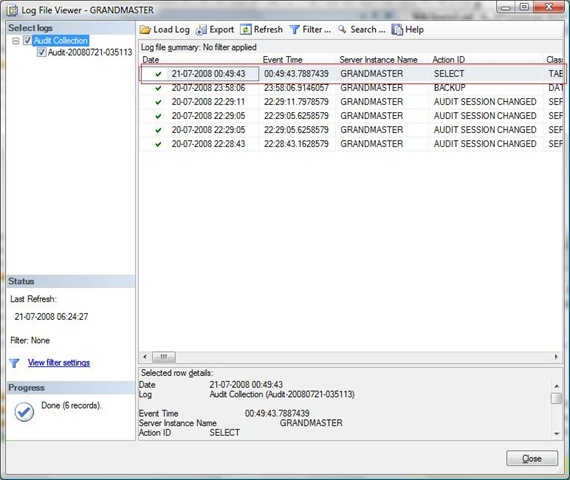
This will bring up the dialog box that will show the details of the backup event. In the picture below you would see the back up event that happened on the AdventureWorksLT database. You can scroll to the right to find the details in the dialog box.
Step 9:
Now we would create a Database Audit Specification. I would use the AdventureWorksLT database for the demonstration. You may visit the TechNet Article : Server Audit Action Groups and scroll down to "Database-Level Audit Action Groups" and "Database-Level Audit Actions" sections in this article to find more information.
The scenario is we want to Audit every select, insert, update, delete operation done on the SalesLT.Product table by anyone.
Explore the Database >> AdventureWorksLT >> Security >> Database Audit Specifications nodes in the Object Explorer. Now right click on the "Database Audit Specifications" node and select "New Database Audit Specification" from the menu.
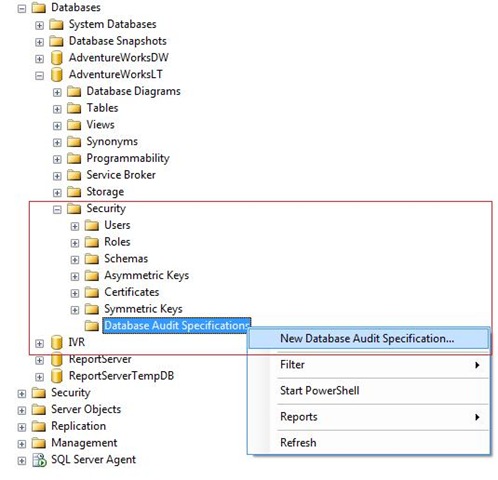
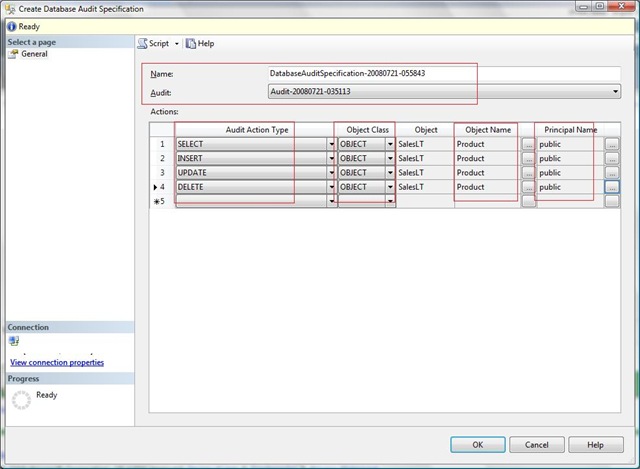
This will open up a new dialog box with the Title - "Create Database Audit Specification".
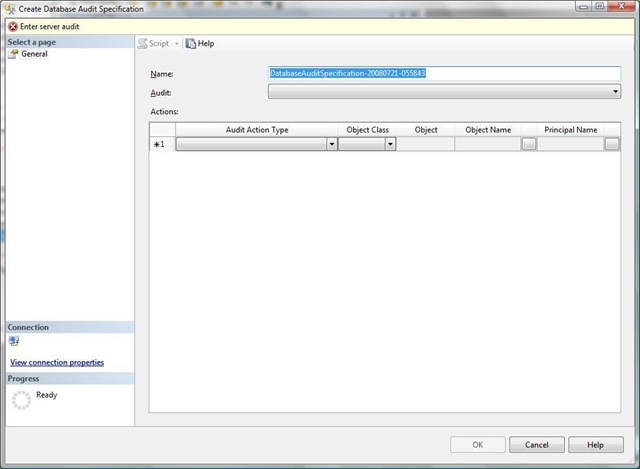
Now we need to Give the Database Audit Specification a name and then select the Server Audit name from the drop down list.
Within the grid in the "Audit Action Type" choose "SELECT" from the drop down list, in the "Object Class" select "OBJECT". Click on the button beside Object Name text box, which opens up a dialog box. Select SalesLT.Product table which will bring "SalesLT" in "Object" and "Product" in "Object Name". Now click the button beside the text box under the section "Principal Name", select "public" by browsing the objects in the dialog box that appears once you click the button.
Repeat the operation for the Audit Action Type INSERT, UPDATE, DELETE. Then finally press OK.
This will create a Database Audit Specification for you which is not enabled. Right click on this Database Audit Specification and select "Enable Database Audit Specification" from the menu.
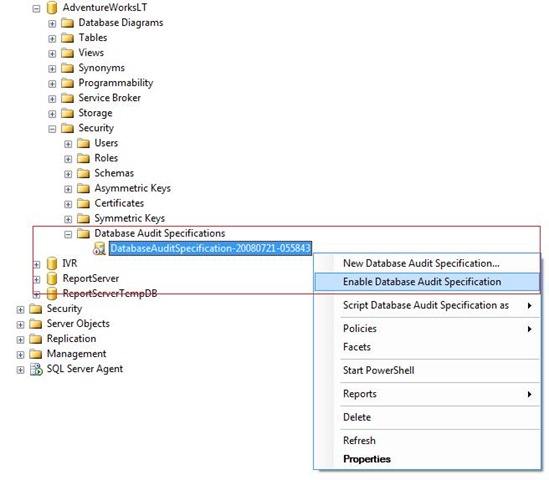
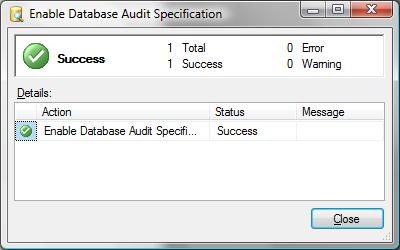
Once it the operation completes.. a dialog box appears confirming the success of the operation.
You can create a policy out of this Database Audit Specification by right clicking on the Database Audit Specification and selecting the option "Facets" and following the procedure in the similar way how we have done previously.
Step 10: (Last Step)
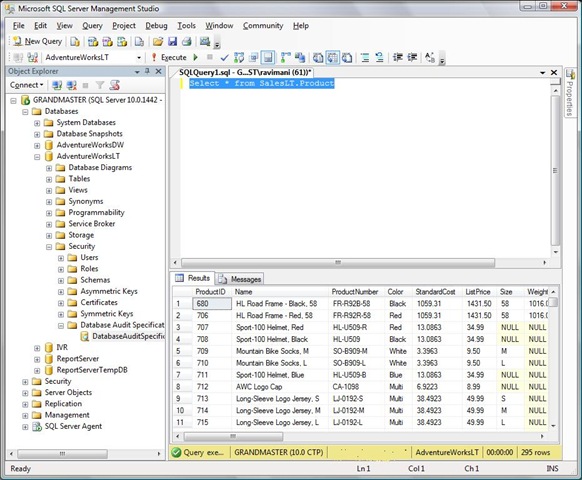
Now we would fire the query "Select * from SalesLT.Product" against the AdventureWorksLT database.
After that you may explore the Security Node in the Object Explorer. <SQL Instance Name> >> Security >> Audits and then right click on the server audit that is already created and select "View Audit Logs" from the menu.
Now the dialog box appears, it has the audit log that says that you have selected the SalesLT.Product table in the AdventureWorksLT Database. You may scroll to the right in the dialog box to find detailed information.
Wow! You have learned to work with this new new feature in just 10 steps.
Wasn't that very easy.
Thanks guys, to take a look at this post, I hope you enjoyed the article. Your comments and feedbacks are valuable so drop me an email. I would be happy to hear back from you, it gives me an opportunity to improve and gives me pleasure to bring new articles.
| I will bring in more articles soon so keep a ... |
Bye now !