How to continuously deploy web application to Azure VM Scale sets using VSTS and Packer?
Azure VM Scale sets are a great way to deploy identical set of VMs (based on same VM image) in true autoscale. When one wants to change a application deployed to VM Scale sets, one common approach is to bake a new VM Image with the latest application code built in, and then update the VM scale set to use this modified image. Performing this task manually can be error prone, time consuming, and often only few individuals in the team can perform this task.
In this post we see one way in which we can set continuous deployment to an environment (called QA in the sample) when using VM scale sets, which means that every time the application is modified and code is merged in the configured git branch, the latest application is deployed to the VM Scale set. The Visual Studio Team Services (VSTS) release pipeline shown in our example can be enhanced to include more environments including production. We use packer in our release pipeline to continuously bake the VM image with latest application code, each time there is an application update. For details of configuring packer with Azure you can refer to my post using Packer with Azure .
The sample application code (php web application), the build / release scripts (including packer file, UI and load test files), and the VSTS release template can be found at my github repo .
Build and Release Pipeline Overview
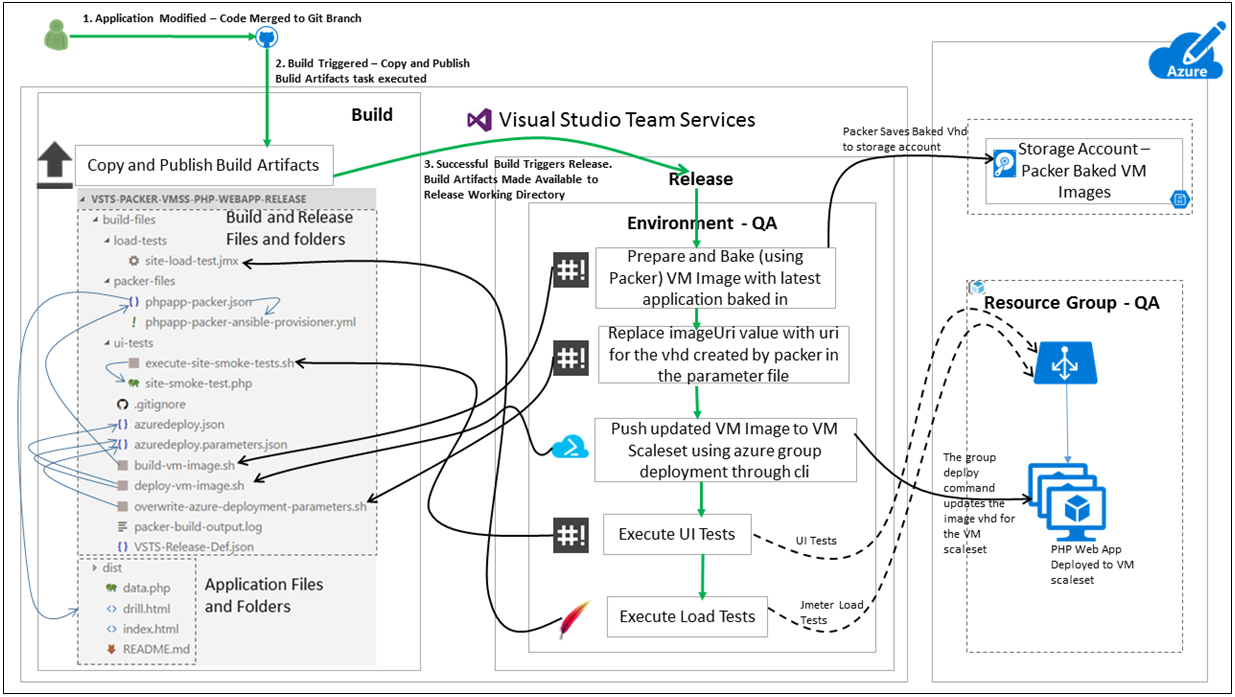
Will give overview of the solution before diving into into some of the details. The VSTS build is triggered each time code is merged into the master branch of the repository. The VSTS build in the sample is a simple one which just publishes files needed for the release. Successful build then triggers a release. The first step of the release packages the latest application files into an Azure VHD image using packer, this VM image (vhd) is stored in the configured storage account. Next we use the azure cli group deployment command to push the new VM image (with latest application code baked in) to the VM Scale set. The last two steps are for UI testing (Using php unit and selenium in this case), and Load testing (using JMeter). At the end of each successful release, the VM scale set has the latest application code.
Please Note : The VSTS VMSS task and VSTS Packer tasks are now available, The deployment pipeline is much more simpler if these tasks are used together. See the Post on how to use these tasks together to bake custom VM Image and update VM Scale Set Image.
Now let us dive into some of the details of our build and release configurations.
- Configuring the custom linux agent for build and release: Have a look at the link VSTS Custom Linux Agent
- to create you own linux agent
- Configuring the custom agent to execute Packer: Information on installing latest Packer executable can be found at install packer. The script below shows installation of packer version 0.12.0 .
(Note : Built in VSTS packer task is now available, You don't need to configure agent to use packer if you are planning to use that task. You can read my post to configure the built in VSTS Packer task)sudo apt-get install unzip wget https://releases.hashicorp.com/packer/0.12.0/packer_0.12.0_linux_amd64.zip unzip packer_0.12.0_linux_amd64.zip sudo mv packer /usr/bin/packer - Configuring the custom agent to execute phpunit and selenium scripts: Follow the link to install phpunit (only if you are using a php based application) and then you can move it to /usr/bin/phpunit. You can use the link to install firefox. You can use the link to install xvfb and selenium stand alone as a service. Once these tools are installed on the agent, we are good to configure the release pipeline.
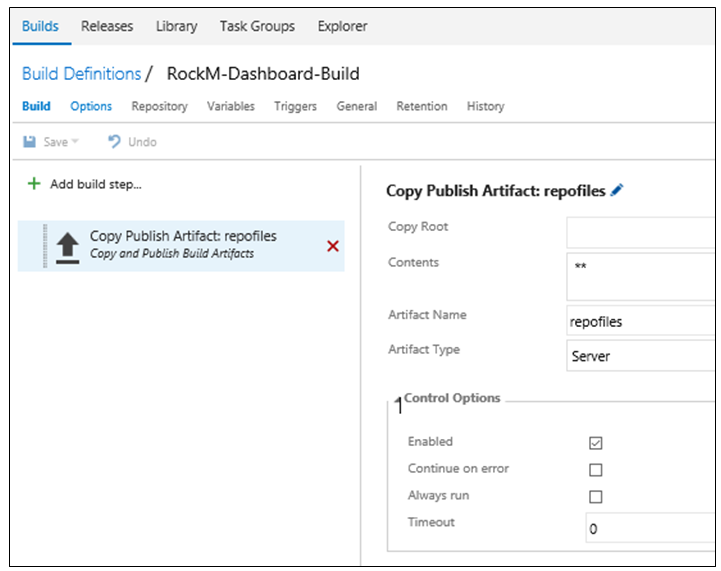
- Build configuration : For simplicity the build is configured to publish all files are folders in the repository.
- Configuring the Release. The file VSTS-Release-Def.json under the build-files folder has the sample release definition which can be imported in VSTS :
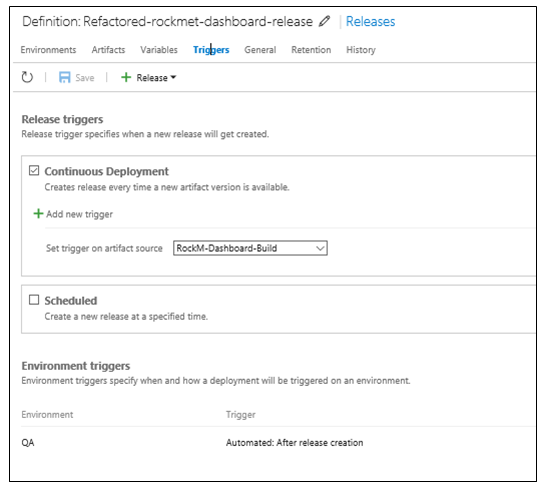
A new release is configured to be created on each successful build.
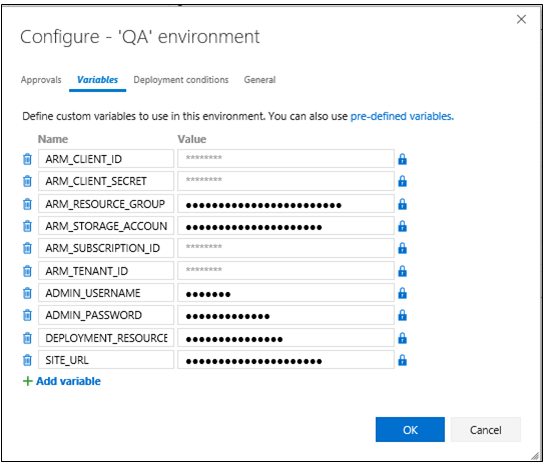
Following are the environment variables which are configured for the release. The ARM_CLIENT_ID, ARM_RESOURCE_GROUP, ARM_STORAGE_ACCOUNT, ARM_SUBSCRIPTION_ID, and ARM_TENANT_ID are used by packer to save the baked VM Image VHD into the configured Azure storage account. ADMIN_USERNAME, and ADMIN_PASSWORD are the the logon credentials for the VM scale set VMs. DEPLOYMENT_RESOURCE_GROUP is the resource group where the VM scale set is deployed. These are passed to the different tasks in the release (as we will see when we go through each task in detail).
Bake VM image with latest application updates baked in, using packer: In this step we use the execute shell script task to call the build-vm-image.sh file, and pass it the parameters required by packer to create the vm image in the configured Azure storage account.Image below shows configuration of this shell script step:
( Note : Built in VSTS packer task is now available, to use that task instead you can read my post Using the VSTS Packer Task and Replace Tokens Task )
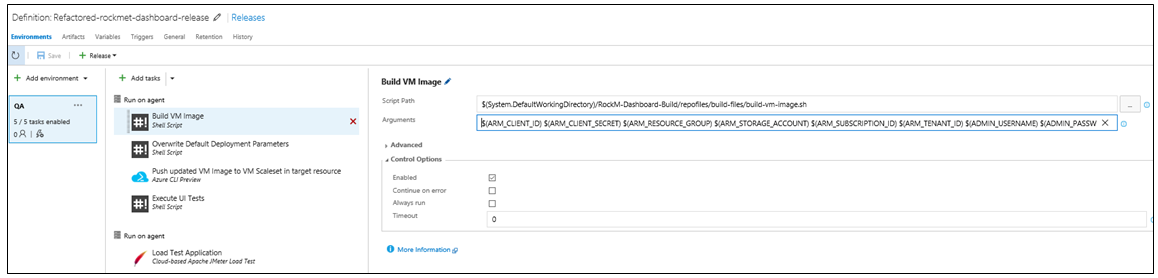
Following code block shows key lines from the shell script. The environment variables are passed as positional parameters to the script in this example:
export ARM_CLIENT_ID=$1 export ARM_CLIENT_SECRET=$2 export ARM_RESOURCE_GROUP=$3 export ARM_STORAGE_ACCOUNT=$4 export ARM_SUBSCRIPTION_ID=$5 export ARM_TENANT_ID=$6 export ADMIN_USERNAME=$7 export ADMIN_PASSWORD=$8 packer build ./packer-files/phpapp-packer.json 2>&1 | tee packer-build-output.logThe packer build configuration file php-packer.json has all the configuration to enable packer to package the latest application code and bake the VM image (including base VM image and Azure region). Following configuration section from the packer configuration file demonstrates how the application dist folder is copied into the baked image using the file provisioner:
"provisioners": [ . . { "type": "file", "source": "../dist", "destination": "/tmp/dist" }, . . . ]In the example other than file and shell script provisioners, we have used the ansible provisioner, but packer supports several other provisioners like chef, puppet, powershell etc. The output of the packer build command is written to the file packer-build-command-output.log. Packer writes the image uri of the newly created vhd in the format :
OSDiskUri: https://*********/system/Microsoft.Compute/Images/images/packer-osDisk.5a892bb0-*********-410f-8198-92c8b140390e.vhd(see file packer-build-output.log for complete output of packer build command)Replace image uri in ARM template deployment parameters file, with uri of vhd generated by packer in preceding step.

The shell script overwrite-azure-deployment-parameters.sh is invoked, which parses the packer out log file to retrieve the uri of the newly created vhd. it then replaces the parameter value azuredeploy.parameters.json file. Code extract of file is shown below :
export imageodisk=$(cat packer-build-output.log | grep OSDiskUri: | awk '{print $2}') sed -i 's/@@VMUSERNAME@@/'"$ADMIN_USERNAME"'/g' azuredeploy.parameters.json sed -i 's/@@VMPASSWORD@@/'"$ADMIN_PASSWORD"'/g' azuredeploy.parameters.json sed -i 's|@@IMAGEURI@@|'"$imageodisk"'|g' azuredeploy.parameters.json
Note : The VSTS VMSS task is now available, if the VSTS Packer task is used along with the VSTS VMSS task then this step and the next step "Push updated VM image to VM scale set" may not be required. See the Post on how to use these tasks.Push updated VM image to VM scale set using Azure Cli group deployment: This is done by using the Azure cli task which calls the deploy-vm-image.sh file and passes the resource group where the VM Scale set is deployed.
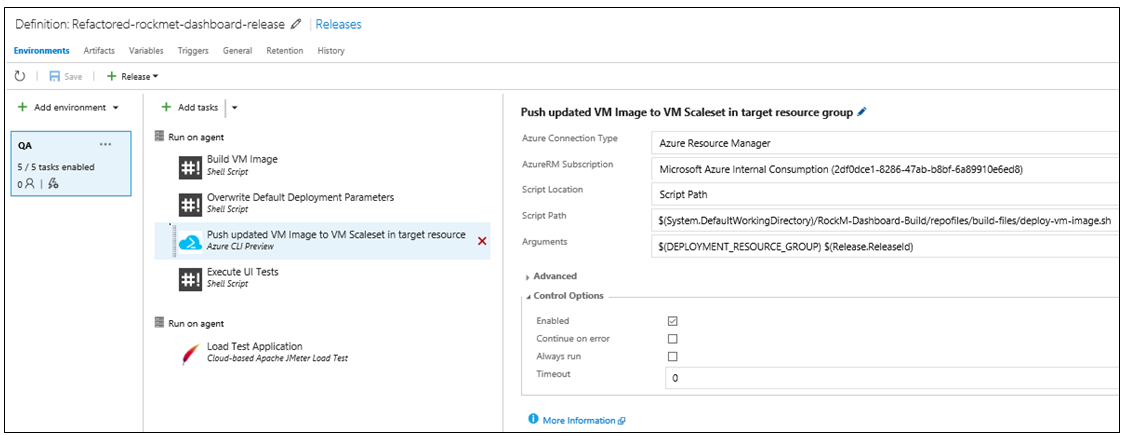
This script then executes the azure group deployment command passing it the ARM template and parameters file. The script is shown below :
azure group deployment create -f azuredeploy.json -e azuredeploy.parameters.json -g $1 -n rocdashdeploy$2Execute Selenium based Smoke test on Application.
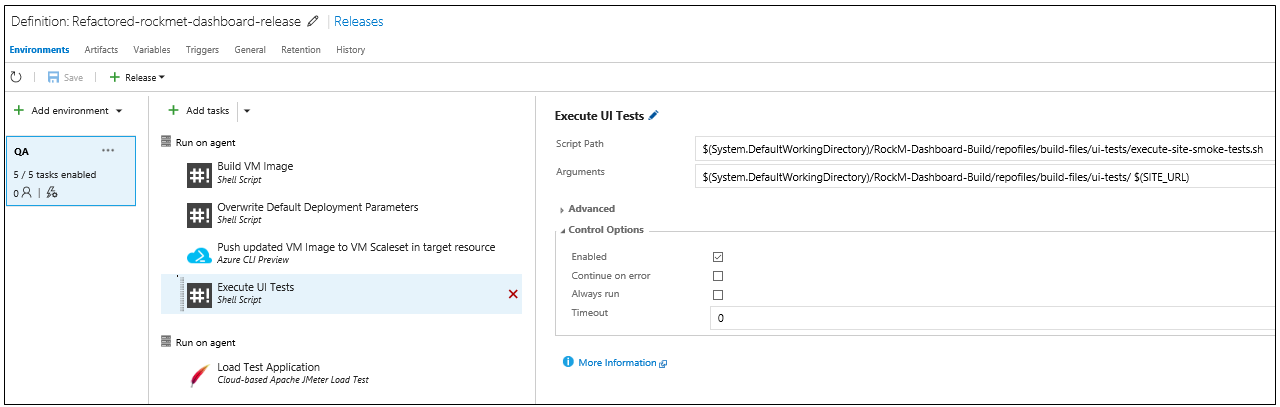
Phpunit is used to then execute the site smoke tests:
phpunit $1site-smoke-test.php $2Execute Load tests on Application
<img src="https://raw.githubusercontent.com/maniSbindra/vsts-packer-vmss-php-webapp-release/master/images/execute-jmeter-load-tests.PNG" alt="Execute JMeter Load tests on application" width="60%" height="auto" />The JMeter Load test execution task then fires JMeter Load Tests against the site site using the JMX file site-load-test.jmx (which has duration assertions) .
In the sample used for this post all tasks are executed the same QA environment. This Release configuration can be enhanced by adding other environments like Performance and Volume Testing envrionment (where the load test can be moved), etc.
Thanks for reading my blog. I hope you liked it. Please feel free to write your comments and views about the same over here or at @manisbindra.