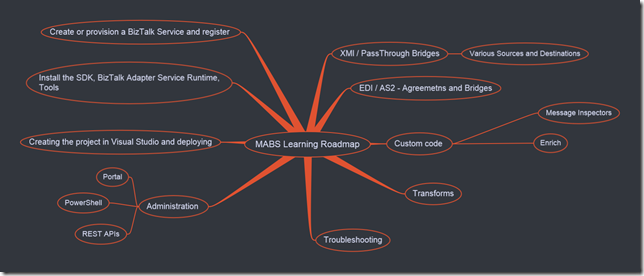
MABS Learning Roadmap
I will write various blog post to cover each component.
In this post, I will cover 3 top components on the left side which will help the user to get going with the MABS. Other components may get scattered across various blog posts.
Before creating Microsoft Azure BizTalk Service:
- What edition do I Need? Check this link and make a decision: BizTalk Services: Editions Chart
- For production / commercial business scenario usage consider using custom domain names.
Custom domain names allow you to assign existing domain names like https://www.contoso.com to the BizTalk Services deployment instead of using the default *.biztalk.windows.net URLs. In such cases, a private certificate (.pfx) that matches the custom domain name needs to be uploaded. Generally you will purchase it from the well-known certificate authority. By default, the BizTalk Services create wizard in the Azure portal uses the BizTalk Service URL as the custom domain URL. - MABS now supports Azure Active Directory. Have a look at the blog Azure Active Directory integration on BizTalk Portal to see the details and decide if you need it.
- It is good to have Service, Storage and SQL created under the same region.
- Don’t use special / reserved keywords, bad words, brand names etc. for the service name – in such cases the service creation will eventually fail.
- A lot of users use the MSDN subscription to utilize monthly free usage. Most of them will not update the subscription by paying extra if the subscription has reached the limit before the month ends. Make sure that you have an active subscription.
- For the SQL Azure subscription, users have upper limit on number of databases that can be created under one SQL server instance – make sure the user is not violating the limit.
Creating and Registering BizTalk Service
Follow the articles Create a BizTalk Service using Azure management portal (specifically go through the section “Requirements Explained” before creating the service)
Installing BizTalk Adapter Services Runtime , SDK, Tools
Install Azure BizTalk Services SDK. The following blog will help you to get over some common issues while installing BizTalk Adapter Services - Installing BizTalk Adapter Service.
Registering and Updating a BizTalk Service Deployment on the BizTalk Services Portal
After this, user is ready to create the projects in a Visual Studio – or work on EDI / AS2 using the BizTalk Portal.
Creating projects in Visual Studio
The Developer SDK is required to develop Windows Azure BizTalk Services applications using Microsoft Visual Studio.
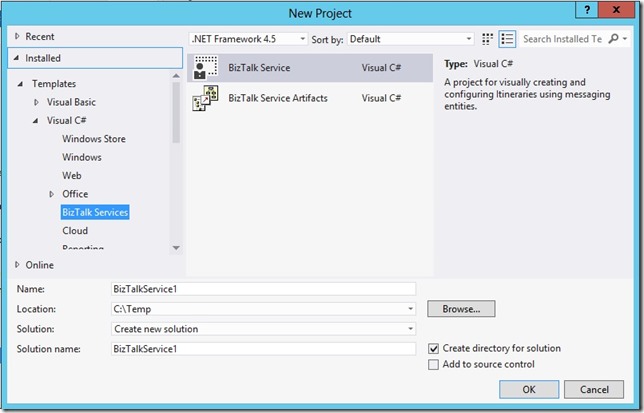
In Visual Studio you need to go to Templates - Visual C# - BizTalk Services and then BizTalk Service or BizTalk Service Artifacts.
To deploy the projects:
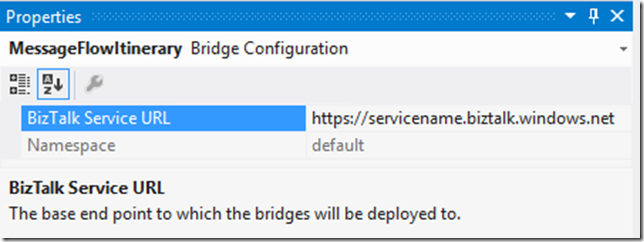
Click on the blank space within Message Flow Itinerary design surface. Update the service name to the BizTalk service name where you want to deploy your project.
Note:
You get only one MessageFlowItinerary.bcs per BizTalk Service project. This is auto-generated when you created the project. For some reason if this file gets deleted, and don't have backup, there are no means to add it back. You will have to create a new project – not advisable to copy from some other project (or older copy – where there are a lot of changes made to the itinerary) and try to work on it. However, you can have multiple bridges on the Itinerary. The number of bridges is limited by the BizTalk Service Edition being used.
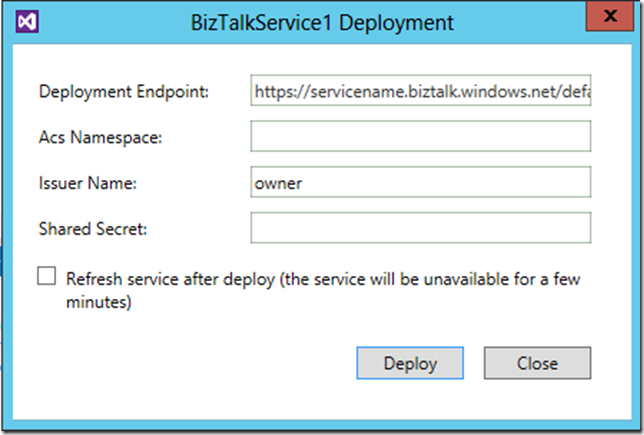
When you deploy the project, you get the prompt for ACS Name space and Shared Secret.
To get the Access Control namespace information:
Log in to the Azure Management Portal.
Select BIZTALK SERVICES in the left navigation pane and then select your BizTalk Service.
In the task bar, select Connection Information:
Copy the Access Control values.
Once the deployment is successful, you can go to the BizTalk Portal and check the deployed artefacts.
Tutorials and Samples
- Samples: Azure BizTalk Services
- Tutorial: Configuring B2B Messaging Using BizTalk Services Portal and Bridges
- Tutorial: Using BizTalk Bridges to Insert Flat File Messages into an On-premises SQL Server
- Tutorial: Using BizTalk Service Bridges to Send and Receive Messages from Service Bus Relay Service
- Tutorial: Using Azure BizTalk Services to Integrate with an On-Premises SAP Server
- Tutorial: Using BizTalk Service Bridges to Lookup Data from Azure SQL Database
- Using BizTalk Services from a Windows 8 Application
- Tutorial: Process EDIFACT Invoices Using Azure BizTalk Services


