Azure IoT Hub uploading a Webcam picture in an Azure blob with node.js on Windows and Linux
In my garden, I have couple of sensors and a greenhouse. In order to play with different technologies I’m using a RaspberryPI v1 (RPI) under Linux with an Atmel328 (same as in Arduino) for analogic data. And I wanted to test the new Azure IoT Hub. As I didn’t know anything on node.js, I‘ve decided to go for node.js as well using this RPI under Linux. So many new technologies for me  As I just wrote, I’m not a node.js king neither a Linux expert, just a beginner but I want to share my experience. And there may be best ways to code all this, so feedbacks welcome.
Setup the dev environement
I’ll use Windows as my development environnement. Visual Studio 2015 can support node.js development and debugging. So first I needed to setup Visual Studio 2015. You can get for free Visual Studio Community 2015 here. Then you need to the free node.js tools for Visual Studio, download them here. And you need of course to install the node.js framework from here.
And you’re all done for the dev side! so fast, so quick on the Windows side!
Setup the RaspberryPI
I have to say, this part was a bit more difficult for me. First I’m not a Linux guy, second, it’s not that easy to install node.js when you don’t really know what you need. So here are the steps to install the latest version. I have to say I’ve spend quite a lot of time trying to install the right version. The one by default in the raspian repository is not the latest version. Finally, after some time I found the way to properly install it from the Azure IoT SDK github page here. The version I’m running on the RPI is a Debian (wheezy). So if you’re running the Jessie or Wheezy version, to get node.js installed correctly, here are the steps:
 sudo apt-get install curl
sudo curl --silent --location https://deb.nodesource.com/setup_0.12 | bash –
sudo apt-get install --yes nodejs
Most likely because of previous/bad versions installed before it didn’t worked right away. After a reboot, it did finally (who said, no reboot is necessary in Linux? ). This will install as well “npm” which will allow later to download some needed module packages.
Creating a node.js project in Visual Studio
this is quite straight forward, you have new project type which is node.js. I’ve created a Web project (this will allow easily to test couple of functions)

It will create a server.ts file. I do recommend to create TypeScript file and not Javascript. this will allow to have a better support and maintainability over time. Javascript file are generated once compiled. And you can choose which version of Javascript you want to generate.
You can hit F5 and run your code by default, it will create a project with a simple web server, you can try to debug, put break point. Quite magic
How to run all this on Raspberry?
the only 2 files you’ll need are the “server.js” and the “package.json” one. this second one contains the dependencies with other modules. So far, no real dependencies. It’s needed as well if you want to publish and share back your code as a package. So you’ll make sure that you’ll get all the right dependencies for your package and that it will always work.
to lunch the server, just type:
node server.js
The server will run as long as you close the console or stop it. Access it thru a browser with https://ipaddress:port/ the ipaddress is the ip address of the RPI and the port, the port you’ve chosen in your code.
If at this point it does not work, then it’s maybe because you have a node.js problem. Try to type “node –v”, this is supposed to give you the installed version. The one I’ve installed is v0.12.7
Installing packages on dev environment
With node.js you’ll need to install couple of packages. Both on the dev environment and on the production environment.
Using Visual Studio, makes it super easy. Just right click on “npm” in your project then select “Install new npm Packages…”

This will open this window where you can search for the packages.

We’ll need the following ones: “azure” and “azure-iot-device”. So install them. this will install all the packages and dependencies needed. It makes it very easy to see what are the available versions, if a package is already installed locally.
Installing packages on the RPI
it’s about the same except it’s in command line. Thanks to the npm utility in Visual Studio, I know the packages I’ll need to install
sudo npm install azuresudo npm install azure-iot-device
Note: if you need a specific version, you can install it by giving the version like: sudo npm install azure-iot-device@1.0.0-preview5
Connecting a device to Azure IoT Hub
The first thing to do is to create an Azure IoT Hub. Step by step here. This is great step by step, very easy. I do recommend to do all the tutorial and create all the codes in C#. This will allow you to understand how Azure IoT Hub is working. You’ll need this to continue this article.
The most important is to create at least 1 device identity. If you don’t, you will not be able to access the IoT Hub, send and receive messages.
The other tool I recommend you to use is part of the Azure IoT SDK and named DeviceExplorer. Follow the tutorial to create a device, launch this tool, put the connection string from your Azure IoT Hub in it (connection string look like: HostName=youriothub.azure-devices.net;SharedAccessKeyName=iothubowner;SharedAccessKey=thekey), and you should be able to see the device:

From here, you’ll need for later the device ConnectionString. this connection string is different from the main hub connection string! it is formed the same way as the previous one but is contains DeviceId (here calle LaurelleRPI) which is the name of your device instead of SharedAccessKeyName.
HostName=youriothub.azure-devices.net;DeviceId=LaurelleRPI;SharedAccessKey=thedevicekey
In the code, you’ll need this to get connected to the IoT Hub:
var device = require('azure-iot-device');
// must match the deviceID in the connection string
var connectionstring = HostName=youriothub.azure-devices.net;DeviceId=LaurelleRPI;SharedAccessKey=thedevicekeyI';
var iotHubClient = new device.Client(connectionstring, new device.Https());
And yes, that’s all what you need! How to test it? We can modify a bit the web server code to have a function which will send data to the IoT Hub. We will check with the Device Explorer if data arrive. So add this to the previous code and change the server function.
var url = require('url');
var deviceID = 'LaurelleRPI';
var port = process.env.port || 1337
http.createServer(function (req, res) {
var request = url.parse(req.url, true);
var action = request.pathname;
if (action == '/senddata') {
var payload = '{\"deviceid\":\"' + deviceID + '\",\"wind\":42 }';
var message = new device.Message(payload);
iotHubClient.sendEvent(message, function (err, res) {
if (!err) {
if (res && (res.statusCode !== 204)) console.log('send status: ' + res.statusCode + ' ' + res.statusMessage);
}
else
console.log('no data send, error ' + err.toString());
});
res.end('data sent');
} else {
res.writeHead(200, { 'Content-Type': 'text/plain' });
res.end('Linux RPI working perfectly, try /status /postimage /senddata and /image.jpg \n');
}
}).listen(port);
Run the code and access to the https://ipaddress:1337/senddata
this will post data to the Azure IoT Hub and you’ll see them in the Device Explorer, You’ll need to monitor the device you’ve just created and you’ll use in your node.js code. At this point, you should see this:

if not, you’ll most likely get an error message. Most of the error I got was because I made a mistake in the connection string or in my Typescript.
Now, the next step is to be able to receive messages from the IoT Hub. In order to see if we have received a message or not, we’ll need to listen all the time to check is a message is arrived. The function bellow check is a message is arrived and place it into messageFromIoTHub
var messageFromIoTHub = "";
function pushtoblob()
{ //do nothing
}
function isMessage()
{
iotHubClient.receive(function (err, res, msg) {
if (!err && res.statusCode !== 204) {
console.log('Received data: ' + msg.getData());
// process the request
messageFromIoTHub = msg.getData();
if (messageFromIoTHub === "picture")
pushtoblob();
iotHubClient.complete(msg, function (err, res) {
if (err) console.log('complete error: ' + err.toString());
if (res && (res.statusCode !== 204)) console.log('complete status: ' + res.statusCode + ' ' + res.statusMessage);
});
return true;
} else if (err) {
console.log('receive error: ' + err.toString());
}
});
return false;
}
var isWaiting = false;
function waitForMessages() {
isWaiting = true;
isMessage()
isWaiting = false;
}
// Start messages listener
setInterval(function () { if (!isWaiting) waitForMessages(); }, 1000);
The hub will be checked every second. Up to this point, you can test the code. Place a break point on the line “messageFromIoTHub = msg.getData();” and run the code.
From Device Explorer, send the message “picture”, if all geos well, you’ll receive back a feedback.

In terms of code, it’s quite straight forward, the Azure SDK IoT is very well done and easy to use. Most of the function to access the IoT hub are super well designed and only 1 or 2 functions are needed.
Uploading the picture to an Azure Blob storage
As for the previous part, you’ll need a storage setup. Follow the very well done step by step here. You’ll need to go thru to continue this code.
Blob storage are very easy as well to access in node.js. They can get access like https://mystorageaccount.blob.core.windows.net/mycontainer/myblob.
In terms of code, as for the IoT Hub, you need the connection string and create the access to the blob service.
var azure = require('azure');
//need to change AccountName and AccountKey
var connectionblob = 'DefaultEndpointsProtocol=https;AccountName=mystorageaccount;AccountKey=thelongkey';
var blobSvc = azure.createBlobService(connectionblob);
From the previous code, replace
function pushtoblob()
{
blobSvc.createContainerIfNotExists('webcam', function (error, result, response) {
if (!error) {
// Container exists
if (result == true)
console.log('blob created');
else
console.log('blob existing');
}
});
//create the picture named image.jpg
//webcam.run();
// this will upload the picture named image.jpg which needs to be in the same directory as the js file
blobSvc.createBlockBlobFromLocalFile('webcam', 'picture', 'image.jpg', function (error, result, response) {
if (!error) {
// file uploaded
console.log('file uploaded :-) ');
} else {
console.log('error uploading picture');
}
});
}
the code is very straight forward as well. I do create a blob called “webcam” and upload an existing picture from the disk called “image.jpg”. We’ll see right after how to generate this picture from the webcam. In the meantime, make sure you add a picture called “image.jpg” in the same directory as your server.js file.
You can as well add the following code into the ‘'”http.createServer” function, after the “action =”.
if (action == '/image.jpg') {
//webcam.run();
var img = fs.readFileSync('./image.jpg');
res.writeHead(200, { 'Content-Type': 'image/jpeg' });
res.end(img, 'binary');
}
Hit F5 in VS and test the code by accessing https://ipaddress:1337/image.jpg
You should be able to see the picture you’ve placed in the folder. now, go back to the Device Explorer, and send again the “picture” message. You will see a confirmation in the Device Explorer that the message has been received.
So how to check if the blob picture has been uploaded correctly?
One of the way is to check in the Azure portal is the container has been created. And you can change the properties to make it public for example, so you can directly from the browser check your image. You’ll access it like https://yourblobstorage.blob.core.windows.net/webcam/picture

You can use as well the excellent CloudBerry Explorer for Azure which you can download from here. Once setup (see my previous post where I show how to move one Azure VM from one subscription to another to have more info on how to setup this tool). If all went correctly, you should be able to see the “webcam” container created

if you double click in it, you’ll see the picture blob:

and if you double click on the “picture” blob, you can open it and download your picture.
Saving a picture from the webcam
I have to say, I did quite a lot of research to see if there is an efficient way to do this on a RPI. And there are not that many nice, easy and straight forward way to do it. First, not all webcam are supported. I had to check couple of webcams to find an old Lifecam-VX-6000 supported.
I finally went for some command line tool that generate images from the webcam entry (/dev/video0 for the default webcam). I’ve installed fswebcam
sudo apt-get install fswebcam
To create an image, just run “fswebcam image.jpg” and it will generate an image. Worked quite well on my Raspberry.
Then I’ve created in my project a webcam.ts file and put the following code:
'use strict'
var child = require('child_process');
module.exports = {
run: function () {
child.execSync('fswebcam image.jpg', function (err, stdout, stderr) {
if (err !== null) {
console.log('error ' + err);
} else
{
console.log('image saved');
}
});
}
};
and in the main server.js file:
var webcam = require('./webcam');
You can un comment the 2 lines you’ll find with this “//webcam.run();” This code just create the image from the webcam. Now, if you test this code on Windows, it will not create the image as the command “fswebcam” does not exist. But it will work on the RPI where you’ve install the command. Note that you need to use execSync to create the external process. It will wait for the external process to finish before continuing. If you're using the normal exec, the picture won't have time to be saved before the next steps.
Deployment on the Raspberry and all together
You’ll need to deploy only the 3 files: “server.js”, “webcam.js” and “package.json”. Use the method you want (I personnaly use the old smb way, so installing and setting up smb…). I have to say I like as well to access my Raspberry with Remote Desktop. Just install “xrdp” and you’re good to go for this
And voilà, you can get it from your blob storage:
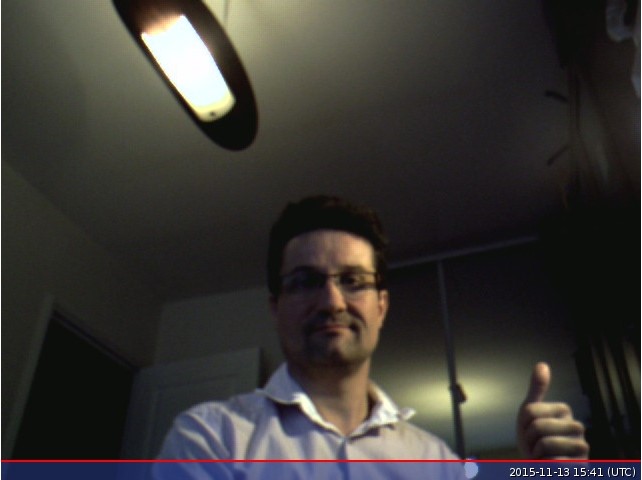
For sure all this can be improved, especially with the webcam part.
<edit> I've placed the webcam on the RPI which is in the garden and the picture can be found here. </edit>
Conclusion
Visual Studio 2015 + node.js tools + Azure IoT Hub + Azure Storage = happiness
So easy to develop, so easy to debug, so easy to find the right module with the npm tools in VS. All the Azure resources are really easy and simple to use with node.js.
The great news is that my solution is working the same way under Windows and Linux. Only difference is about the webcam part but I really didn’t need it on the Windows side.
I’ve learned a lot in this project and will for sure continue it!
https://portalvhdskb2vtjmyg3mg.blob.core.windows.net/webcam/picture