Testing LAPS for Nano Server with ws2016lab
Recently I met Jaromir Kaspar, my fellow PFE, and we chatted on LAPS for Nano Server Preview I recently published. He wanted to see it in action in lab of some size. He publishes Windows Server 2016 lab hydration scripts on github, so we came with idea to enhance those scripts by support for provisioning of DSC infrastructure that will automate LAPS for Nano Server installation and configuration. He started working at full throttle (as always) and shortly came to me to show working lab, updated hydration script and this blog post that describes the process he went through when building the lab. Enjoy reading and playing with LAPS on Nano server!
Hi all, here is Jaromir – Premier Field Engineer, colleague of Jiri Formacek (creator of LAPS) and I would like to show you today, how easy is to deploy your Nano LAPS lab.
I met Jiri (he is real programmer, not me – I’m gluing scripts together not programming) in the office again and we talked little bit about LAPS. I asked if he tried my scripts (obvious answer is no, because he is super busy) so I decided to show him and you, how to create your own lab with my ws2016lab https://github.com/Microsoft/ws2016lab and LAPS for Nano server https://blogs.msdn.microsoft.com/laps/2016/05/10/laps-and-nano-server/ under 20 minutes.
You will go through end to end process from nothing to fully provisioned lab of Nano servers with LAPS for Nano installed and configured. What you will learn? How DSC Pull server works, how to deploy configuration on DSC Pull server, how to configure DSC client to pull the configuration, and how to install and configure LAPS for Nano via DSC.
Changes in ws2016lab scripts
Variables.ps1
#LAPS Lab
$LabConfig=@{AdminPassword='LS1setup!'; DomainAdminName='JiriF'; Prefix = 'NanoLAPS-'; SecureBoot='On'; CreateClientParent='No'; DCEdition='ServerDataCenter'; ClientEdition='Enterprise'; InstallSCVMM='No'}
$NetworkConfig=@{SwitchName = 'LabSwitch'; StorageNet1='172.16.1.'; StorageNet2='172.16.2.'}
$LAbVMs = @()
1..2 | % {"Nano$_"} | % { $LAbVMs += @{ VMName = $_ ; Configuration = 'Simple'; ParentVHD = 'Win2016Nano_G2.vhdx'; MemoryStartupBytes= 128MB ; DSCMode='Pull'; DSCConfig=@('LAPS_Nano_Install','LAPSConfig1')} }
3..4 | % {"Nano$_"} | % { $LAbVMs += @{ VMName = $_ ; Configuration = 'Simple'; ParentVHD = 'Win2016Nano_G2.vhdx'; MemoryStartupBytes= 128MB ; DSCMode='Pull'; DSCConfig=@('LAPS_Nano_Install','LAPSConfig2')} }
In the example above, you can see that I will create 4 nano servers with specified DSCMode and Config. We will have 2 different configurations of LAPS for Nano.
BTW this is the only piece you need to modify in scripts that you can download from here: https://github.com/Microsoft/ws2016lab. Notice that you are specifying DSCMode and DSCConfig. DSCMode specifies Pull Configuration, therefore Pull Server will be used (https://msdn.microsoft.com/en-us/powershell/dsc/pullServer) and DSCConfig specifies configuration that should be downloaded from Pull server (https://msdn.microsoft.com/en-us/powershell/dsc/partialconfigs)
If you want to have bigger lab, you can replace just few characters and hydrate 20 machines instead of 4:
#LAPS Lab
$LabConfig=@{AdminPassword='LS1setup!'; DomainAdminName='JiriF'; Prefix = 'NanoLAPS-'; SecureBoot='On'; CreateClientParent='No'; DCEdition='ServerDataCenter'; ClientEdition='Enterprise'; InstallSCVMM='No'}
$NetworkConfig=@{SwitchName = 'LabSwitch'; StorageNet1='172.16.1.'; StorageNet2='172.16.2.'}
$LAbVMs = @()
1..10 | % {"Nano$_"} | % { $LAbVMs += @{ VMName = $_ ; Configuration = 'Simple'; ParentVHD = 'Win2016Nano_G2.vhdx'; MemoryStartupBytes= 128MB; DSCMode='Pull'; DSCConfig=@('LAPS_Nano_Install','LAPSConfig1')}}
11..20 | % {"Nano$_"} | % { $LAbVMs += @{ VMName = $_ ; Configuration = 'Simple'; ParentVHD = 'Win2016Nano_G2.vhdx'; MemoryStartupBytes= 128MB; DSCMode='Pull'; DSCConfig=@('LAPS_Nano_Install','LAPSConfig2')}}
2_CreateParentDisks.ps1
During 2_CreateParentDisks.ps1, scripts will hydrate DC with following DSC Configuration (this is just a part of the script):
WindowsFeature
DSCServiceFeature
{
Ensure = "Present"
Name = "DSC-Service"
}
xDscWebService PSDSCPullServer
{
Ensure = "Present"
EndpointName= "PSDSCPullServer"
Port = 8080
PhysicalPath = "$env:SystemDrive\inetpub\wwwroot\PSDSCPullServer"
CertificateThumbPrint= "AllowUnencryptedTraffic"
ModulePath = "$env:PROGRAMFILES\WindowsPowerShell\DscService\Modules"
ConfigurationPath= "$env:PROGRAMFILES\WindowsPowerShell\DscService\Configuration"
State = "Started"
DependsOn = "[WindowsFeature]DSCServiceFeature"
}
xDscWebService PSDSCComplianceServer
{
Ensure = "Present"
EndpointName = "PSDSCComplianceServer"
Port = 9080
PhysicalPath = "$env:SystemDrive\inetpub\wwwroot\PSDSCComplianceServer"
CertificateThumbPrint = "AllowUnencryptedTraffic"
State = "Started"
DependsOn = ("[WindowsFeature]DSCServiceFeature","[xDSCWebService]PSDSCPullServer")
}
File RegistrationKeyFile
{
Ensure = 'Present'
Type = 'File'
DestinationPath = "$env:ProgramFiles\WindowsPowerShell\DscService\RegistrationKeys.txt"
Contents = $RegistrationKey
}
3_Deploy.ps1
During 3_Deploy.ps1 (based on variables.ps1) RegistrationKey that was used in DSC config above and Config name you specify will be set for each VM that will be created as you can see in DSC config below:
#DCM Config
[DSCLocalConfigurationManager()]
Configuration PullClientConfig {
param
(
[Parameter(Mandatory=$true)]
[string[]]$ComputerName,
[Parameter(Mandatory=$true)]
[string[]]$DSCConfig
)
Node $ComputerName
{
Settings
{
AllowModuleOverwrite = $True
ConfigurationMode = 'ApplyAndAutoCorrect'
RefreshMode = 'Pull'
RebootNodeIfNeeded = $True
ActionAfterReboot = 'ContinueConfiguration'
}
ConfigurationRepositoryWeb PullServerWeb
{
ServerURL = 'https://dc.corp.contoso.com:8080/PSDSCPullServer.svc'
AllowUnsecureConnection = $true
RegistrationKey = '14fc8e72-5036-4e79-9f89-5382160053aa'
ConfigurationNames = $DSCConfig
}
$DSCConfig| ForEach-Object {
PartialConfiguration $_
{
RefreshMode = 'Pull'
ConfigurationSource = '[ConfigurationRepositoryWeb]PullServerWeb'
}
}
}
}
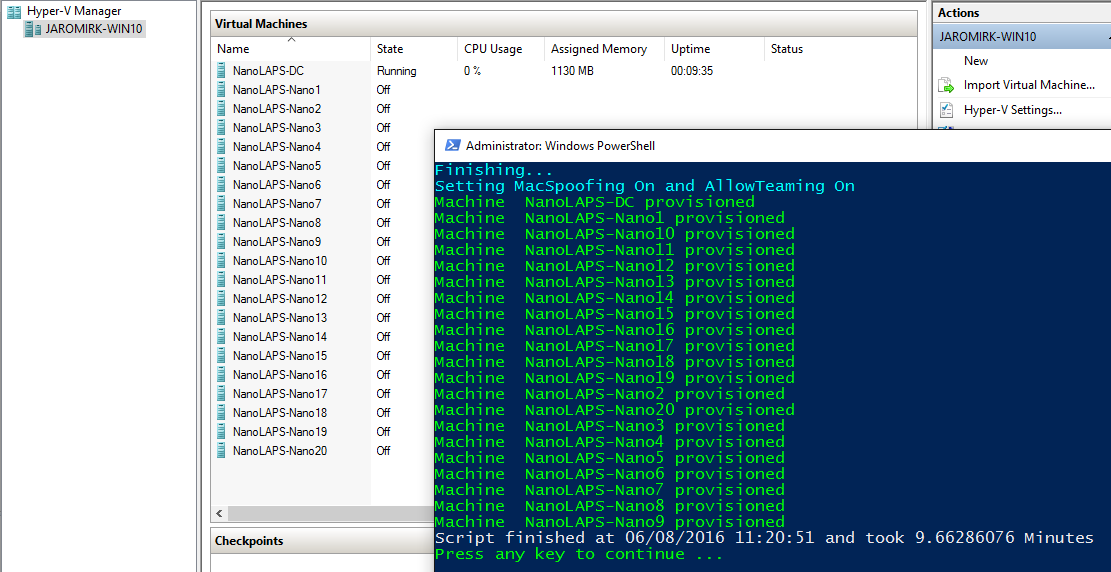
Result: 20 machines in 9.6 minutes. Its good, isn’t it? If you would like it in just few minutes – start bugging JiriF as he promised me to make it parallel (run several jobs at once) – he is a programmer, I’m just gluing scripts together, remember?
LAPS Client for Nano Server
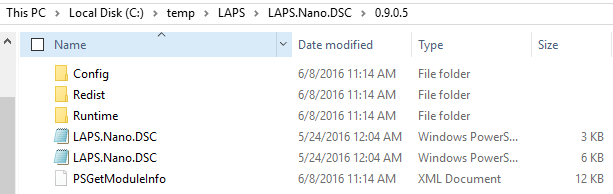
1) Grab LAPS.Nano.DSC module on Internet connected machine from PowerShell Gallery:

2) Create mof files
Downloaded module contains sample DSC configuration files in Config folder.
Just add just a few lines to LAPS.NANO.DSC.Install.ps1 and LAPS.Nano.DSC.Config.ps1 samples to create mof files for DSC.
In LAPS.Nano.DSC.Install.ps1 replace the last line with code as shown below:
#LAPS_Nano_Install -ConfigurationData $ConfigData -Ensure Present
$OutputPath='C:\temp\LAPS\'
$ConfigName='LAPS_Nano_Install.mof'
LAPS_Nano_Install -ConfigurationData $ConfigData -Ensure Present -OutputPath $OutputPath
Rename-Item -Path "$OutputPath\localhost.mof" -NewName $ConfigName -Force
New-DscChecksum -Path "$OutputPath\$ConfigName" -OutPath $OutputPath
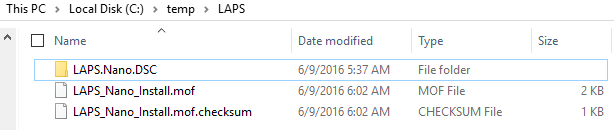
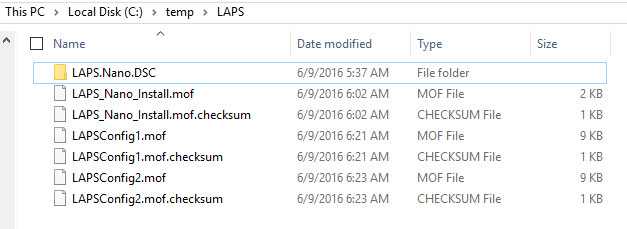
Running the script after modifications creates mof file with checksum:
With config it will be little bit more tricky as we want to have 2 different configurations and want to change config name.
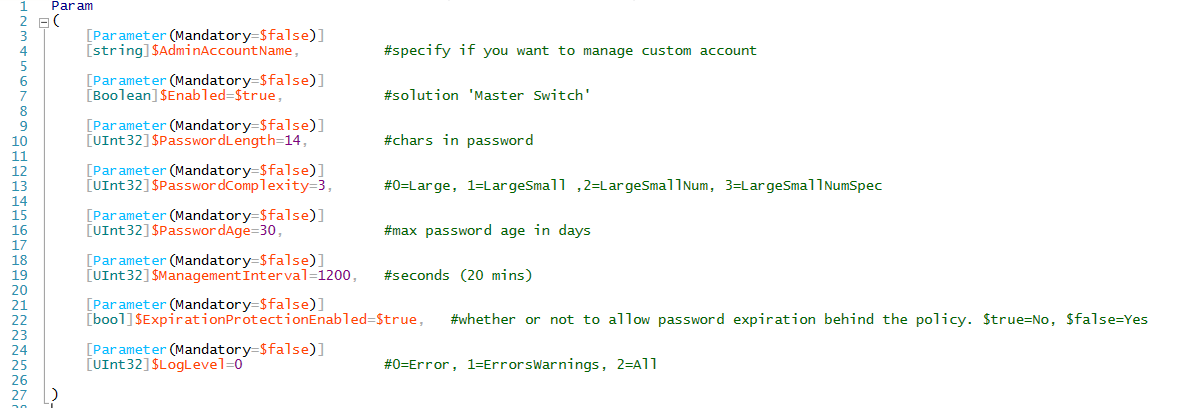
In LAPS.Nano.DSC.Config.ps1 first setup LAPS client parameters as desired:
Then I need to modify configurqtion name so as it matches the config name stored in LCM configuration:

Then replace last line in script with code as shown below:
#LAPS_Nano_Config -ConfigurationData $ConfigData -Ensure Present
$OutputPath='C:\temp\LAPS\'
$ConfigName='LAPSConfig1.mof'
LAPSConfig1 -ConfigurationData $ConfigData -Ensure Present -OutputPath $OutputPath
Rename-Item -Path "$OutputPath\localhost.mof" -NewName $ConfigName -Force
New-DscChecksum -Path "$OutputPath\$ConfigName" -OutPath $OutputPath
I’ll repeat steps above with ConfigName LAPSConfig2.mof, with password length 28 - copy sample config file, set paremeters as desired, and replacing last line in script, now specifying LAPSConfig2.mof as ConfigName.
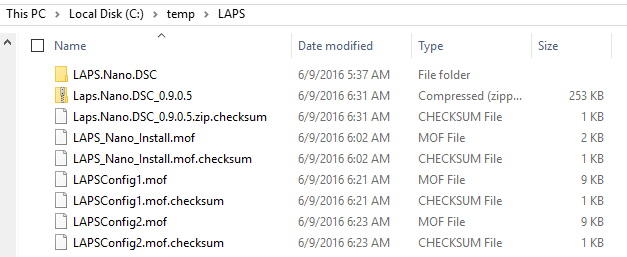
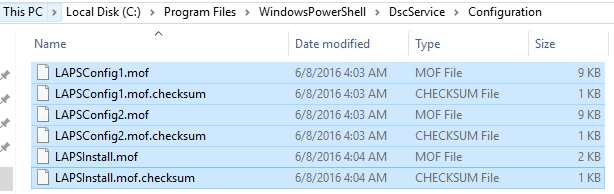
As a result, we have 2 mof files with checksums:
3) Package LAPS.Nano.DSC module with resources and create checksum to zip file with name expected by DSC Pull Server (moduleName_Version):
#remove space before version number in path below if you copy/paste - seems that blog engine does not like <backslash><zero> combination
Compress-Archive -Path c:\temp\LAPS\LAPS.Nano.DSC\ 0.9.0.5\* -DestinationPath c:\temp\LAPS\Laps.Nano.DSC_0.9.0.5.zip
New-DscChecksum -Path c:\temp\LAPS\Laps.Nano.DSC_0.9.0.5.zip -OutPath c:\temp\LAPS\
So now I have mof file with LAPS.Nano.DSC module containing custom resources necessary for installation, and 2 mof files with configurations of LAPS client; all files with checksums:
Now I need to transfer all files to DSC Pull Server.
4) Put DSC Module with resources, and mof files with configurations to Pull server
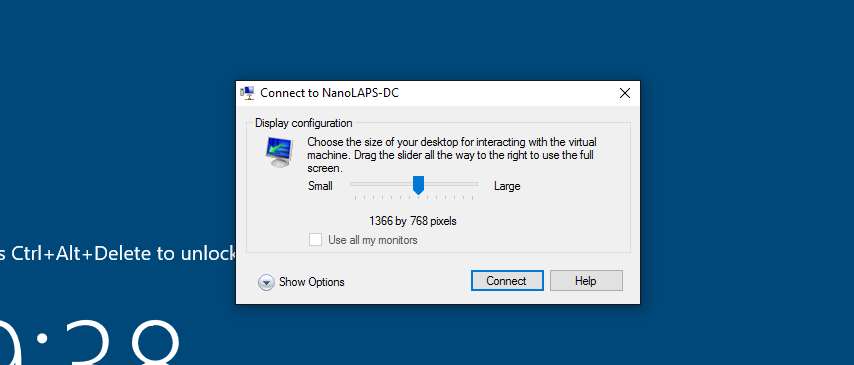
Connect to DC that is running DSC Pull Server Service (Make sure you use enhanced session mode. You need to login, logoff and then the option will appear, if you login with different user than built-in admin for very first time) If you login with built-in admin, option will appear right after first login (no need to logoff)
Copy Module files into the Pull Server modules storage:

Copy Configuration files into the Pull Server configurations storage:
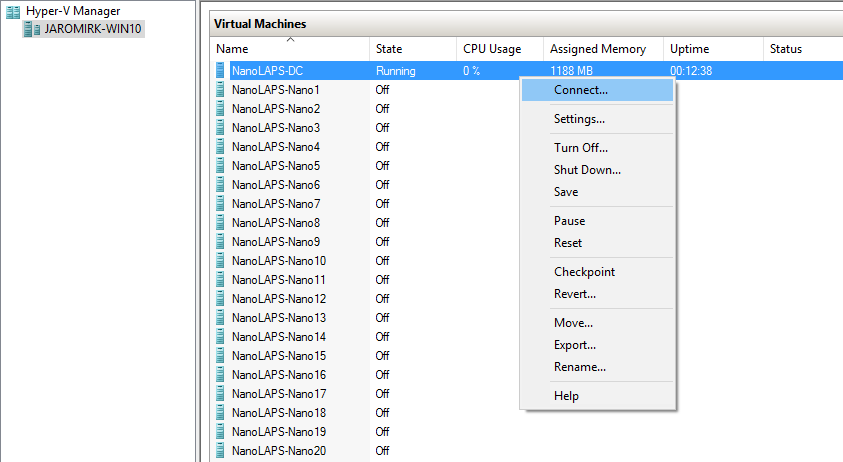
5) Start Nano VMs and enjoy!
Start VMs one by one with some delay as shown in the script below.
#example to start VMs one by one (run from Host)
1..20 | % {
Start-VM *Nano$_
Start-Sleep 30
}
If you start them all at the same time, you may bump into the following error:

Nano VMs will automatically get configurations from Pull server. DSC will install and configure LAPS Client for Nano.
You can review configuration of VMs:
#run this from DC
#get DSCconfig status from Nano1 VM
(Get-DscConfigurationStatus -CimSession nano1).resourcesindesiredstate | ft ConfigurationName,InstanceName,InDesiredState
#Push DSC Config again
Start-DscConfiguration ComputerName nano1 -UseExisting -Verbose -Wait
#Review LCM Config
Get-DscLocalConfigurationManager -CimSession nano1
(Get-DscLocalConfigurationManager -CimSession nano1).ConfigurationDownloadManagers
(Get-DscLocalConfigurationManager -CimSession nano1).PartialConfigurations
#review LAPS Client Settings
invoke-command -ComputerName nano1 -ScriptBlock {Get-ItemProperty "HKLM:\software\policies\Microsoft Services\AdmPwd\"}
get-service -ComputerName nano1 -Name *Laps*
6) OK, one more step is needed to make solution working
I need to configure environment for LAPS in my lab - extend the AD schema and delegate permissions:
- Download LAPS https://www.microsoft.com/en-us/download/details.aspx?id=46899
- Install LAPS on DC with following settings:
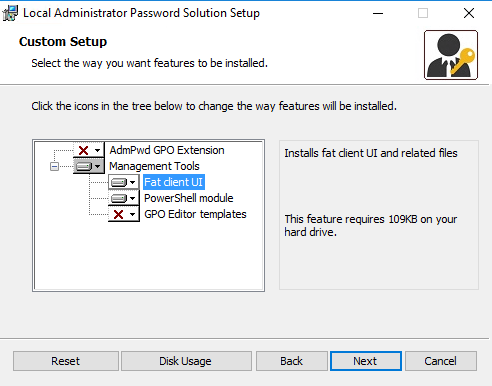
-
- Note: You don’t need GPO templates on DC for this lab with Nano servers, as LAPS for Nano does not use GPO at all. However, for real environment with mixed Nano and “normal” machines, you will need GPO templates as “normal” machines still receive configuration via GPO
- Run
Update-AdmPwdADSchemafrom PowerShell to extend AD schema. - Run
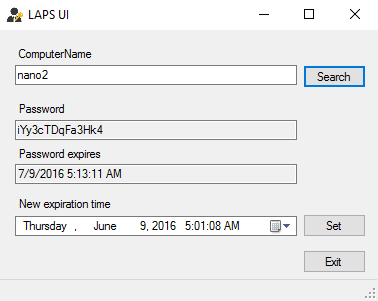
Set-AdmPwdComputerSelfPermission -identity:Workshopfrom PowerShell to delegate computer permission to write password under OU Workshop - Wait some time and check password of managed admin account on Nano machines reported to AD:
That’s it! See you next time! – probably on askpfeplat blog where I’ll show you how crazy fast and small nano server is.
Jaromirk@MSFT
Update 11.6.2015:
- Fixed typo in script Variables.ps1
- Optimized script 3_Deploy.ps1