Creating Virtual Machines for Lab Management
To create virtual environments in Microsoft Test and Lab Manager, you first need to have virtual machines in your project library share. Lab Management does not provide the functionality to create fresh virtual machines. You have to use Hyper-V or SCVMM in order to create these initial or golden virtual machines, and then "import" them into a project. The import in Beta1 is done by 'creating a new virtual machine' using Microsoft Test and Lab Manager.
Before moving further, let me clarify that the terminology used in Beta1 is changing for our next release. A lot of customers said that they were confused about the use of our phrase 'create new virtual machine' in library. For this blog, I will make two clarifications and continue to use Beta1 terminology. First, when we "create a new virtual machine" in a project library share, we are just importing a virtual machine managed by SCVMM into lab. We are not really creating a fresh copy of the virtual machine. Second, our term virtual machine in project library share can refer to either a Virtual Machine or a Virtual Machine Template in SCVMM. Thanks to your feedback, we are going to clean this up and remove some of the confusion surrounding this in Beta2.
Coming back to our topic, in order to import a VM into lab, you either need to have a virtual machine or a virtual machine template already in SCVMM library. So, the question is, how to create a VM or a VM template in SCVMM library?
There are several ways and some of our customers (especially those who are new to SCVMM) were asking for best practices around this. In this blog, we will talk about some of these practices. If you have discovered something else that works for you, please share it with us and the rest of the community.
Starting point
In order to create a VM or VM template in SCVMM, you can start from one of the following:
(a) Scratch: You have got nothing. You want to create a fresh VM, then install OS, and any applications + agents into that VM.
(b) An existing VHD: You have a VHD that already has the OS, applications, and agents installed. You need to turn this into a VM or VM template that can be later used in Lab Management.
(c) An existing physical machine: You have a physical machine that you want to convert into a virtual machine and then use that to create environments in Lab Management.
Target
You need to decide whether you would like to import a VM or a VM Template -
You can think of the VM as a 'fully baked' computer. It will have OS, apps, and agents installed; it has a computer name, an IP address, etc. When you import a VM into lab and use it to create several copies of environments, you need to use network isolation - a feature in Lab Management that prevents network conflicts. The advantage of using VMs is that you will get exact replicas of what you have created and it saves you time from re-installing or re-configuring your application.
A VM Template is a 'half baked' computer. The OS inside the VM is generalized by running a tool called Sysprep, which essentially removes the instance specific information from the image. When a VM Template is imported into lab, you can use it create multiple copies of the environments without network isolation feature. Each copy of the VM is customized with a unique computer name so that there are no network conflicts.
To summarize, create a VM in SCVMM library if you plan to use network isolation or don't plan to clone environments. Create a VM Template in SCVMM library if you do not plan to use network isolation.
Recommended approaches for creating VMs and VM Templates
The following table shows the starting points on the left and targets on the top. Find the box that suits your needs and see the recommended approach for creating a VM or VM Template. Each step is usually a hyperlink to more detailed documentation in SCVMM or Hyper-V.
Target ----- Starting point |
Virtual Machine
|
Virtual Machine Template
|
Scratch
|
Using SCVMM Admin Console
(OR) Using Hyper-V Manager
|
Using SCVMM Admin Console
|
Existing VHD
|
Using SCVMM Admin Console
|
Using SCVMM Admin Console
|
Physical machine
|
Using SCVMM Admin Console
|
Using SCVMM Admin Console |
Additional notes:
In all the above, use the same SCVMM server that is used for Lab Management as well.
Wherever mentioned copy the object to the same SCVMM library share that is used for Lab Management.
If you create a VM template, do not set sensitive information such as Administrator password, Domain credentials, and Product key using SCVMM. When the VM template is imported into Lab Management, this sensitive information is dropped.
This article does not cover how to install lab or other agents into your golden VMs. For more information about this, please refer to the lab setup guide.
Whenever you use Hyper-V to create a VM and export it, you have to perform the following additional steps to be able to use the VM from SCVMM or Lab Management.
-
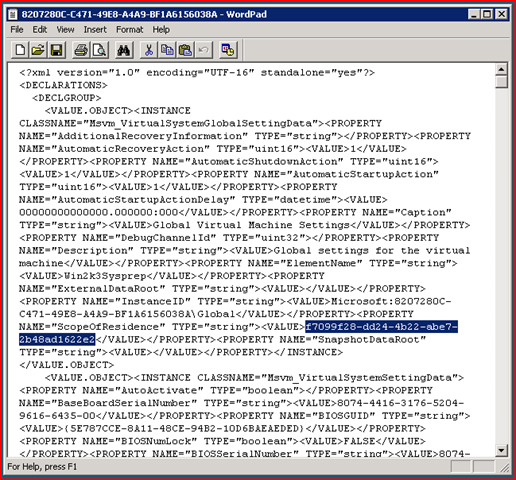
- Go to the Virtual Machines folder in the export location (say C:\export\My VM\Virtual Machines) and open the <guid>.exp file in a text editor.
- Search for the tag <ScopeOfResidence> within that file. Clear the value that exists between the <Value></Value> tags. The following screen shows an example of this.
- Save the file.
What's next?
Now that you have a VM or VM template in SCVMM library share, go to Microsoft Test and Lab Manager -> Lab Center -> Library -> Virtual Machine Templates and import it by clicking on 'New'. Once the VM or VM Template is imported into lab, you can use it in creating environments.