RIA Services and Windows Azure Table Storage
We worked right up to the deadline, but I’m happy to say we got a preview of RIA support for Windows Azure Table Storage into the October Toolkit release (that coincides with the SP1 Beta release). You could integrate with table storage previously, but our goal was to make using it as simple as possible. With all the great new Azure features coming down the pipe (announced at PDC10), we want to give you first-class experience using table storage with WCF RIA Services.
Where to Start?
If you’re new to Windows Azure (and to tell the truth, we all fall in that bucket) then you need to start with Jim Nakashima’s blog. I always refer back to it, and it’s proved an invaluable resource. For an introduction to table storage, this post is a good start. The difference between Jim’s approach and what I’ll show here are the steps we take to integrate with existing DomainService patterns. Without further introduction, I’ll jump into the things you need to know to get the most out of our Microsoft.ServiceModel.DomainServices.WindowsAzure assembly preview.
Let’s Get a Project Set Up
We’ll use this section to go step-by-step and set up a clean Silverlight project ready for Azure. If you’re interested in starting with the Business Application Template instead, take a look at this introductory post.
1) Make sure you have the latest Windows Azure SDK installed (https://www.microsoft.com/windowsazure/)
2) Open Visual Studio and create a new Silverlight project with WCF RIA Services enabled
3) Add a Windows Azure Cloud Service project to your solution. When the New Cloud Service Wizard pops up, select ‘Ok’.
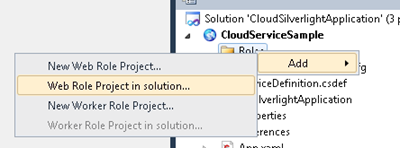
4) In your Cloud Service project, Add a Web Role Project from your solution.
In the Wizard, select your Web Application project.
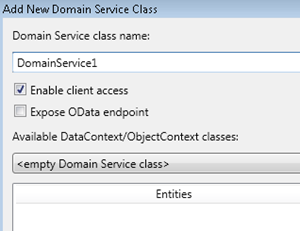
5) The next step is to add the RIA Services reference you need to your Web Application project. My favorite way to do this is to add an empty DomainService using the wizard and then immediately delete it.
6) Finally, we need to make sure our application can be deployed by setting the RIA Services references to ‘Copy Local = True’.
In your web project, make sure to update the reference to both System.ServiceModel.DomainServices.Hosting and System.ServiceModel.DomainServices.Server.
7) Now that we’re ready to go, let’s add the references we’ll need to work with Windows Azure. Add references to System.Data.Services.Client, Microsoft.WindowsAzure.ServiceRuntime, Microsoft.WindowsAzure.StorageClient, and Microsoft.ServiceModel.DomainServices.WindowsAzure to your Web Application project.
You’ll also need to set Copy Local to True for both Microsoft.WindowsAzure.StorageClient and Microsoft.ServiceModel.DomainServices.WindowsAzure.
A Windows Azure Entity
Now that we have a project set up, we can focus on using Windows Azure Table Storage. Windows Azure provides queryable structured storage. You can create an unlimited number of tables which in turn can have an unlimited number of entities. There are a few constraints to the structure, but it’s pretty flexible (for more information take a look at the Table Storage whitepaper). One hard rule is that every entity must have three properties, the PartitionKey, the RowKey and the Timestamp. Together these form a unique key for an entity. Additionally, query results are returned sorted by PartitionKey and then by RowKey.
To make it as simple as possible to define entities, we’ve provided the base class TableEntity that includes these properties. The first step to working with table storage is to define your entity. For this post, we’re starting from scratch and the properties on our entity will define the schema of our table.
   public class MyEntity : TableEntity
  {
    public string MyName { get; set; }
  }
With this small snippet, I’ve defined an entity with four properties; PartitionKey, RowKey, Timestamp, and MyName. Now with an entity in hand, we’ll look at defining a context for working with table storage.
A Context for Table Storage
The second step for getting running with Windows Azure Table Storage is to create a context the DomainService can use. We wanted to create a familiar feel for developers used to working with RIA, so we’ve provided you with two types TableEntitySet and TableEntityContext.
   public class MyEntityContext : TableEntityContext
  {
    public MyEntityContext() :
      base(RoleEnvironment.
             GetConfigurationSettingValue("DataConnectionString"))
    {
    }

    public TableEntitySet<MyEntity> MyEntities
    {
      get { return base.GetEntitySet<MyEntity>(); }
    }
  }
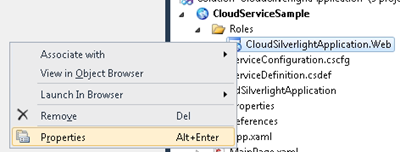
In the snippet above, we reference a connection string specified in the Web Role configuration. To add a connection string, open the Web Role properties.
Now, with a small snippet of code, we’re ready to write our DomainService.
A Table Storage Domain Service
With our entity defined and our context ready, we can begin to write a DomainService. Once again, we’ve provided you with a base class to start with. The TableDomainService takes care of a lot of the table-storage-specific concerns so you can concentrate on your business logic.
   [EnableClientAccess]
  public class MyDomainService : TableDomainService<MyEntityContext>
  {
    public IQueryable<MyEntity> GetMyEntities()
    {
      return this.EntityContext.MyEntities;
    }

    public void AddMyEntity(MyEntity entity)
    {
      this.EntityContext.MyEntities.Add(entity);
    }

    public void DeleteMyEntity(MyEntity entity)
    {
      this.EntityContext.MyEntities.Delete(entity);
    }

    public void UpdateMyEntity(MyEntity entity)
    {
      this.EntityContext.MyEntities.Update(entity);
    }
  }
For this sample, I just stubbed out simple CRUD operations. This is only a start, but we’ve now completed everything that’s required to get you up and running with a DomainService that reads and writes to table storage.
The Best Part
The best part is that once you have written your DomainService, all the RIA things you’re familiar with just work. You get change tracking. You get validation. You get the works. For instance, this small snippet uses a DomainDataSource to hook a DataGrid up to your DomainService.
   <UserControl … >

    <StackPanel …>

      <dds:DomainDataSource ElementName="myEntitiesDDS" QueryName="GetMyEntitiesQuery">
        <dds:DomainDataSource.DomainContext>
          <web:MyDomainContext />
        </dds:DomainDataSource.DomainContext>
      </dds:DomainDataSource>

      <sdk:DataGrid ItemsSource="{Binding ElementName=myEntitiesDDS, Path=Data}" />

    </StackPanel>
  </UserControl>
This post was just a brief intro, but there was a lot of area to cover. In the next couple of weeks, I’ll try to flesh out some of the scenarios where things get a little more interesting. Also, if there are any Azure-related topics you’re curious about or want to see covered, just let me know and I’ll try to include them.


