In the Before of the Beginning: Custom Prerequisites for VSTO ClickOnce (part I).
In January I talked about using Custom Prerequisites to add a little more specialization to the VSTO ClickOnce experience. I didn't go too much in depth into this and I've since seen a few comments crop up about them in some of the VSTO community spaces I watch. So I'm going to go through a basic walk through of how you might go about doing this.
So first you need to create your custom prerequisite installer. I believe any executable can be used but for this post I'm going to cover a method where instead of using an "executable" I'm going to build an MSI (Windows Installer). I might come back to the executable option in another post, but with that lets move on.
Creating a Custom Prerequisite MSI that does something:
For my first try I actually created a custom .NET DLL that did my prerequisite step (in which I just to display an Message Box to ensure it was working). To do this I created a C# class library project and added a new "Installer Class" to the solution. Here's what the code for that class looks like:
 namespace CustomAction1
{
    [RunInstaller(true)]
    public partial class Installer1 : Installer
    {
        public Installer1()
        {
            InitializeComponent();
        }

        public override void Install(IDictionary stateSaver)
        {
            base.Install(stateSaver);

            string messageString = "Message Strings: \n";

            messageString = messageString + "Message:";
            messageString = messageString + this.Context.Parameters["Message"];
            messageString = messageString + "\n" + "OtherMessage:";
            messageString = messageString + this.Context.Parameters["OtherMessage"];
            System.Windows.Forms.MessageBox.Show(messageString);
        }
    }
}
I built this action and then created a "standard" Windows Installer Project. I ripped out all of the steps from the MSI project and then added Custom action. To do this, I added the "Primary Output" of the dll project to the project and then go to the Custom Actions pane via the view option in Setup Project.
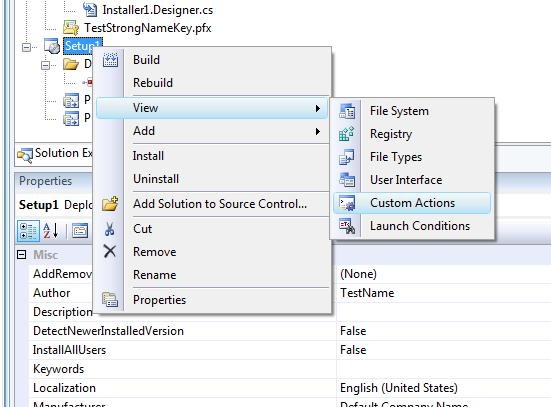
Once there I was able to add the "Primary output from CustomAction1" (the dll) as an install custom action. In the properties window for the custom action (you have to select it) I set the following values:
CustomActionData = /Message="Message1" /OtherMessage="This is the other Message"
InstallerClass = True
And with that I had my CustomAction MSI (I left it labelled "Setup1" in my example). This is about as simple as it gets and it doesn't nearly cover everything (I didn't implement Uninstall or Update steps). I believe the "power" in the MSI method is that you can hook into a standardized setup framework and it handles a lot of details you would otherwise need to implement. This goes a little outside my particular area of expertise and I haven't had time to do the full degree of experimentation to give a definite reasons beyond that yet though. If anyone is interested in educating me or clarifying anything on this stuff, please feel free to leave a comment.
In the next installment I'll cover how I authored the package manifest files so VS can include this at publish time.
My post frequency has been a down a bit lately due to being busy with a lot of things but I am responsive to feedback (I've gotten a littler here and there, please feel free to post any comments or questions here so others may also get the benefit of it). And with that I'm going to wrap up this post.
Thank You for reading.
Kris