Microsoft Azure Forced Tunneling (for Azure Classic portal) - Redirecting all Internet traffic through on-premise location
A common concern with customers when setting up a site to site network and linking a VM to one of its subnets is the flow of traffic to the Internet. Restricting the Internet bound traffic is a key security requirement for organisations which need to be enforced. Forced Tunneling allows you to block all Internet bound traffic and re-routes via on-premise allowing administrators to monitor and inspect all traffic.
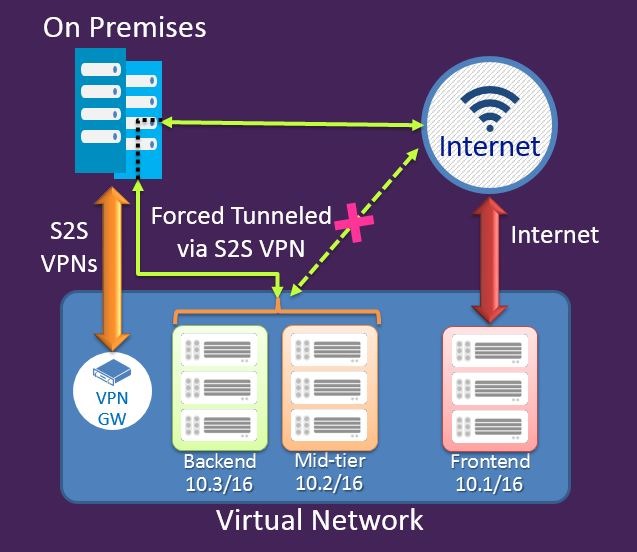
Image source: https://azure.microsoft.com/blog/2014/10/29/networking-enterprise/
The above diagram illustrates a site to site VPN from Azure to a RRAS/VPN device on premise. It demonstrates a typical behaviour of the subnets in the Azure virtual network allowing the flow of traffic both via the S2S VPN and to the Internet. The implementation of Forced Tunneling forces all the traffic to flow via the S2S VPN connection to on-premise before being allowed to the Internet.
How to implement Forced Tunneling?
Implementing Forced Tunneling is simple and is achieved through four simple steps. Before proceeding, ensure that the following prerequisites have been met so that there are no errors.
- An active Azure Subscription
- An active Virtual Network which has been configured and tested
- Latest version of Azure PowerShell (more information: https://azure.microsoft.com/en-gb/documentation/articles/powershell-install-configure/)
Prior to carrying out the below steps ensure that the Azure publish settings file has been downloaded and imported onto PowerShell. Steps on how to do this can be found here: https://azure.microsoft.com/en-gb/documentation/articles/powershell-install-configure/
1. First we need to create a routing table which will be used later to associate it to the subnets in your virtual network.
The cmdlet below creates a new routing table
New-AzureRouteTable –Name <routeTableName> –Label <routeTableLabel –Location <azureDatacentreLocation>
2. Now we have created a routing table which needs a default route.
The cmdlet below adds a default route to the routing table.
Set-AzureRoute –RouteTableName <routeTableName> –RouteName <routeName> –AddressPrefix “0.0.0.0/0” –NextHopType VPNGateway
3. Next we need to add the routing able to one or multiple subnets within the virtual network.
The cmdlet below associated the routing table created in the above steps to a specific subnet. To apply for multiple subnets use the same cmdlet and replace only the subnet name to the actual subnet.
Set-AzureSubnetRouteTable -VNetName <vnetName> -SubnetName <subnetName> -RouteTableName <routeTableName>
4. Finally we need to add a default site.
The cmdlet below selects a local site among the multi-site connections of the virtual network as the default site or tunnel.
$DefaultSite = @(<defaultSiteName>)
Set-AzureVNetGatewayDefaultSite –VNetName<vnetName> –DefaultSite <defaultSiteName>
Forced Tunneling is now set up on all configured subnets in a virtual network.
Removing Forced Tunneling
1. Delete a route table
Remove-AzureRouteTable -RouteTableName <routeTableName>
2. Delete a route from a route table
Remove-AzureRouteTable –Name <routeTableName>
3. Unassign a route from a subnet
Remove-AzureSubnetRouteTable –VNetName <virtualNetworkName> -SubnetName <subnetName>
4. Unassign a default site from the virtual network VPN gateway
Remove-AzureVnetGatewayDefaultSites -VNetName <virtualNetworkName>
List routing tables
1. List a routing table
Get-AzureRouteTable [-Name <routeTableName> [-DetailLevel <detailLevel>]]
2. List a routing table associated to a subnet
Get-AzureSubnetRouteTable -VNetName <virtualNetworkName>-SubnetName <subnetName>