Bot Framework と Microsoft Graph で DevOps その 7 : リリース定義の作成
※2017/6/10 アプリリリース定義の手順 6 画面ショット差し替え。テストアセンブリの指定が間違っていました。
前回はファンクションテストを実装しました。今回は VSTS でリリース定義を作成します。
リリース定義とは
リリース定義はコンパイルしたモジュールを App Service などに公開する用途で使います。今回は以下の 3 つをやります。
- Infrastructure as a Code (Azure の場合は ARM テンプレート) を使って環境を自動整備
- リリース
- ファンクションテスト
ARM テンプレートの詳細はこちら
※今回の作業を始める前に、前回のファンクションテストチェックインした後に、ビルドが完了していることを確認しておいてください。
Azure Resource Manager テンプレート
前回手動で Azure App Services にアプリを公開しました。今回はこれをテンプレート化して自動的に行えるようにします。
テンプレートの取得
1. https://portal.azure.com にログイン。一旦前回作成したリソースグループを削除。

2. 新規から Web App を選択。

3. 各種設定を行い、作成ボタンが出るところまで進め、Create の横にある Automation options をクリック。

4. Download ボタンをクリックしてテンプレートをダウンロード。

5. ダウンロードしたテンプレートを解凍。template.json にサービスの定義が、parameters.json にパラメーター値があります。

6. ここにテスト用の環境や、アプリケーション設定のパラメーターも手動で追加すると、ARMテンプレートは完成です。template.json を以下に差し替えます。足りない要素は自由に付け足してください。
 {
  "parameters": {
    "webName": {
      "type": "string"
    },
    "webNameTest": {
      "type": "string"
    },
    "hostingPlanName": {
      "type": "string"
    },
    "hostingEnvironment": {
      "type": "string"
    },
    "location": {
      "type": "string"
    },
    "sku": {
      "type": "string"
    },
    "skuCode": {
      "type": "string"
    },
    "workerSize": {
      "type": "string"
    },
    "serverFarmResourceGroup": {
      "type": "string"
    },
    "subscriptionId": {
      "type": "string"
    },
    "botId": {
      "type": "string"
    },
    "microsoftAppId": {
      "type": "string"
    },
    "microsoftAppPassword": {
      "type": "string"
    },
    "activeDirectory.RedirectUrl": {
      "type": "string"
    },
    "botIdTest": {
      "type": "string"
    },
    "microsoftAppIdTest": {
      "type": "string"
    },
    "microsoftAppPasswordTest": {
      "type": "string"
    },
    "activeDirectory.RedirectUrlTest": {
      "type": "string"
    }
  },
  "resources": [
    {
      "apiVersion": "2016-03-01",
      "name": "[parameters('webName')]",
      "type": "Microsoft.Web/sites",
      "properties": {
        "name": "[parameters('webName')]",
        "serverFarmId": "[concat('/subscriptions/', parameters('subscriptionId'),'/resourcegroups/', parameters('serverFarmResourceGroup'), '/providers/Microsoft.Web/serverfarms/', parameters('hostingPlanName'))]",
        "hostingEnvironment": "[parameters('hostingEnvironment')]"
      },
      "location": "[parameters('location')]",
      "tags": {
        "[concat('hidden-related:', '/subscriptions/', parameters('subscriptionId'),'/resourcegroups/', parameters('serverFarmResourceGroup'), '/providers/Microsoft.Web/serverfarms/', parameters('hostingPlanName'))]": "empty"
      },
      "dependsOn": [
        "[concat('Microsoft.Web/serverfarms/', parameters('hostingPlanName'))]"
      ],
      "resources": [
        {
          "apiVersion": "2015-08-01",
          "name": "appsettings",
          "type": "config",
          "tags": {
            "displayName": "WebAppSettings"
          },
          "properties": {
            "BotId": "[parameters('botId')]",
            "MicrosoftAppId": "[parameters('microsoftAppId')]",
            "MicrosoftAppPassword": "[parameters('microsoftAppPassword')]",
            "ActiveDirectory.RedirectUrl": "[parameters('activeDirectory.RedirectUrl')]"
          },
          "dependsOn": [
            "[concat('Microsoft.Web/sites/', parameters('webName'))]"
          ]
        }
      ]
    },
    {
      "apiVersion": "2016-03-01",
      "name": "[parameters('webNameTest')]",
      "type": "Microsoft.Web/sites",
      "properties": {
        "name": "[parameters('webNameTest')]",
        "serverFarmId": "[concat('/subscriptions/', parameters('subscriptionId'),'/resourcegroups/', parameters('serverFarmResourceGroup'), '/providers/Microsoft.Web/serverfarms/', parameters('hostingPlanName'))]",
        "hostingEnvironment": "[parameters('hostingEnvironment')]"
      },
      "location": "[parameters('location')]",
      "tags": {
        "[concat('hidden-related:', '/subscriptions/', parameters('subscriptionId'),'/resourcegroups/', parameters('serverFarmResourceGroup'), '/providers/Microsoft.Web/serverfarms/', parameters('hostingPlanName'))]": "empty"
      },
      "dependsOn": [
        "[concat('Microsoft.Web/serverfarms/', parameters('hostingPlanName'))]"
      ],
      "resources": [
        {
          "apiVersion": "2015-08-01",
          "name": "appsettings",
          "type": "config",
          "tags": {
            "displayName": "WebAppSettings"
          },
          "properties": {
            "BotId": "[parameters('botIdTest')]",
            "MicrosoftAppId": "[parameters('microsoftAppIdTest')]",
            "MicrosoftAppPassword": "[parameters('microsoftAppPasswordTest')]",
            "ActiveDirectory.RedirectUrl": "[parameters('activeDirectory.RedirectUrlTest')]"
          },
          "dependsOn": [
            "[concat('Microsoft.Web/sites/', parameters('webNameTest'))]"
          ]
        }
      ]
    },
    {
      "apiVersion": "2016-09-01",
      "name": "[parameters('hostingPlanName')]",
      "type": "Microsoft.Web/serverfarms",
      "location": "[parameters('location')]",
      "properties": {
        "name": "[parameters('hostingPlanName')]",
        "workerSizeId": "[parameters('workerSize')]",
        "numberOfWorkers": "1",
        "hostingEnvironment": "[parameters('hostingEnvironment')]"
      },
      "sku": {
        "Tier": "[parameters('sku')]",
        "Name": "[parameters('skuCode')]"
      }
    }
  ],
  "$schema": "https://schema.management.azure.com/schemas/2014-04-01-preview/deploymentTemplate.json#",
  "contentVersion": "1.0.0.0"
}
7. 同じく paramters.json もいかに差し替えます。自分の環境に合わせて値を変えてください。
 {
  "$schema": "https://schema.management.azure.com/schemas/2015-01-01/deploymentParameters.json#",
  "contentVersion": "1.0.0.0",
  "parameters": {
    "webName": {
      "value": "o365botprod"
    },
    "webNameTest": {
      "value": "o365bottest"
    },
    "hostingPlanName": {
      "value": "O365BotPlan"
    },
    "hostingEnvironment": {
      "value": ""
    },
    "location": {
      "value": "South Central US"
    },
    "sku": {
      "value": "Standard"
    },
    "workerSize": {
      "value": "0"
    },
    "serverFarmResourceGroup": {
      "value": "O365BotRG"
    },
    "skuCode": {
      "value": "S1"
    },
    "subscriptionId": {
      "value": "__YourAsureSubscriptionId__"
    },
    "botId": {
      "value": "__YourBotId__"
    },
    "microsoftAppId": {
      "value": "__YourMicrosoftAppId__"
    },
    "microsoftAppPassword": {
      "value": "__YourMicrosoftAppPassword__"
    },
    "activeDirectory.RedirectUrl": {
      "value": "__YourSite__/api/OAuthCallback"
    },
    "botIdTest": {
      "value": "__YourTestBotId__"
    },
    "microsoftAppIdTest": {
      "value": "__YourTestMicrosoftAppId__"
    },
    "microsoftAppPasswordTest": {
      "value": "__YourTestMicrosoftAppPassword__"
    },
    "activeDirectory.RedirectUrlTest": {
      "value": "__YourTestSite__/api/OAuthCallback"
    }
  }
}
ARM テンプレートチェックイン
新しいレポジトリに入れたいと思います。興味あれば是非 Visual Studio Code で管理してみてください。
1. VSTS にログインして、プロジェクトに移動。
2. レポジトリ名をクリックして、New repository をクリック。

3. ARM という名前でレポジトリ作成。

4. レポジトリを Initialize。

5. 作成したレポジトリに template.json と parameters.json をコピー。

リリース定義の作成
準備は整ったということで、最後にリリース定義を作ります。
リリース定義
1. VSTS の Build & Release より Releases に移動して、New definition をクリック。

2. Empty テンプレートを選択して、Next。

3. 利用する Build を選択。「Continuous deployment」にチェックを入れて作成。

これで入れ物ができます。次に環境作成。
Artifacts 追加
Build 結果以外にも必要なファイルがある場合、Artifact としてリンク追加できます。
1. Artifacts タブの、Link an artifact source をクリック。

2. Type 等を以下のようにして、ARM レポジトリをリンク。

3. 同様に BotWithDevOps レポジトリもリンク。

ARM で環境を整える
1. Environment1 を ARM にリネーム。ここでまず環境作成を指示。

2. Add tasks をクリック。

3. Deploy カテゴリより Azure Resource Group Deployment を選択して Add。Close をクリック。

4. テンプレートのバージョンを 1.* に変更。※ 2.*ではうまく動かなかったので、一旦 1.* で。 
5.Azure subscription を選択して、Authorize ボタンが出る場合は認証しておきます。Action は Create or update resource group としておくと、無ければ作成、あれば設定値合わせをしてくれます。

6. Template 欄右の[・・・]をクリックし、template.json を選択。

7. parameters.json も同様に選択。

アプリリリース定義
環境が出来たらアプリリリースをします。
1. Add environment より Create new environment をクリック。

2. 以下テンプレートを選択して Next。

3. 前環境終われば自動でいくように設定して、作成。

4. 環境名を Test に変更。

5. Azure Subscription や App Service Name を指定。App Service Name は存在しない場合手で入れれます。

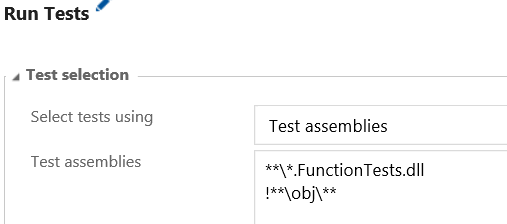
6. RunTests を選択し、アセンブリ名を *functiontests*.dll に変更。
7. Settings File 右の[・・・] をクリック。

8. Test.runsettings を選択。

9. 必要に応じて設定を追加。ここでは Code coverage enabled をチェック。

10. Run on agent リンクをクリックして、 Deployment queue より Hosted VS2017 を選択。

11. 次に本番を。Test を選択した状態で、Add environment より Clone selected environment を選択。

12. 前環境成功したら自動で実行されるように選択して、作成。名前を Prod に変更。

13. App Service name を本番に変更。

14. Run Tests のSettings file を本番に変更。

15. 最後にリリース定義の名前を変更して、保存。

リリース定義のテスト
1. Release より Create Release を選択。

2. それぞれ最新のチェックインを選択して、作成。

3. 画面左のリリース定義一覧より、作成したリリース定義を確認。手動でキューされた結果が表示されるので、[・・・] より Open。

4. Log タブをクリックすると実行状況が確認可能。

4. リリース完了したら、念のため意図した設定になっているか、確認しておきます。
まとめ
今回はリリース定義を作りました。ARM テンプレートも入っているので、誤って環境壊しても安心です。次回からは少しボットの機能を充実させつつ、BotBuilder の機能を紹介していきます。