How-to: In search of strmbase.lib
Several of the DirectShow samples in the Windows SDK require strmbase.lib, and quite a few developers have asked me where to find this file. It does not install to the default location with other libraries (C:\Program Files\Microsoft SDKs\Windows\v6.1\lib). Other folks have figured out how to build strmbasd.lib, but they need strmbase.lib.
Strmbasd.lib is not included in the SDK \lib directory. You must build it yourself by building the Samples\Multimedia\DirectShow\baseclasses sample first. Once you’ve built the sample, strmbasd.lib will be found in the Samples\Multimedia\DirectShow\baseclasses\debug folder.
Strmbasd.lib is created when making a debug build of the baseclasses sample. Strmbase.lib is created when making a release build of the baseclasses. If you want to create a release build, you can do it from within Visual Studio or at the command line build environment of the Windows SDK.
Windows SDK Command Line build environment
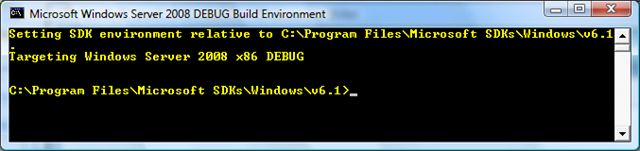
The Windows SDK build environment opens automatically in Debug mode, and by default builds Debug builds. You may have noticed that the font in a debug build environment is yellow, and the title of the command window includes the word "debug."
You can use setenv commands to switch to Release mode:
1. Open the Windows SDK CMD shell (Start > All Programs > Windows SDK v6.1 > SDK CMD Shell). This will work with older versions of the Windows SDKs too.
2. Type: setenv /release
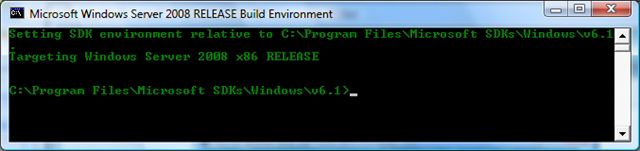
3. The CMD shell will switch from yellow text (debug) to green text (release).
4. Build your sample as you usually do:
- Build a .sln file by typing msbuild *.sln /p:platform=[win32 | X64 | IA64]
- Build a .vcproj by typing vcbuild *.vcproj /platform=[win32 | X64 | IA64]
5. Once you’ve built the sample, strmbase.lib will be found in the \Multimedia\DirectShow\baseclasses\release folder.
From within the Visual Studio IDE
Visual Studio opens by default in Debug mode, and by default builds Debug builds. You can easily switch to Release mode.
1. When you open your sample in Visual Studio IDE you’ll see a green arrow pointing to the right next to the word “Debug” on the tool bar.
2. Use the drop down menu to change “Debug” to “Release.”
3. Or you can open the configuration manager to set to “Release” from the menu bar: Project, Properties, Configuration Manager. Use the pull down menu on the top of the configuration manager window to change your build settings to Release.