Extending the Unified Service Desk: Co-Browse
One of the most powerful and differentiating aspects of Microsoft Dynamic's Unified Service Desk is the ability to interact with Third Party tool-sets and applications that empower your agents to serve customers across diverse channels and interaction points. In this post, we will be exploring how you can apply the concepts of Hosted Controls, Action Calls, Window Navigation Rules, Replacement Parameters and Events to integrate a Co-Browse solution into a USD Environment.
We will be working with a Co-Browse technology called Realtime, developed by Recursive Labs. Realtime allows for a secure, no-download co-browsing experience as well as Open APIs for simple development. Please contact Recursive Labs to schedule a demonstration if you are interested in this technology.
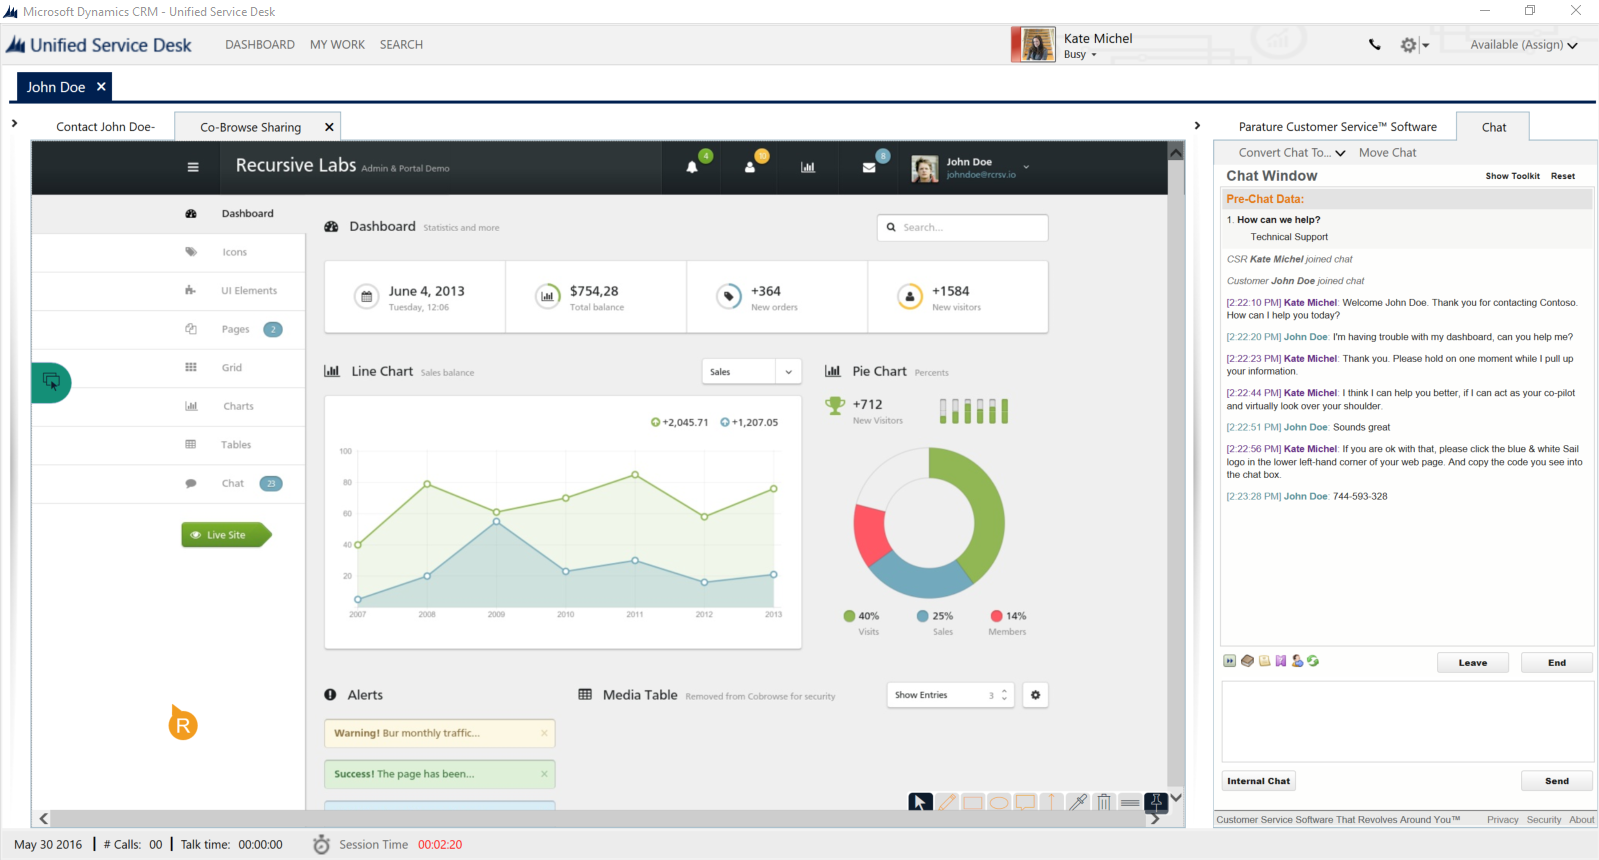
Before we get started, I'd like to share a brief video demonstration of this example integration in action. As you can see, I am able to initiate a Co-Browse session directly from the Unified Service Desk. I have also integrated a Chat solution and can post messages directly into the chat interface related to Co-Browsing. The Co-Browse session itself will launch in the central panel for easy viewing and my chat deployment will move to the right, enabling me to continue to chat with the user while engaged in screen sharing.
[video width="800" height="600" mp4="https://msdnshared.blob.core.windows.net/media/2016/05/cobrowse2.mp4"][/video]
This tutorial is meant to illustrate a real world example of building an integration within the Unified Service Desk by applying the learnings and concepts discussed in this blog. These concepts are applicable to a wide variety of scenarios, allowing you to extend the Unified Service Desk with a number of different solutions. My hope is to share the concepts and best practices involved in customizing USD so that you can create your own integrations.
 Prerequisites
- Microsoft Dynamics CRM 2013+
- Unified Service Desk Installed
- Administrative User Rights
- Co-Browse Solution (we'll be using Realtime)
Step 1: Understand the Requirements
It sounds simple enough but when building anything in the Unified Service Desk it is important to have a clear objective and plan of what you want to build and how you want it to interface with the rest of the Microsoft Dynamics and USD. Brain storm with stakeholders, leveraging user stories to map out your high level requirements and help to guide the development process.
Here some example user stories for Co-Browse integration we will be building in this blog.
- As a customer, I want to share my screen with a customer service agent in order to get help with a process.
- As an agent, I want to generate new Co-Browse Sessions to engage with customers
- As an agent, I want the option to start a Co-Browse from any session.
- As a supervisor, I want co-browse sessions to be logged as activities and tied to the relevant contact, customer or case.
Step 2: Assemble and Understand Third Party Resources
In this post I will be working with a web based Co-Browse solution. This solution has two interfaces that I need to work with: the Initiation Widget which generates the unique session to support a Co-Browse between agent and customer and the screen sharing Application itself.
The Initiation Widget will be a Web Resource hosted within CRM that allows a CSR to initiate the application. The Application itself is our web-based Co-Browse Solution.
Step 3: Create Hosted Controls
A Hosted Control within the Unified Service Desk can be thought of as the "building blocks" of your application. For our purposes, you can think a Hosted Controls as where you can host .NET components, Dynamics CRM pages as well as Web Applications. You can also think of Hosted Controls as Objects. We will discuss Hosted Controls in more detail in another post.
As we discussed in Step 2, there are two application interfaces we need to add to support our Co-Browse experience: the Initiation Widget and the Co-Browse Application. We need to create a Hosted Control for each.
- To create our Hosted Controls we will log in to Dynamics CRM, navigate to Settings and select the Unified Service Desk menu item.
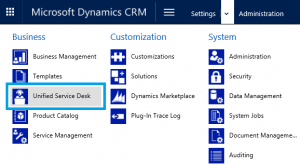 From the Unified Service Desk Administration area, select the Hosted Controls item.
 In the Hosted Control entity ribbon, click New to create a new Hosted Control.
- Create a Hosted Control for the Initiation Widget.
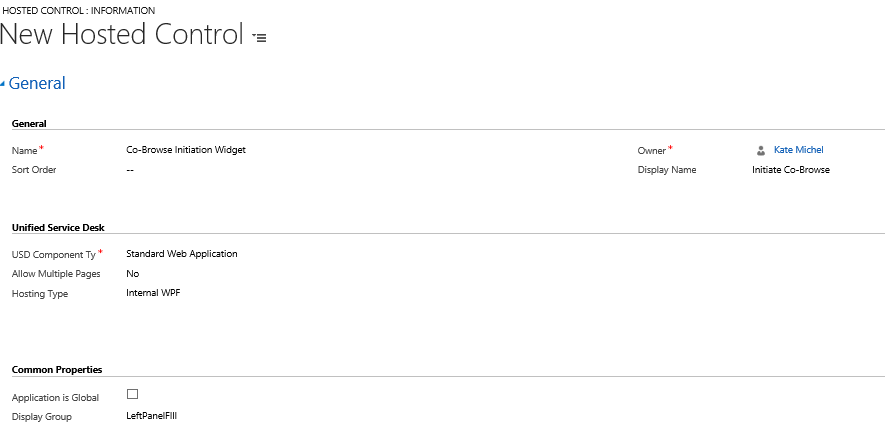 Give your Hosted Control a name. Best practice is to name your custom USD Components in a similar fashion. For example, I might prepend the word "Co-Browse" or "CB" to elements that relate to the Co-Browse application I am building. This will allow you to find the elements easily for configuration, troubleshooting or even updates in the future as well as make your components easier for future developers to work with.
- The display name is what will be shown to CSRs within the USD application. If no display name is selected, the name of the Hosted Control will be shown instead.
- The USD Component Type allows us to specify what this Hosted Control will be used for. In this example we selected a Standard Web Application which allows us to load a non-CRM webpage. By default, USD will use the Windows Presentation Foundation (WPF) WebBrowser to load the page but based on your need you can use IE Process as well.
- We need to make sure the Application is Global box remains unchecked as we want this Hosted Control to only exist within the context of a customer session. Checking the box means that your Hosted Control will exist irrespective of any one session.
- Finally, we will selecte the Display Group "LeftPanelFill" which will add our Hosted Control beneath the Agent Script Panel in the standard USD Layout.
- Save your Hosted Control and click the New button to create another for the Co-Browse Application.
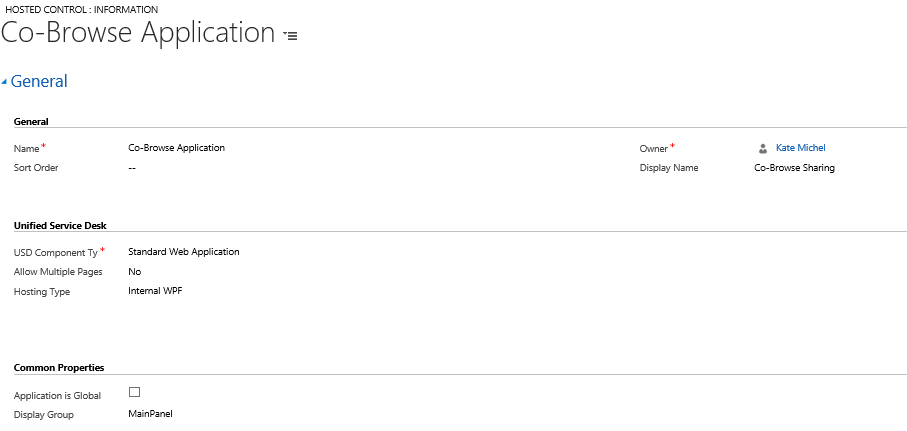 As before, we are creating a Standard Web Application Hosted Control, adhering to our naming conventions and specifiying that it is session context specific, not global. This will be the Hosted Control where our Co-Browse Application lives. To give the agent the best view of their customer's screen, we will specify the MainPanel Display Group which will put our Hosted Control in the center of USD.
Step 4: Action Call to Instantiate The Applications
Now that we have created the object references for our Co-Browse Initiation Widget and Application, we need to instantiate them. Basically, we need to tell USD what to load. We do this using Action Calls. Action Calls can be thought of as function calls, triggering UII Actions within the Unified Service Desk. We will use these Action Calls to load our Web Applications as well as to communicate with other Hosted Controls within USD, as we will see in the next steps.
We now want to load our Initiation Widget which will point to a Web Resource that contains the logic to generate the Co-Browse session. The creation of the Web Resource is outside the scope of this post as it will vary depending on the type of solution you are integrating with. If you are deploying the Realtime Co-Browse solution, your Web Resource will be available to you in the installed Solution File.
-
- Return to the Unified Service Desk Administration area (Settings -> Unified Service Desk). You can also use CRM Breadcrumbs to go back to this page from within a USD component.
- Click on the Action Calls item.

- As before, click the New button to create a new Action Call. The first action call we will create will be to load our Web Resource for the InitiatIon Widget.
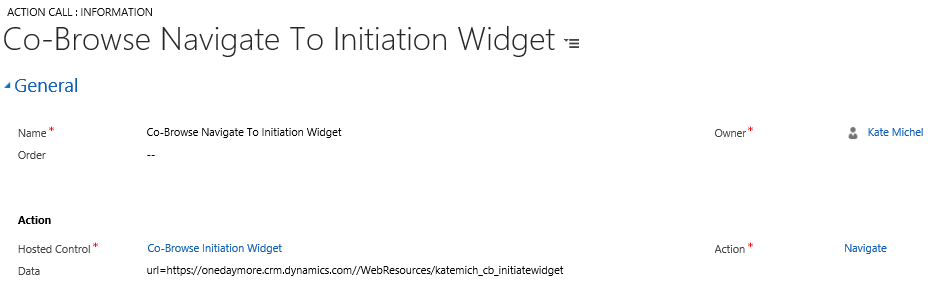
- We will give our Action Call a name that is logical and describes the function of the action to take place. We will also continue our naming conventions so that it is easy to identify which Action Calls relate to our Co-Browse integration.
- We then need to select a Hosted Control that the defined Action will apply to when the Action Call is invoked. Since we are loading our Initiation Widget, we want to leverage the Co-Browse Initiation Widget Hosted Control that we defined in the Step 3.
- The Action defines what type of action will be performed when the Action Call is invoked. Different Actions will be available depending on the type of Hosted Control you have selected. In this case, we want to load a web resource into a Standard Web Application Hosted Control and so we can use the available Navigate UII Action.
- Finally, we need to provide some Data for the Action to use. Data is accepted as name value pairs. You can input multiple data parameters, separated by line breaks. In this case, we just need to provide a URL where the Hosted Control should be Navigated to. The URL provided will then be loaded using the Hosting Type browser defined in the Co-Browse Initiation Widget Hosted Control.
- Save your Action Call.
But wait, why didn't we create an Action Call to load the Co-Browse Application as well? In this example, the Co-Browse Initiation Widget launches the Application when an agent engages in a session with a customer. We cannot manually navigate to the Application as it is session-based but we do need to help route the launch into the right place, which we will do in Step 5 below.
Let's Test Our Action Call
In another blog post, we talk about using the Unified Service Desk Debugger tool to test and troubleshoot Action Calls. This is a great way to do unit testing and validate that the custom code or integrations you are building works as expected in the USD environment.
- Launch Unified Service Desk and log in to Microsoft Dynamics
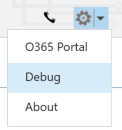
- In the top-right corner of the application, select the Debugger toolbar button to launch the Debugger control which will load in the center area of USD known as the MainPanel.
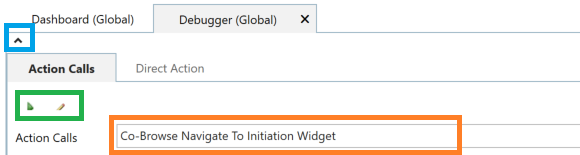
- At the top-left of the Debugger (in blue) you can expand and collapse the Direct Action area. This allows you to run action calls manually from within the Unified Service Desk. From the list available (in orange) we will select our newly created Co-Browse Navigate To Initiation Widget. In green, you can see we have the ability to run (green arrow) or edit (yellow pencil) this action call. This allows us to test and make modifications to our Action Call without having to save those changes or reload USD.
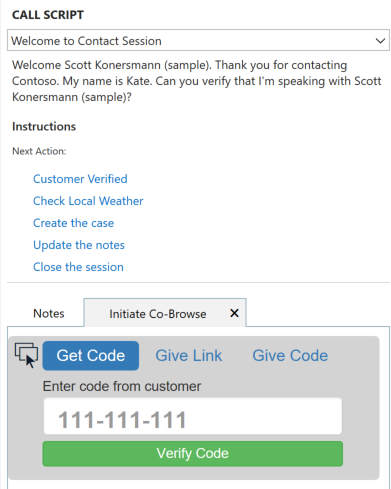
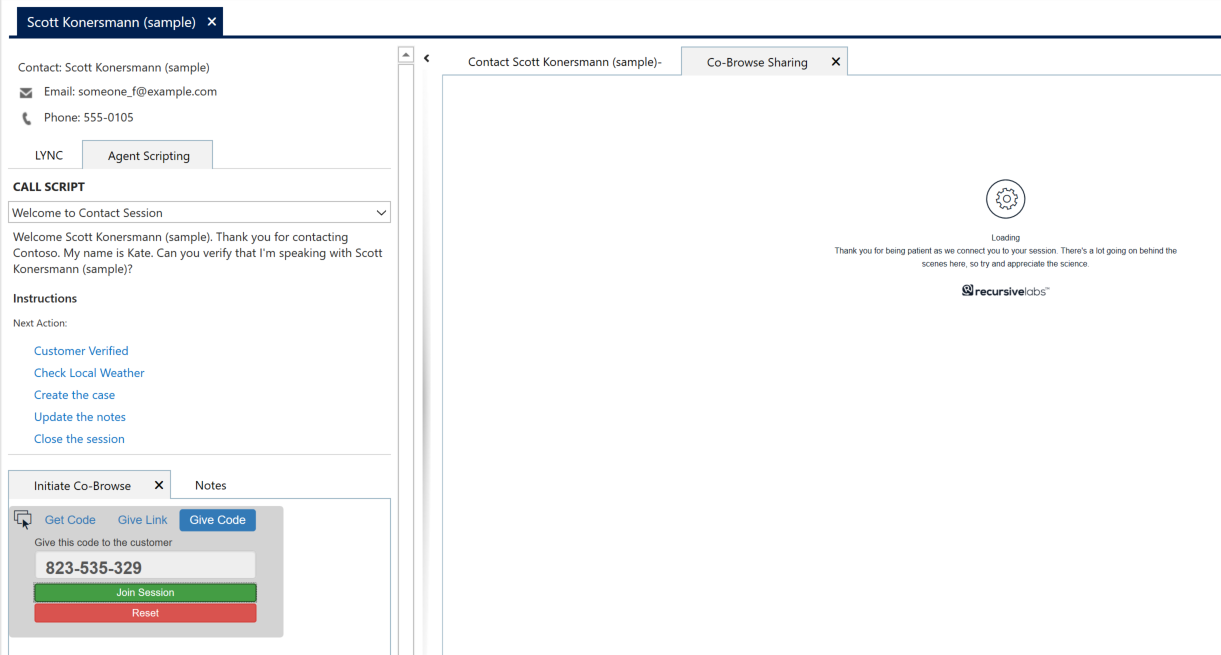
- Now, because this is not a Global Hosted Control, it will only open and exist within the context of a session. So before we can run our test, we have to start a session. To do this, I will open a random contact in USD.
- When I run my Action Call I will see that the Web Resource loads in the LeftPanelFill pane, right under the Agent Scripting area.
- We have now confirmed our Action Call loads the appropriate Hosted Control and that it Navigates to the specified Web Resource that we defined in the Data.
Step 5: Launch Co-Browse Application
Our Web Resource for Initiating a Co-Browse triggers the launch of the Realtime application. If we loaded this page in a Web Browser it would launch in a new window. USD, however, does not handle pop-ups, new windows or tabs in the same way a browser might. So if we want to launch the application with tall the appropriate session information that was created by our Initiation Widget, we need to tell USD how to behave.
Window Navigation Rules are a key component to working across applications and panels within USD. When you click a link within a Hosted Control, you need to define the behavior you want. For example, if I click a link to open a Contact record within a Dynamics CRM Page Hosted Control, USD will not only load the Contact's profile but will also start a Session. The logic that handles this behavior is called a Window Navigation Rule.
- Navigate back to the Unified Service Desk Administration Area (Settings->Unified Service Desk)
- Click on the Window Navigation Rules item

- Click the New button to create a new Window Navigation Rule. The first WNR that we will create will be a Default Rule
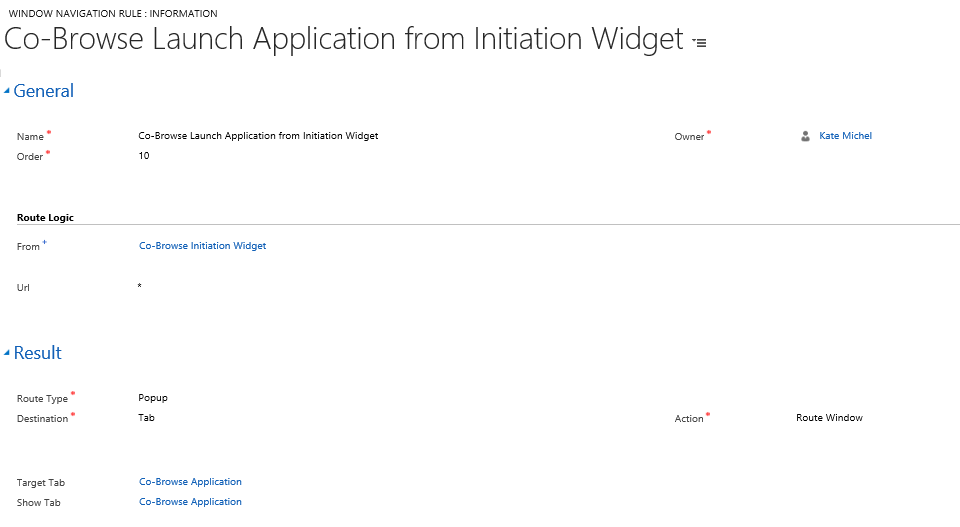
- As before, use your established naming conventions when selecting the Name for your Window Navigation Rule. It should be descriptive of what the rule is meant to do. In this case, we want to launch the Co-Browse Application from the Initiation Widget.
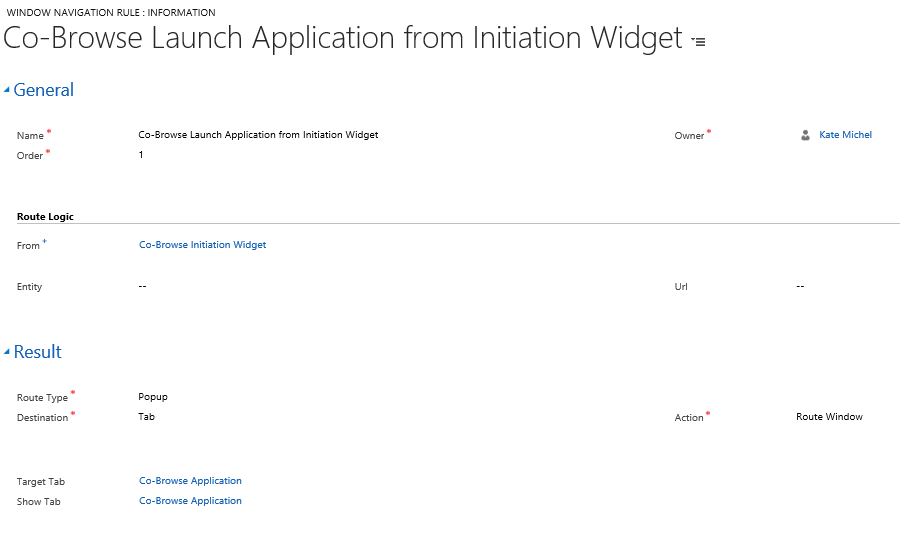
- As with other entities within USD, specifying an order ensures that, when multiple rules are being run, they are executed in the correct order.
- Now, let's talk about the Route Logic that defines when this rule is called. We have a number of different WNR being used within USD and we only want to apply this rule in a specific situation. The Rule Logic, in conjunction with the Order field, lets USD know when this rule is applicable.
- The From field specifies which Hosted Control this WNR can be initiated from. Since we specified the Co-Browse Initiation Widget Hosted Control as the From field, only that Hosted Control can trigger this specific rule.
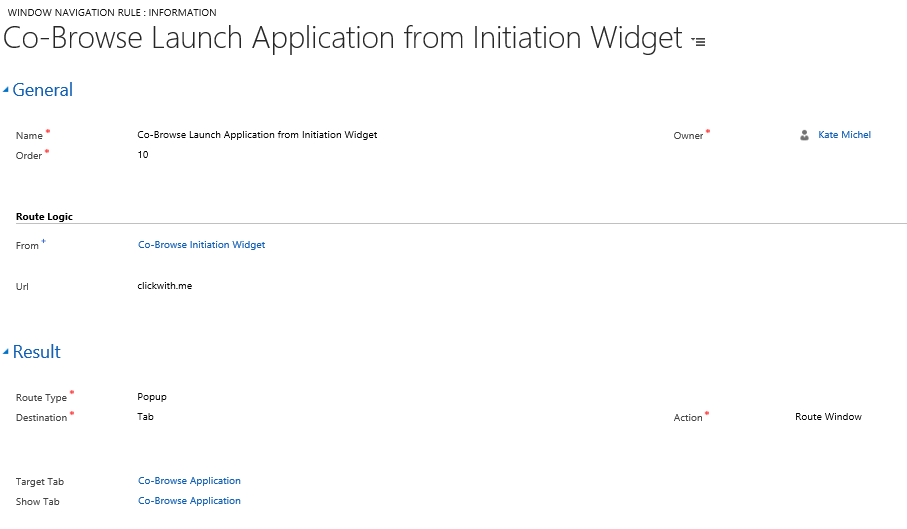
- Now, we have to specify a CRM Entity or URL. This allows us to be more specific about when the rule should run and what kind of information will be displayed when it does. Since we are routing a Web Application, we can enter a partial URL of that application (example.com) or a wildcard character (*) to allow all URLs from the originating Hosted Control.
- Now that we've defined when this rule should run, we can tell USD how to behave. In this case, we want to route the new window into the Co-Browse Application Hosted Control. To do that, we specify the Route Type as a Popup, the destination as a USD Tab and the Action as Route Window. If we chose the Action of "In Place" the Application would load within the Initiating Widget Hosted Control.
- Finally, we want to specify which Hosted Control we want to Target for our Route Window Action. Since we want the Application to load in the Co-Browse Application Hosted Control, that is what we will selected here. We can also specify if a particular Hosted Control should get "focus" or shown within USD when this rule runs. We want to automatically see our Co-Browse session, so we will select the Application Hosted Control to be shown when this rule runs.
Pretty simple, right? Again, the logic to open the Application in another browser window exists in the Initiation Widget Web Resource. With our WNR, we are telling USD how to behave when the Popup or new window request is initiated that matches our Route Logic.
Let's Test Our Window Navigation Rule
As before, we can test our changes within the Unified Service Desk Debugger.
- We first will launch the Unified Service Desk, log in to our Dynamics CRM instance and open the Debugger.
- Remember that our integration can only work within the context of a session so we will need to start a session before we can test.
- Just like before, we will run the Co-Browse Navigate to Initiation Widget Action Call from the Debugger. As before, this will load the Hosted Control that contains our Initiate Co-Browse Web Resource.
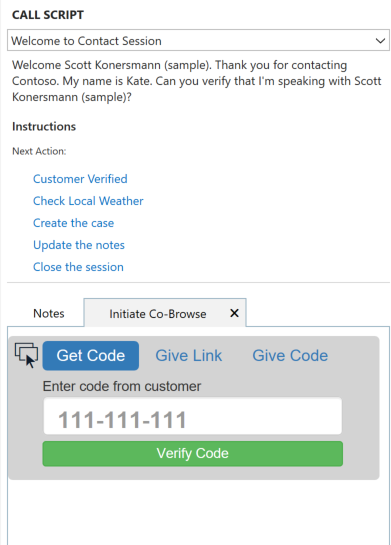
- Once the Initiation Widget Hosted Control loads, I will try to start the Co-Browse Application by generating a link and clicking the "Join Session" button. This functionality, again, is defined by the Web Resource we have loaded within this Hosted Control.
- When we click "Join Session" the Web Resource will try to load a new browser window or Tab. This will be picked up by our Window Navigation Rule, since it is originating from our specified Hosted Control, and the Co-Browse Application Web Resource will be routed to the Co-Browse Application Hosted Control.
Looks good! We can now initiate a new Co-Browsing session and start the Application directly from within USD.
Step 6: Record Co-Browse Activity within CRM
Now that we have the ability to initiate a Co-Browse session from within USD, let's address the next user story. As an agent, I want all my Co-Browsing sessions to be saved as Activities within CRM.
First, you'll need to create an Activity Entity for your Co-Browse sessions. Entity creation is outside the scope of this blog post but is hopefully something you are familiar with. If you have Realtime by Recursive Solution files installed in your Dynamics CRM Instance, you will already have the necessary entity and fields created.
Make note of your Entity Name and any relevant Field Names as you will need these to create records from within USD.
Alright, now lets get on with the process of creating entity records from within USD. Earlier in this post we covered Action Calls which act as functions within the Unified Service Desk. We will be using Action Calls to create entity records within Dynamics CRM.
- Navigate back to the USD Administration Screen (Settings -> Unified Service Desk) and select the Action Calls item.
- Select the New button to create a new Action Call. This action call will create an entity record for our Co-Browse Activity and save that activity to the contact record.
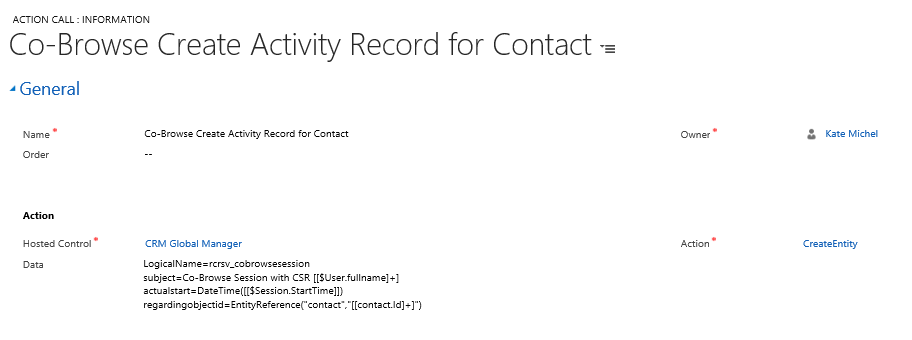
- As before, we will follow our naming conventions and make sure that the name of our Action Call is descriptive.
- The Hosted Control we are invoking with this Action Call is going to be CRM Global Manager. This special Hosted Control is the brain behind USD and does everything from loading and interpreting data to providing multi-lingual capabilities. The CRMGlobalManager Hosted Control also has special UII Actions that can be used by your USD Customizations. In this example, we will use the special UII Action of CreateEntity.
- The Data field, just like before, specifies what information we want to use when invoking the Action. Previously in this example we passed a URL value. Now, we are defining what kind of entity we want to create and what data we want to pre-populate it with. Just as before, the Data consists of name=value pairs seperated by a line break.
- The LogicalName correlates to the "Name" field of the CRM Entity. If you aren't sure what to use here, look at the entity record to find the system name.

- The regardingobjectid allows you to associated this Activity with a particular record. In this example, we are saving the activity to the contact record associated with our current Session in USD. We can use the CRM Implicit Method EntityReference() to specify the type of entity (contact) and the entity's ID.
- The rest of the data included are name/value pairs that align with specific fields on the Co-Browse Activity Entity. We are using just a few basic fields as an example here including the text string "subject" and the DateTime() field that specifies when the Co-Browse Activity Started.
- You can retrieve data from USD using Replacement Paramters. Replacement Parameters are basically variables that can be invoked using
[[VariableName.Value]]syntax. System parameters will start with a leading $ as in[[$User.fullname]]which references the CSR's name. You can also use keys between the last two brackets for special handling of Replacement Parameters. This is a topic we will dig deeper into in a later post. - Now, we can Save our Action Call and test it once again in Unified Service Desk.
Step 7: Tie it All Together
At this stage we have a custom integration build that allows us to view a widget, launch and route our application and create an activity entity. While these are all the components of a complete solution, we still need to tie it all together so that our agents can take advantage of the integration.
So far we have been invoking our Action Calls manually using the Debugger in Unified Service Desk. It's now time to make these actions available to our agents.
First, we'll want to launch the Co-Browse Initiation Widget every time a Session starts.
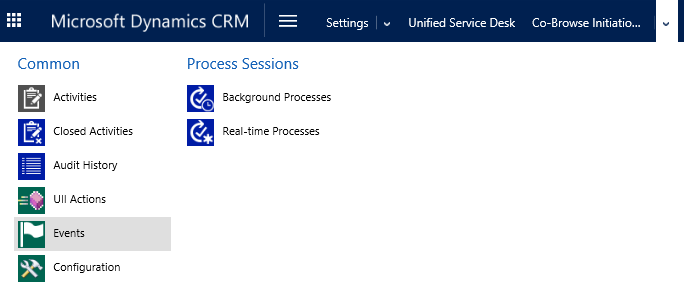
- We've already created our action call to load our Initiation Widget, now we just need to tell USD when to invoke it. Going back to the Unified Service Desk Administration page, lets select the Events item.

- Events are notifications that something has occurred within USD. You can tie Action Calls to Events to trigger behavior in USD.
- Locate the Event called "Session New." This is a default Event in USD that indicates a new session has been started. Any Action Calls associated to this event will be invoked when the Event runs. Now, you can see where the Order value on Action Calls comes into play. The Action Calls are evaluated in the order indicated by the Order field.
- Now, let's add our Co-Browse Navigate to Initiation Widget Action Call to the Session New Event.

- Remember how I said to name things in a predictable way? This is where that comes in handy. I can search for the beginning part of my naming convention and see all Action Calls related to Co-Browse. I can then select the correct Action Call and easily add it directly to the Event.
- Now, when a new Session starts in USD, my Initiation Widget will load in area specified by the Hosted Control. We can test this, again, by launching USD and starting a session.
Now, we'll want to automatically create a Co-Browse Session Activity Record when the Co-Browse Application launches. We will do this using Events that are tied to specific Hosted Controls.
- Recall that the Co-Browse Initiation Widget is what routes the Popup via Window Navigation Rules to the Co-Browse Application Hosted Control. As such, we will be using the Initiation Widget Hosted Control Events to trigger the creation of our activity when a Popup is routed.
- Open the Co-Browse Initiation Widget Hosted Control (Settings->Unified Service Desk->Hosted Controls). Like many other components of Dynamics CRM, Hosted Controls have associated information including their own Events.
- In your Dynamics Menu, select the carrot next to your Hosted Control's name. This will expand the additional details about your Hosted Control. In this example, we will be working with Events and will select that menu item.
- Two default Events will already exist for a Hosted Control: BrowserDocumentComplete (fires when the Hosted Control completes loading) and PopupRouted which is, of course, the Event we will be using here.
- Opening the PopupRouted event we can see that the Hosted Application field is tied to the Initiation Widget. This event only fires when a Popup is routed from this specific Hosted Control.
- Here, we will add the Co-Browse Create Activity Record for Contact Action Call..
There we have it, in seven easy steps we have integrated an application into USD and have reviewed many of the fundamental components required to customize a USD instance.
Too Long, Didn't Read? Here is the abbreviated version:
- We created two Standard Web Application Hosted Controls: One for the Co-Browse Initiation Widget and one for the Co-Browse Application.
- We created an Action Call to Navigate the Co-Browse Initiation Widget Hosted Control to a specified URL of our Web Resource
- We also learned how to use the USD Debugger to test Action Calls
- We then created a Windows Navigation Rule to take Popups from the Co-Browse Initiation Widget HC and route them to the Co-Browse Application HC.
- We then created an Activity Entity in CRM to log our Co-Browse Sessions
- Then, we created an Action Call that leveraged the CRMGlobalManager special Hosted Control to create records for our Co-Browse activities and associate them with a Contact record.
- We then added our Action Call to load the Initiation Widget to the Session New event, invoking it every time USD starts a new Session.
- Finally, we added our Record Creation Action Call to the Popup Routed event for the Initiation Widget Hosted Control so a record will be created every time a CSR starts to Co-Browse with a customer.
But wait, how did you incorporate Chat into the story?
The extra components that work directly with the web chat as shown in the demonstration video include:
- Toolbars associated with the Co-Browse Initiation Widget HC that trigger Javascript to submit a pre-defined chat message.
- Action Call that triggers the action "MovePanel" on the Chat Hosted Control, automatically moving it from the MainPanel to the RightPanel. This Action Call should be invoked when you load another MainPanel application that you want to view alongside the chat window.