Fixing People Picker for SAML Claims Users Using LDAP
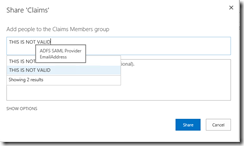
One of the things that frustrates customers when implementing claims authentication in SharePoint is how the people picker works for SAML claims users. If you try to add a SAML claims user to a group in SharePoint, anything you type is considered valid. For instance, I don’t have a user named “THIS IS NOT VALID”, but when I type that into the people picker, it works just fine. In fact, it shows me two results!
Huh?
The title of this post says “fixing people picker”, but it is actually working just as it was designed. The way this works is that you enter a claim value and by doing so you are asserting that any user with that claim value has access to the site. There is no function to get a list of users using SAML claims, so SharePoint just accepts whatever we type and assumes we are typing the correct value. There are two values that it is looking for, either the email address (which is the identifier claim in this configuration) or a role claim.
What we want, instead, is to see something like this:
With a little code, we can add the capability to the people picker so that we can select from a list of valid results. This code is called a Claim Provider. The code for this solution is attached at the end of the post.
Introducing Claim Providers
Claim providers can be difficult at first to understand what they do, but once you understand what they do you will see how incredibly powerful they can be. A claim provider serves two purposes:
- When someone logs into SharePoint, you might want to give additional claims to a user that they didn’t have before. For instance, I wrote a previous blog entry on How to Allow Only Users Who Have a Community Badge to Your SharePoint 2013 Site. That solution used a claim provider to add additional claims to the user when they log in such as the Achievements they have unlocked, and this is called entity augmentation.
- When you search for a user or group in SharePoint, such as when adding a user to a group, a claim provider can provide the search results. Similarly, when you type something into the textbox to add a user or group, a claim provider is used to validate the value. This is called name resolution.
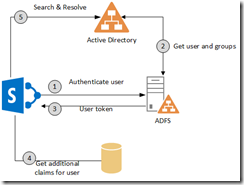
One of the limitations of using SAML claims is that there is no standard way to provide a list of users, which is needed when searching for users based on part of their name. To provide this behavior, we can use a custom claim provider, which takes care of steps 4 and 5 in the following diagram.
- The user logs into SharePoint by going to ADFS or another SAML authentication provider.
- The SAML authentication provider validates the requested user against some authentication store or directory such as Active Directory and gets the attributes for the user and even perhaps their group memberships.
- A token is returned that contains claims about the user, which are used to gain access to resources within SharePoint.
- We may want to add additional claims to the user’s token that are not passed back from the authentication service such as the Achievements they have unlocked. For this, we can add additional claims using entity augmentation to add additional claims to the user’s token.
- When we are searching for a user, we cannot go directly to ADFS because there is no search function. Instead, we use a custom claim provider to query directly to some authentication store or directory such as Active Directory to retrieve information about a list of users in order to provide name resolution.
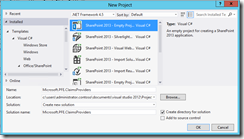
This post will focus solely on number 5 in this list, providing name resolution. Start by creating a new empty SharePoint project created as a Farm Solution.
Setting Up the Data Model
The first thing I want to do is to define the data model that will be used with my claim provider. I start with the basic data being modeled and create a data entity class called LDAPUser.
 using System;

namespace Microsoft.PFE.ClaimsProviders
{
    public class LDAPUser
    {
        public string DisplayName { get; set; }
        public string GivenName { get; set; }
        public string SurName { get; set; }
        public string Mail { get; set; }
        public string sAMAccountName { get; set; }
    }
}
I am going to query via LDAP, so I create a class with methods that let me search on partial values or exact values using LDAP. I wrote in a previous blog post about Querying Active Directory that shows how to use System.DirectoryServices to query using LDAP.
 using Microsoft.SharePoint;
using System;
using System.Collections.Generic;
using System.DirectoryServices;

namespace Microsoft.PFE.ClaimsProviders
{

    public class LDAPHelper
    {
        public static List<LDAPUser> Search(string pattern)
        {
            List<LDAPUser> ret = new List<LDAPUser>();

            //Run with elevated privileges to get the context of the service account
            SPSecurity.RunWithElevatedPrivileges(delegate()
            {
                //TODO: Where to store the LDAP string?
                using (DirectoryEntry entry = new DirectoryEntry("LDAP://OU=SAMLEMPLOYEES,DC=CONTOSO,DC=LAB"))
                {
                    using (DirectorySearcher ds = new DirectorySearcher(entry))
                    {
                        ds.PropertiesToLoad.Add("displayName");
                        ds.PropertiesToLoad.Add("sAMAccountName");
                        ds.PropertiesToLoad.Add("givenName");
                        ds.PropertiesToLoad.Add("sn");
                        ds.PropertiesToLoad.Add("mail");

                        ds.Filter = "(|((displayName=" + pattern + "*)(sAMAccountName=" + pattern + "*)" +
                            "(givenName=" + pattern + "*)(sn=" + pattern + "*)(mail=" + pattern + "*)))";

                        SearchResultCollection results = ds.FindAll();

                        foreach (SearchResult result in results)
                        {
                            ret.Add(new LDAPUser
                            {
                                DisplayName = result.Properties["displayName"][0].ToString(),
                                sAMAccountName = result.Properties["sAMAccountName"][0].ToString(),
                                GivenName = result.Properties["givenName"][0].ToString(),
                                SurName = result.Properties["sn"][0].ToString(),
                                Mail = result.Properties["mail"][0].ToString()
                            });
                        }
                    }
                }
            });
            return ret;

        }

        public static LDAPUser FindExact(string pattern)
        {
            LDAPUser ret = null;

            //Run with elevated privileges to get the context of the service account
            SPSecurity.RunWithElevatedPrivileges(delegate()
            {
                //TODO: Where to store the LDAP string?
                using (DirectoryEntry entry = new DirectoryEntry("LDAP://OU=SAMLEMPLOYEES,DC=CONTOSO,DC=LAB"))
                {

                    using (DirectorySearcher ds = new DirectorySearcher(entry))
                    {
                        ds.PropertiesToLoad.Add("displayName");
                        ds.PropertiesToLoad.Add("sAMAccountName");
                        ds.PropertiesToLoad.Add("givenName");
                        ds.PropertiesToLoad.Add("sn");
                        ds.PropertiesToLoad.Add("mail");

                        ds.Filter = "(|((displayName=" + pattern + ")(sAMAccountName=" + pattern + ")" +
                                "(givenName=" + pattern + ")(sn=" + pattern + ")(mail=" + pattern + ")))";

                        SearchResult result = ds.FindOne();
                        if (null != result)
                        {
                            ret = new LDAPUser
                            {
                                DisplayName = result.Properties["displayName"][0].ToString(),
                                sAMAccountName = result.Properties["sAMAccountName"][0].ToString(),
                                GivenName = result.Properties["givenName"][0].ToString(),
                                SurName = result.Properties["sn"][0].ToString(),
                                Mail = result.Properties["mail"][0].ToString()
                            };
                        }
                    }
                }
            });
            return ret;

        }

    }
}
Now that the data entity model is created, we can start on the claim provider implementation.
Creating the Claim Provider
The first step is to add a class that derives from SPClaimProvider. We add a few properties to the class including 4 properties that tell SharePoint what our provider is capable of doing.
 using Microsoft.SharePoint.Administration.Claims;
using Microsoft.SharePoint.WebControls;
using System;
using System.Collections.Generic;


namespace Microsoft.PFE.ClaimsProviders
{
    public class LDAPClaimProvider : SPClaimProvider
    {
        #region ctor
        public LDAPClaimProvider(string displayName) : base(displayName)
        {
        }
        #endregion


        #region Properties
        internal static string ProviderInternalName
        {
            get { return "LDAPClaimProvider"; }
        }

        public override string Name
        {
            get { return ProviderInternalName; }
        }

        internal static string ProviderDisplayName
        {
            get { return "LDAP Claim Provider"; }
        }

        private static string LDAPClaimType
        {
            //The type of claim that we will return. Our provider only returns the
            //email address, which is the user identifier claim.
            get { return "https://schemas.xmlsoap.org/ws/2005/05/identity/claims/emailaddress"; }
        }
        private static string LDAPClaimValueType
        {
            //The type of value that we will return. Our provider only returns email address
            //as a string.
            get { return Microsoft.IdentityModel.Claims.ClaimValueTypes.String; }
        }

        internal static string SPTrustedIdentityTokenIssuerName
        {
            //This is the same value returned from:
            //Get-SPTrustedIdentityTokenIssuer | select Name
            get { return "ADFS SAML Provider"; }
        }


        public override bool SupportsEntityInformation
        {
            //Not doing claims augmentation
            get { return false; }
        }

        public override bool SupportsHierarchy
        {
            //Not modeling search results as a hierarchy.
            get { return false; }
        }

        public override bool SupportsResolve
        {
            //Yes, we will resolve search results
            get { return true; }
        }

        public override bool SupportsSearch
        {
            //Yes, we will enable searching for users
            get { return true; }
        }
        #endregion
The next two methods tell SharePoint what type of data we are going to return. We will return the user’s email address as a string.
         protected override void FillClaimTypes(List<string> claimTypes)
        {
            if (claimTypes == null)
                  throw new ArgumentNullException("claimTypes");

              // Add our claim type.
              claimTypes.Add(LDAPClaimType);
        }

        protected override void FillClaimValueTypes(List<string> claimValueTypes)
        {
             if (claimValueTypes == null)
                 throw new ArgumentNullException("claimValueTypes");

            // Add our claim value type.
            claimValueTypes.Add(LDAPClaimValueType);
        }
The next method tells SharePoint what type of entity types we are returning. We will return claims that uniquely identify a user.
             protected override void FillEntityTypes(List<string> entityTypes)
        {
            if (null == entityTypes)
             {
                 throw new ArgumentNullException("entityTypes");
             }
             entityTypes.Add(SPClaimEntityTypes.User);
        }
Once we have gotten the basics out of the way, we are left with 3 methods to implement. The first is called FillSearch, which populates the search results. This method becomes ridiculously easy to implement because we separated out data entities in a separate class. The FillSearch method is called when we type a partial name and hit the search button to display a list of results. In this case we call our LDAPHelper.Search method which allows us to do a partial match on multiple values.
         protected override void FillSearch(Uri context, string[] entityTypes, string searchPattern,
                string hierarchyNodeID, int maxCount,
            SharePoint.WebControls.SPProviderHierarchyTree searchTree)
        {
            if (!EntityTypesContain(entityTypes, SPClaimEntityTypes.FormsRole))
            {
                return;
            }

            List<LDAPUser> users = LDAPHelper.Search(searchPattern);
            foreach (var user in users)
            {
                PickerEntity entity = GetPickerEntity(user);
                searchTree.AddEntity(entity);
            }
        }
We use a custom method called GetPickerEntity, we’ll see the details of that method in a minute, but let’s take a look at the last two methods that provide validation for the item we select. Here we use our LDAPHelper.FindExact method to find a single match.
         protected override void FillResolve(Uri context, string[] entityTypes,
                SPClaim resolveInput, List<SharePoint.WebControls.PickerEntity> resolved)
        {
            FillResolve(context, entityTypes, resolveInput.Value, resolved);
        }

        protected override void FillResolve(Uri context, string[] entityTypes,
                string resolveInput, List<SharePoint.WebControls.PickerEntity> resolved)
        {
            LDAPUser user = LDAPHelper.FindExact(resolveInput);
            if (null != user)
            {
                PickerEntity entity = GetPickerEntity(user);
                resolved.Add(entity);
            }
        }
In both the FillSearch and FillResolve methods, we call a custom method “GetPickerEntity”. This method performs the task of adding the results to the people picker, which is the control that you interact with when adding users or groups to SharePoint.
         private PickerEntity GetPickerEntity(LDAPUser user)
        {
            PickerEntity entity = CreatePickerEntity();
            entity.Claim = new SPClaim(LDAPClaimType, user.Mail, LDAPClaimValueType,
                    SPOriginalIssuers.Format(SPOriginalIssuerType.TrustedProvider, SPTrustedIdentityTokenIssuerName));
            entity.Description = user.DisplayName;
            entity.DisplayText = user.DisplayName;
            entity.EntityData[PeopleEditorEntityDataKeys.DisplayName] = user.DisplayName;
            entity.EntityData[PeopleEditorEntityDataKeys.Email] = user.Mail;
            entity.EntityData[PeopleEditorEntityDataKeys.AccountName] = user.sAMAccountName;
            entity.EntityType = SPClaimEntityTypes.User;
            entity.IsResolved = true;
            return entity;
        }
We are issuing identity claims in this scenario, so we use the SPClaim constructor to create the claim as discussed in Replacing the out of box Name Resolution in SharePoint 2010 - Part 2. To make sure we use the correct claims encoded value, we add the SPTrustedIdentityTokenIssuerName to the claim. We then add a few properties such as the display name, email, and account name so that the people picker will display them, and return the resolved entity.
There are a few other methods that we implement from the abstract class that I point out the fact they are not implemented within a region.
         #region Not Implemented
        protected override void FillClaimsForEntity(Uri context, SPClaim entity, List<SPClaim> claims)
        {
            throw new NotImplementedException();
        }

        protected override void FillHierarchy(Uri context, string[] entityTypes, string hierarchyNodeID,
                int numberOfLevels, SharePoint.WebControls.SPProviderHierarchyTree hierarchy)
        {
            throw new NotImplementedException();
        }

        protected override void FillSchema(SharePoint.WebControls.SPProviderSchema schema)
        {
            throw new NotImplementedException();
        }
        #endregion
Deploying the Claim Provider
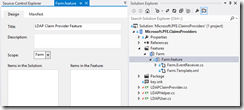
In order to deploy the claim provider, we need to register the claim provider using a feature receiver. Add a new farm-scoped feature to the class and add a feature receiver to the feature.
Next, change the type that it derives from to SPClaimProviderFeatureReceiver and fill in the data for the properties.
 using System;
using System.Runtime.InteropServices;
using System.Security.Permissions;
using Microsoft.SharePoint;
using Microsoft.SharePoint.Administration.Claims;

namespace Microsoft.PFE.ClaimsProviders.Features.Farm
{
    [Guid("fa2cc96b-68f5-4428-9812-9ade4033e41a")]
    public class FarmEventReceiver : SPClaimProviderFeatureReceiver
    {
        public override string ClaimProviderAssembly
        {
            get { return typeof(LDAPClaimProvider).Assembly.FullName; }
        }

        public override string ClaimProviderDescription
        {
            get { return "LDAP claim provider sample provider written by Kirk Evans"; }
        }

        public override string ClaimProviderDisplayName
        {
            get { return LDAPClaimProvider.ProviderDisplayName; }
        }

        public override string ClaimProviderType
        {
            get { return typeof(LDAPClaimProvider).FullName; }
        }

    }
}
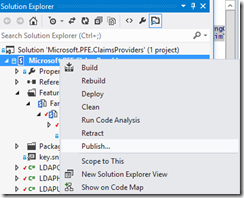
Next, right-click on the project node in Solution Explorer and choose Publish to create a WSP.
Once you have the WSP, use some PowerShell to register the solution and install it. The feature should automatically register the claim provider.
 Add-SPSolution -LiteralPath C:\temp\Microsoft.PFE.ClaimsProviders.wsp
Install-SPSolution microsoft.pfe.claimsproviders.wsp  -GACDeployment -Force
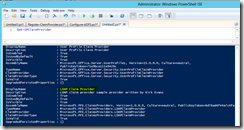
This might take a minute to deploy, but once it is done you should be able to confirm that the claim provider now appears in the list of claim providers when you use Get-SPClaimProvider.
The last step is to register your claim provider as the default for the SPTrustedIdentityTokenIssuer.
 $ap = Get-SPTrustedIdentityTokenIssuer "ADFS SAML Provider"
$ap.ClaimProviderName = "LDAPClaimProvider"
$ap.Update()
This step is necessary because it will allow us to override the claims issued by this provider, otherwise we would issue duplicate claims and get some weird errors in SharePoint about users not being unique.
What’s The Payoff?
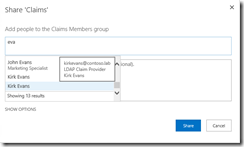
Thanks for sticking around this long ![]() The payoff here is that the people picker will now validate any text we enter in the people picker control, and we can select from a set of results that display information about users. When I search for “Eva”, my LDAPHelper.Search method is called that looks for users that have a partial match on email, first name, last name, or account name. This particular search matches on last name to find an entry for Kirk Evans.
The payoff here is that the people picker will now validate any text we enter in the people picker control, and we can select from a set of results that display information about users. When I search for “Eva”, my LDAPHelper.Search method is called that looks for users that have a partial match on email, first name, last name, or account name. This particular search matches on last name to find an entry for Kirk Evans.
Notice that there are two results, one for my LDAP Claim Provider, the other entry is for Active Directory. I have both types of authentication enabled for this zone. If you want to see how to enable a claim provider for a particular zone, see Steve Peschka’s blog on Configuring a Custom Claims Provider to be Used only on Select Zones in SharePoint 2010.
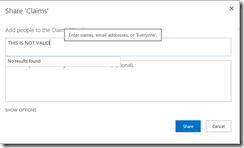
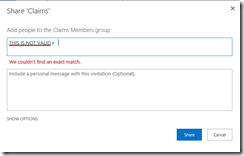
Even better, though, is that now when we type “THIS IS NOT VALID”, we see that the results do not match anything.
This happens because our claim provider validates the list of entries in FillResolve to look for an exact match.
Looking For a Pre-Built Solution?
The purpose of this post was to introduce you to how claims work and show you how you can build a custom solution for yourself. However, as I was writing this code and showing it to a friend, he mentioned that there is a CodePlex solution that does something quite similar to this, and they had made it much more configurable. I took a look, and holy smokes the guys who wrote LDAP/AD Claims Provider for SharePoint 2013 did a great job, including writing application pages for it. The purpose of my blog has always been to introduce you to concepts, but if you want a solution that is mostly done for you then go download and evaluate this solution.
For More Information
Writing a Custom Claims Provider for SharePoint 2010 - Part 2: Adding Support for Hierarchy Nodes
Writing a Custom Claims Provider for SharePoint 2010 - Part 3: Searching Claims
Writing a Custom Claims Provider for SharePoint 2010 - Part 4: Supporting Resolve Name
Replacing the out of box Name Resolution in SharePoint 2010 - Part 2
