Code-Behind Page Layouts with Visual Studio 2010
This post shows how to create content types and page layouts with Visual Studio 2010. In Part 1, I introduced the concept of content types and page layouts using SharePoint Designer. In this post, I will show how to accomplish the same tasks with Visual Studio 2010, and will show how community tools like CKS:Dev make this even easier.
I have been working on a business problem for a customer this week. We need to have users visit and accept a Terms & Conditions page before they visit content on the site. Not only does this imply the users will read the content on the page, but the legal department needs to be able to quickly and easily edit the page content as the terms & conditions change over time. This is a perfect use for a publishing page.
Export a Content Type from SharePoint
Visual Studio 2010 does not provide a graphical designer to create a content type, instead you edit an XML file. Instead of editing the XML file by hand, it is much easier to just create the content type using SharePoint Designer 2010 or the web UI and then export the content type using a tool. Following the steps in Part 1, I created the content type in SharePoint. Once you have created the content type, there are a few ways to export it. The easiest that I know of is to use AC’s WCM Custom Commands for STSADM.EXE. To install, you just add the WSP to the solution store and deploy it (directions are on the linked blog post). Once deployed, go to the command line and type:
STSADM.EXE -o GenContentTypesXml -url https://team -outputFile "c:\contentTypes.xml" -excludeParentFields
Then open your file and find the content type you created.
Create the Content Type in Visual Studio 2010
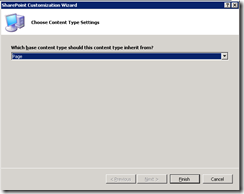
Open Visual Studio 2010 and create a new SharePoint 2010 project. We will use a farm solution, because there will be a few things in future posts that will require a farm solution, such as edits to web.config. Add a new content type to the project, and choose the Page content type to inherit from.
In the previous step, you generated an XML file based on an existing content type. Open that file and copy the contents of the FieldRefs section and paste into the FieldRefs section of your content type in Visual Studio 2010. My content type now looks like the following:
 <?xml version="1.0" encoding="utf-8"?>
<Elements xmlns="https://schemas.microsoft.com/sharepoint/">
  <!-- Parent ContentType: Page (0x010100C568DB52D9D0A14D9B2FDCC96666E9F2007948130EC3DB064584E219954237AF39) -->
  <ContentType ID="0x010100C568DB52D9D0A14D9B2FDCC96666E9F2007948130EC3DB064584E219954237AF390035e07eba31844ff5bd10e36808ad5efd"
               Name="TermsAndConditionsType"
               Group="Custom Content Types"
               Description="Terms and Conditions"
               Inherits="TRUE"
               Version="0">
    <FieldRefs>
      <FieldRef ID="{f55c4d88-1f2e-4ad9-aaa8-819af4ee7ee8}"
                Name="PublishingPageContent" />
    </FieldRefs>
  </ContentType>
</Elements>
Note that the content type ID is different than it was in the picture above, this is because Visual Studio is generating a new content type.
Create the Page Layout
Once the Content Type is created in Visual Studio, deploy the solution to your SharePoint server. The reason why is because you want the content type to exist on the server using the same ID as the one in Visual Studio, which won’t match the one that already exists on the server.
Note: The content type that you are defining in Visual Studio 2010 has a different content type ID than the one that you created in SharePoint. You can copy the content type ID from SharePoint into your definition in Visual Studio 2010 if you like.
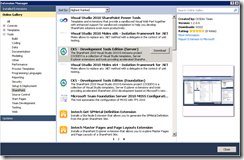
Once it is deployed, you can create a Page Layout using SharePoint Designer 2010. I like this approach because it provides a WYSIWYG designer, where SharePoint 2010 does not have a designer to create a page layout. Once you create the page layout, copy the contents to Visual Studio (explained in the next section). Another option is to use the CKS – Development Tools Edition (Server) tools, which are a free add-on you can find in the Visual Studio 2010 extension manager:
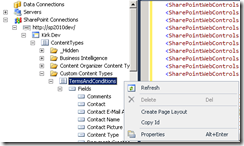
Install the tools, and they add a bunch of new capabilities for SharePoint 2010 development. For instance, you can now right-click a content type and choose “Create Page Layout”.
Once the page layout is created, it’s easy to edit the HTML just as you would any ASP.NET page.
Deploying the Page Layout in Visual Studio 2010
The next step is to deploy the page layout. There are tools for branding in CKS:Dev, but none specific to creating a page layout, so we’ll walk through how to do this using a Module. In Visual Studio 2010, add a new Module to the project and call it “PageLayoutsModule”. It generates a file called Sample.txt, which we will rename to “TermsPageLayout.aspx”. Then copy the HTML for your page layout into this file.
Another file is created called Elements.xml. Open that file, and edit with the following:
 <?xml version="1.0" encoding="utf-8"?>
<Elements xmlns="https://schemas.microsoft.com/sharepoint/">
  <Module Name="PageLayoutsModule"
          Url="_catalogs/masterpage">
    <File Path="PageLayoutsModule\TermsPageLayout.aspx"
          Url="TermsPageLayout.aspx"
          Type="GhostableInLibrary">
      <Property Name="ContentType"
                Value="$Resources:cmscore,contenttype_pagelayout_name;"/>
      <Property Name="PublishingAssociatedContentType"
                Value=";#TermsAndConditionsType;#0x010100C568DB52D9D0A14D9B2FDCC96666E9F2007948130EC3DB064584E219954237AF390035e07eba31844ff5bd10e36808ad5efd;#"/>
      <Property Name="Title"
                Value="Terms and Conditions Page"/>
    </File>
  </Module>
</Elements>
Replace the really long string that starts with 0x010100 with the content type ID defined in Visual Studio, taking care to leave the trailing “;#” at the end of the attribute value. These two content type IDs must match for your solution to work.
Adding Code Behind to the Page Layout
A really cool capability of page layouts is that you can code them just like any ASP.NET page, including server-side code. In the same folder as your .ASPX (in the Module folder), add a new class with the file name “TermsPageLayout.aspx.cs”. The body of that file looks like the following:
 using System;
using System.Collections.Generic;
using System.Linq;
using System.Text;
using System.Web.UI.WebControls;
using System.Web;

namespace TermsAndConditions
{
    [CLSCompliant(false)]
    public class TermsLayout : Microsoft.SharePoint.Publishing.PublishingLayoutPage
    {
        protected Button Button1;
        protected Button Button2;
        protected Label Label1;
        protected Label Label2;

        protected void Page_Load(object sender, EventArgs e)
        {
            if (null != Request.Cookies["TandC"])
            {
                Label2.Text = Request.Cookies["TandC"].Value;
            }
        }

        protected void AcceptButton_Click(object sender, EventArgs e)
        {
            //Write a cookie that indicates the user accepted
            HttpCookie cookie = new HttpCookie("TandC");
            cookie.Value = "Accepted";

            //The cookie is good for 5 years, or until the
            //page is updated.
            cookie.Expires = System.DateTime.Now.AddYears(5);

            Response.Cookies.Add(cookie);
        }


        protected void DeclineButton_Click(object sender, EventArgs e)
        {
            //Log that the user declined
        }

    }
}
This is a simplified version of what I did for my customer. If the user clicks the “Accept” button in the page layout, we use the same code we would in any ASP.NET project to create a cookie. Our updated code for the page layout defined in TermsPageLayout.aspx becomes:
 <%@ Assembly Name="$SharePoint.Project.AssemblyFullName$" %>
<%@ Page language="C#"   Inherits="TermsAndConditions.TermsLayout, $SharePoint.Project.AssemblyFullName$"  %>
<%@ Register Tagprefix="SharePointWebControls" Namespace="Microsoft.SharePoint.WebControls" Assembly="Microsoft.SharePoint, Version=12.0.0.0, Culture=neutral, PublicKeyToken=71e9bce111e9429c" %>
<%@ Register Tagprefix="WebPartPages" Namespace="Microsoft.SharePoint.WebPartPages" Assembly="Microsoft.SharePoint, Version=12.0.0.0, Culture=neutral, PublicKeyToken=71e9bce111e9429c" %>
<%@ Register Tagprefix="PublishingWebControls" Namespace="Microsoft.SharePoint.Publishing.WebControls" Assembly="Microsoft.SharePoint.Publishing, Version=12.0.0.0, Culture=neutral, PublicKeyToken=71e9bce111e9429c" %>
<%@ Register Tagprefix="PublishingNavigation" Namespace="Microsoft.SharePoint.Publishing.Navigation" Assembly="Microsoft.SharePoint.Publishing, Version=12.0.0.0, Culture=neutral, PublicKeyToken=71e9bce111e9429c" %>

<asp:Content ContentPlaceholderID="PlaceHolderPageTitle" runat="server">
    <SharePointWebControls:FieldValue id="PageTitle" FieldName="Title" runat="server"/>
</asp:Content>

<asp:Content ContentPlaceholderID="PlaceHolderMain" runat="server">

    <PublishingWebControls:EditModePanel runat="server" id="EditModePanel1" PageDisplayMode="Display">
        <SharePointWebControls:FieldValue FieldName="PublishingPageContent" runat="server"/>
        <br/>
        <asp:Button runat="server" Text="ACCEPT" id="Button1" OnClick="AcceptButton_Click"></asp:Button>
        <asp:Button runat="server" Text="DECLINE" id="Button2" OnClick="DeclineButton_Click"></asp:Button>
    </PublishingWebControls:EditModePanel>

    <PublishingWebControls:EditModePanel runat="server" id="EditModePanel2" PageDisplayMode="Edit">
        <PublishingWebControls:RichHtmlField FieldName="PublishingPageContent" runat="server" id="RichHtmlField1"/>
    </PublishingWebControls:EditModePanel>

    <div>Server Version: <asp:Label runat="server" id="Label1" /></div>
    <div>Cookie Version: <asp:Label runat="server" id="Label2" /></div>
</asp:Content>
Notice the placeholder $SharePoint.Project.AssemblyFullName$ that is used twice. The compiler will automatically replace this with the 4-part name of our assembly.
Adding SafeControls
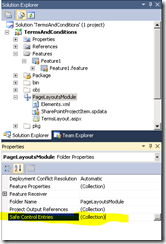
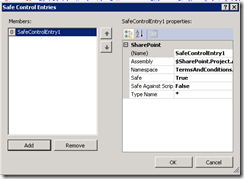
We need to tell SharePoint that it’s OK for our page layout to have code-behind, we’ll do that by adding SafeControls entries to web.config. To do this, click on the Module in Visual Studio 2010 and select the Safe Control Entries option in the Properties pane:
That will bring up a new window that makes it easy to define a new safecontrol entry.
Scoping Features
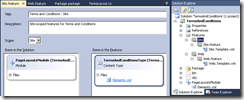
The content type will be deployed to the site collection, while the page layout is deployed to the master page gallery in a single web. Therefore, we need two separate features scoped differently. Right-click the Features node in the project explorer and choose “Add Feature”. I like to name the features similar to how I will deploy them, making it easier to keep track while I am developing them. Here is our new web-scoped feature that contains the module that deploys the page layout.
Similarly, the site-scoped feature deploys the content type.
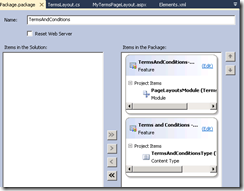
The package designer now looks like:
Using the new Page Layout
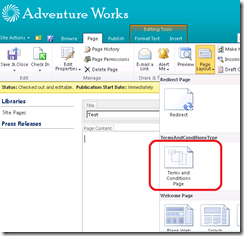
The final step is to create a new page. Create a new page called “Terms”. In the ribbon, click the Page tab and change the Page Layout to our Terms and Conditions page layout.
Enter some values for the page in the provided text fields, and hit save.
Stay tuned for more posts in this series, as there are some really cool things you can do to enhance this solution. The code for this solution is attached to the post.

