Creating a Delete Without Recycling Feature for List Items in SharePoint 2007
In my last post, I talked about errors you might encounter while trying to empty the second stage recycle bin with SharePoint 2007. My customer encountered this problem partially because a single site deletes upwards of 2,000 items per day. They saw items in the second stage recycle bin that were 8 months old and there were nearly 1 million items in the second stage recycle bin. The items could be deleted manually one at a time, but there was no way to bulk delete the items using the SharePoint web user interface. That’s why we came up with a PowerShell script to delete items from the second stage recycle bin.
Note that this problem does not exist for SharePoint 2010.
I also talked about ways you could avoid having an oversized recycle bin. For instance, you can turn off the second stage recycle bin, which affects all site collections within the web application and purges the second stage recycle bin immediately. While this is a good way to empty a problematic recycle bin, it may affect other users within the web application.
There is yet another way to address the problem besides cleaning up after the problem has occurred. The SPListItem class has two methods for deleting items:
- Recycle() – delete the item and send it to the recycle bin
- Delete() – delete the item from the content database
This is useful because calling Delete on an SPListItem will immediately delete the item from the content database. We can add a new icon to the edit and control block for a list item.
Creating the Feature with Visual Studio 2008 and VSeWSS 1.3
I am going to use a pattern nearly identical to the one I used to expose a list as JSON. We will add a custom action to the list item’s edit control block. That custom action will pass the list ID and item ID to a HttpHandler that calles SPListItem.Delete(). It will then redirect back to the default view of the list once the delete operation is successful.
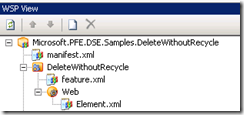
Create a new Empty SharePoint project using Visual Studio 2008 and VSeWSS 1.3. Open the WSPView window and add a new feature by clicking the white document icon.
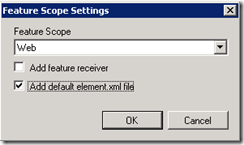
That will pop open a dialog asking what scope you want the feature placed in. We want Web scope so that our new menu item will apply to all lists of a certain type only within a single web site, giving us the ability to turn it on for individual sites. Also make sure to check the “Add default element.xml file” option because we will put our custom action in that file.
That creates a feature named Feature1. You can use F2 to rename the feature to something more meaningful in the WSPView window. I like to rename the feature folder to match the name of the scope (WebApplication, Farm, Site, Web) so that I can move all items of the same scope together and reduce the number of features.
Now, open the Element.xml file to make some edits.
<?xml version="1.0" encoding="utf-8"?>
<Elements Id="119b312b-c028-4214-ba9b-9a724b7ed5e2"
xmlns="https://schemas.microsoft.com/sharepoint/" >
<CustomAction
Id="DeleteWithoutRecycle"
Description="Delete the item without sending to the recycle bin"
RegistrationType="List"
RegistrationId="104"
Location="EditControlBlock"
Sequence="106"
Title="Delete without recycling">
<UrlAction Url="{SiteUrl}/_layouts/DeleteWithoutRecycle/DeleteWithoutRecycleHandler.ashx?ListID={ListId}&ItemId={ItemId}"/>
</CustomAction>
</Elements>
The RegistrationType means that the custom action applies to a List, and the Location attribute tells SharePoint’s feature framework that the custom action will be added to a list item’s EditControlBlock. The RegistrationId attribute tells SharePoint that the custom action is added to all lists with a specific list template id. Our ID of 104 means that this new menu item applies to any Announcements list.
The UrlAction element tells SharePoint where to go when the item is clicked. We will need to create the file and its code-behind in the next step. Notice the token placeholders for the UrlAction, we use these rather than trying to hard-code the path (remember that our feature will be applied to many different individual web sites). We pass the ListId and the ItemId of the current item to the page.
Create the HttpHandler
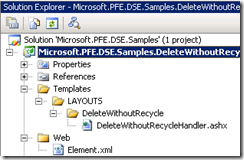
In the Solution Explorer pane of Visual Studio 2008, add a new Template item to the project. Delete the TemplateFile.txt sample file that is generated. The Templates folder corresponds to the “C:\Program Files\Common Files\Microsoft Shared\Web Server Extensions\12\TEMPLATE” directory on your server. Add a new folder LAYOUTS and another child folder “DeleteWithoutRecycle” to the project. Add a new file and name it “DeleteWithoutRecycleHandler.ashx”.
Edit the DeleteWithoutRecycleHandler.ashx file and add the following markup in it.
 <%@ WebHandler Class="Microsoft.PFE.DSE.Samples.DeleteWithoutRecycle.DeleteWithoutRecycleHandler,
 Microsoft.PFE.DSE.Samples.DeleteWithoutRecycle, Version=1.0.0.0, Culture=neutral,
PublicKeyToken=ae2d12eb8ab02fb7"%>
Watch for line breaks, that is one single line of text. You also need to replace the PublicKeyToken with the appropriate public key for your assembly. Open a Visual Studio command prompt and change directory to your project’s bin directory. Use the following command to determine your assembly’s public key.
sn.exe -Tp Microsoft.PFE.DSE.Samples.DeleteWithoutRecycle.dll
Add a new class to your project, this will be the implementation of the IHttpHandler interface that the DeleteWithoutRecycleHandler.ashx refers to.
 using System;
using Microsoft.SharePoint;
using System.Web;
using System.IO;

namespace Microsoft.PFE.DSE.Samples.DeleteWithoutRecycle
{
    public class DeleteWithoutRecycleHandler : IHttpHandler
    {
        #region IHttpHandler Members

        public bool IsReusable
        {
            get { return false; }
        }

        public void ProcessRequest(HttpContext context)
        {
            string listIDFromUrl = context.Request.QueryString["ListID"];
            string itemIDFromUrl = context.Request.QueryString["ItemID"];

            if (string.IsNullOrEmpty(listIDFromUrl))
            {
                throw new ArgumentNullException("ListID","The ListID must be specified to use the DeleteWithoutRecycle feature");
            }
            if (string.IsNullOrEmpty(itemIDFromUrl))
            {
                throw new ArgumentNullException("ItemID","The ItemID must be specified to use the DeleteWithoutRecycle feature");
            }

            int itemId = default(int);

            if (!int.TryParse(itemIDFromUrl, out itemId))
            {
                throw new ArgumentException("ItemID", "The ItemID is in an incorrect format and cannot be parsed to use with the DeleteWithoutRecycle feature.  This value should be an integer.");
            }

            StringWriter writer = new StringWriter();
            context.Server.UrlDecode(listIDFromUrl, writer);
            Guid listID = new Guid(writer.ToString());

            SPWeb web = SPContext.Current.Web;

            SPList list = web.Lists[listID];
            SPListItem item = list.GetItemById(itemId);

            try
            {
                web.AllowUnsafeUpdates = true;
                item.Delete();
            }
            finally
            {
                web.AllowUnsafeUpdates = false;
            }

            context.Response.Redirect(list.DefaultViewUrl);

        }

        #endregion
    }
}
The code is pretty simple, we get the ListID and ItemID from the QueryString then call the item.Delete() method. We have to make sure to add the AllowUnsafeUpdates setting because delete operations are not allowed for HTTP GET requests. Since we are setting AllowUnsafeUpdates, we have to make sure to disable it again in the Finally block.
Once the delete is successful, we redirect back to the default view of the list. You may want to modify the solution to pass the current page to the IHttpHandler so that it can redirect back. To do this, see Jan Tielens’ post, Using the Current Page URL in the UrlAction of a SharePoint Feature.
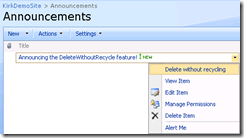
The result of our hard work is here:
When we click that item, we are redirected to the ASHX handler, the item is deleted, and we are redirected back to the default view of our list. The sample file is attached to the post, feel free to download and explore.
Resources
Consuming SharePoint Lists via AJAX
Reserved List Template (ServerTemplate) IDs – SharePointDevWiki
UrlAction Tokens of the CustomAction Feature
Using the Current Page URL in the UrlAction of a SharePoint Feature


