Embedding Flash Video in SharePoint Blogs
For SharePoint 2007, there was a nice project called Enhanced Rich Text for SharePoint Extended. Unfortunately, this solution does not work for SharePoint 2010 due to the ribbon enhancements. I needed something to work quickly, and since I am not allowed to download and review GPL licensed code (ERTE is licensed GPL), I cracked open Visual Studio 2010 and put something together rather quickly that I think might benefit others.
What I came up with is the ability to copy Embed code from sites like YouTube or Vimeo and paste it directly into the rich text editor. I could have gotten fancier with this, but this suits my needs.
This solution is based on the solution posted by the SharePoint Designer team, “Video Blogging with JavaScript and the Media Web Part.” I like that solution, especially when you can leverage the new Asset Library in SharePoint to upload your videos to for playing in Silverlight. However, it does not work for embedding Flash videos from YouTube.
Step 1: Download Resources
- Download jQuery. I used version 1.4.1 for my example.
- Download SWFObject from Google code.
- Download videoBlog2.js from this post’s attachments. I am not going to cover what this script does in this post, for an overview see Video Blogging with JavaScript and the Media Web Part. I have made several changes to it that I will explain in this post.
Step 2: Create a new SharePoint 2010 Project in Visual Studio 2010
Create a new Empty SharePoint 2010 project in Visual Studio 2010. I chose to add files to the layouts directory, so I cannot use the Sandboxed Solution option here, I chose to use a Farm solution.
Right-click the project node and add a new SharePoint “Layouts” mapped folder as shown in the screenshot below. This creates a new folder where we will add our JavaScript files.
Add the downloaded files to this folder.
This is how we will deploy the script files to the server. Once deployed, we will reference them from our Master Page.
Step 3: Add an Event Receiver
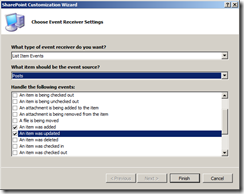
Right-click the project node and add a new item. Choose the Event Receiver project item template. I named mine “BlogReceiver”, but the name is up to you.
You are then prompted to choose which list and the events for the list. Choose the Posts list, and check the “Item was Added” and “Item was Updated" options.
The code here is very easy to read. Since we are posting HTML into the rich text edit box, it is automatically escaped. That means that “<” becomes “<”, “>” becomes “>”, etc. These values are present in the post when it is first created, but stripped when the text is rendered. My very simple regular expression finds an occurrence of the escaped <object> tag in the posted value, strips the src attribute from it, and replaces it with a token placeholder.
The custom ReplaceEmbedsWithTokens method will replace the <object> tag in the post with a wiki-style token:
[[BLOGVIDEO:url of video]]
When the post is rendered, it contains this token placeholder, and the JavaScript will then convert that on the fly to a Flash object. Here is the server-side code:
using System;
using Microsoft.SharePoint;
using System.Text.RegularExpressions;
namespace EmbeddingDemo.BlogReceiver
{
/// <summary>
/// List Item Events
/// </summary>
public class BlogReceiver : SPItemEventReceiver
{
/// <summary>
/// An item was added.
/// </summary>
public override void ItemAdded(SPItemEventProperties properties)
{
SPWeb site = properties.Web;
SPList list = site.Lists[properties.ListId];
SPListItem item = list.GetItemById(properties.ListItemId);
SPField bodyField = item.Fields["Body"];
string body = item[bodyField.Id].ToString();
body = ReplaceEmbedsWithTokens(body);
item[bodyField.Id] = body;
EventFiringEnabled = false;
item.SystemUpdate();
EventFiringEnabled = true;
base.ItemAdded(properties);
}
/// <summary>
/// An item was updated.
/// </summary>
public override void ItemUpdated(SPItemEventProperties properties)
{
SPWeb site = properties.Web;
SPList list = site.Lists[properties.ListId];
SPListItem item = list.GetItemById(properties.ListItemId);
SPField bodyField = item.Fields["Body"];
string body = item[bodyField.Id].ToString();
body = ReplaceEmbedsWithTokens(body);
item[bodyField.Id] = body;
EventFiringEnabled = false;
item.SystemUpdate();
EventFiringEnabled = true;
base.ItemUpdated(properties);
}
private string ReplaceEmbedsWithTokens(string body)
{
Regex rx = new Regex("(<object).*?(<embed src=")(?<src>.*?)(")(.*?)(</object>)");
return rx.Replace(body, "[[BLOGVIDEO: ${src}]]");
}
}
}
Step 4: Update the BlogVideo2.js file
I downloaded the original BlogVideo.js file from the SharePoint Designer team’s blog post and then made modifications. The first modification was the addition of a jQuery handler that fires the script using $(document).ready(function()); The next modification was to remove the extra script that adds links for uploading a video, I didn’t need them for this demo. I also changed the regular expression to use the wiki style token.
The original solution replaced the token placeholder with a Silverlight media player that points to a video in the Assets Library. It’s a very cool solution, and I highly recommend looking at it and seeing how you can merge these two solutions together. Rather than posting the entire contents of the file here, I will point out the two lines of code that were changed.
entryContent = entryContent.replace(/\[\[BLOGVIDEO:\s*(.*)\]\]/gi,
function (m) { return getHolderCode(m) });
if (matched.match(/\[\[BLOGVIDEO:\s*(.*)\]\]/i)) vidURL = RegExp.lastParen;
The biggest change is the insertVideo function, where we replace the Silverlight code with a call to swfobject.embedSWF() . You will need to separately download swfObject.js, but the blogVideo2.js script is included with this post. Here is the relevant change:
//inserts a media web part with given video into a given video holder div function insertVideo(videoHolder, videoURL) { swfobject.embedSWF(videoURL, videoHolder.id, "300", "120", "9.0.0"); }
Our code is now complete, we have a WSP solution that packages the scripts and deploys them, along with an event receiver that replaces the object and embed tags with a token placeholder.
Step 5: Update the Master Page
This is the easiest step. Open SharePoint Designer 2010, open your blog site, and click the Master Pages node. Make a copy of the v4.master (so that you can easily revert your changes later if you so choose). Right-click the new master page and choose “Set as Default” and “Set as Custom” options, then open the file for edit in advanced mode.
At around line 39, you should see the asp:ScriptManager control in the markup. You can add new scripts to be downloaded with the page by adding them to this control. Change the script manager to look like this:
   <asp:ScriptManager id="ScriptManager" runat="server" EnablePageMethods="false" EnablePartialRendering="true" EnableScriptGlobalization="false" EnableScriptLocalization="true">
      <Scripts>
        <asp:ScriptReference Path="https://spdev/sites/rrd/Blog/_layouts/msdn.sharepoint.blogembed/jquery-1.4.1.js"/>
        <asp:ScriptReference Path="https://spdev/sites/rrd/Blog/_layouts/msdn.sharepoint.blogembed/swfobject.js"/>
          <asp:ScriptReference Path="https://spdev/sites/rrd/Blog/_layouts/msdn.sharepoint.blogembed/videoBlog2.js"/>
      </Scripts>
  </asp:ScriptManager>
For reference, here is a screen shot.
Step 6: Test it Out
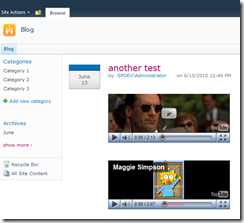
On your blog site, create a new blog entry. Go to YouTube or Vimeo, find a video, and copy the embed code directly into the rich text edit box (don’t put this in the HTML source). Publish the post. The embed code will be escaped by the rich text edit box, processed on the server and changed to a token placeholder, and then processed by JavaScript to dynamically create the Flash object. See the screen shot below.
For More Information
- jQuery – downloads and documentation on jQuery
- SWFObject – the script used to create the Flash object
- Video Blogging with JavaScript and the Media Web Part – the original version of this solution that leverages Silverlight and the Media Asset Library in SharePoint 2010.


