Testing Power BI Report Server Setup using Azure DevTestLabs and Visual Studio Team Services (VSTS)
One of the cool things about working in Microsoft is that we have plenty of resources as internal as externals to solve the engineering problem. With the new setup for the Power BI Report Server we have the option to use our traditional test system or try something new, Azure DevTest Labs offer some of the features that are attractive for this type of end to end testing
- Quick provision of fresh new machines to install the product
- Automatic expiration of lab machines
- Integration with Visual Studio Team Services (VSTS)
- Secret management (integration with KeyVault)
DevTestLabs offer more features that we might use in the future.
The workflow is:
- A download path for the to the latest build of PowerBIReportServer.exe is commited to the Git repo where the setup tests code is.
- The build process starts (as part of the VSTS continuous integration configuration), builds the test bits and download the setup file
- A new machine is created in DevTestLabs (with SQL Server Engine and configured with access from VSTS)
- The tests bits are copied to the machine and tests are executed
The workflow is simple but requires some components that aren’t available natively in VSTS
Setup the machine in DevTestLabs with artifacts
A new DevTestLab environment is created in the Azure Portal the detailed instructions are available in Create a lab in Azure DevTest Labs
The machine image is a simple Windows 2016 Server without anything configured on it, for the additional components DevTestLabs artifacts are used, the artifacts are reusable component to deploy and configure the machine in DevTestLabs.
The artifact for installing SQL Server is available in my Git repo here , you will need to update the placeholder ReplaceWithSQLServerDownloadPath in the InstallSQLServer2016Dev.ps1 with a url where you host your SQL Server 2016 setup bits, the artifact automates the installation of the SQL Server Engine.
The second artifact is the configuration of WinRM which is required to be able to execute commands remotely from VSTS, the artifact called InstallWinRM is available here , it is based in the instructions to Manage a virtual Machine in Azure DevTest Labs from the visualstudio.com documentation (https://www.visualstudio.com/en-us/docs/build/apps/cd/azure/deploy-provision-devtest-lab) and the great blog post from Tarun Aurora https://www.visualstudiogeeks.com/blog/DevOps/Configure-winrm-with-ARM-template-in-AzureDevTestLab-VM-deployment-using-PowerShell-artifact.
Those artifacts are hosted in the team’s internal VSTS repo dedicated to artifacts, to configure the repo follow the instructions to Add a Git repository to store custom artifacts and Azure Resource Manager templates for use in Azure DevTest Labs.
You can test the provision of the new machine creating a new VM in the DevTestLabs, the two new artifacts should show up in the artifacts section

Arm template
For the automation of the process capture the ARM Template for detailed instructions check View and save a virtual machine's Resource Manager template (the sample with the artifacts configured is available here)
There are few elements that are modified from the template provided from the Azure Portal
A new expiration date parameter, it will be used to specify when the machine should be deleted automatically

A new variable of the hostDns with the resource group location and the domain of the machine

Modified parameter in the InstallWinRm artifactto pass the hostDns variable

And finally set the property "disallowPublicIpAddress": false in order to allow every VM to have a public IP address so VSTS can communicate with them using the WinRM port 5986 (if this property is not set the VMs will share the public IP address and will use NAT rules to allow access to the internal ports)

The ARM template should be committed to the same repo where the tests are.
Additional DevTestLab configuration
Use the My Secrets tab in the DevTestLabs to create a password for your VMs, it will create under the covers a KeyVault , check in your list of KeyVault the one with a Secret with the name you just provided, you will need the KeyVault name later for the automation

Visual Studio Team Services (VSTS)
The Variables look like this

There are two new variables added to it the RSSetupCredentials and the VMExpirationDate, those will be used to create the DevTestLab VM, the RSSetupCredentials is marked as secret so it doesn’t show up in the logs, this variables will be set during the Get Password and Expiration Date script in the build tasks
The build tasks look like this

The following task have interesting configuration
Get Password and Expiration Date is a call to an Azure PowerShell Task with the the following content
$expirationDate=(Get-Date).AddDays(2).ToString("yyyy-MM-ddThh:mm:ssZ")
Write-Host "##vso[task.setvariable variable=VmExpirationDate]$expirationDate"
$RsSetupCredentials=(Get-AzureKeyVaultSecret -VaultName 'testlabc1043838' -Name 'rsSetupCredentials').SecretValueText
Write-Host "##vso[task.setvariable variable=RsSetupCredentials]$setupCredentials"It sets the expiration date and the credentials for the VM and make it available for all the other tasks in the build, it gets the password from KeyVault, replace it with the name of the KeyVault from your DevTestLab environment
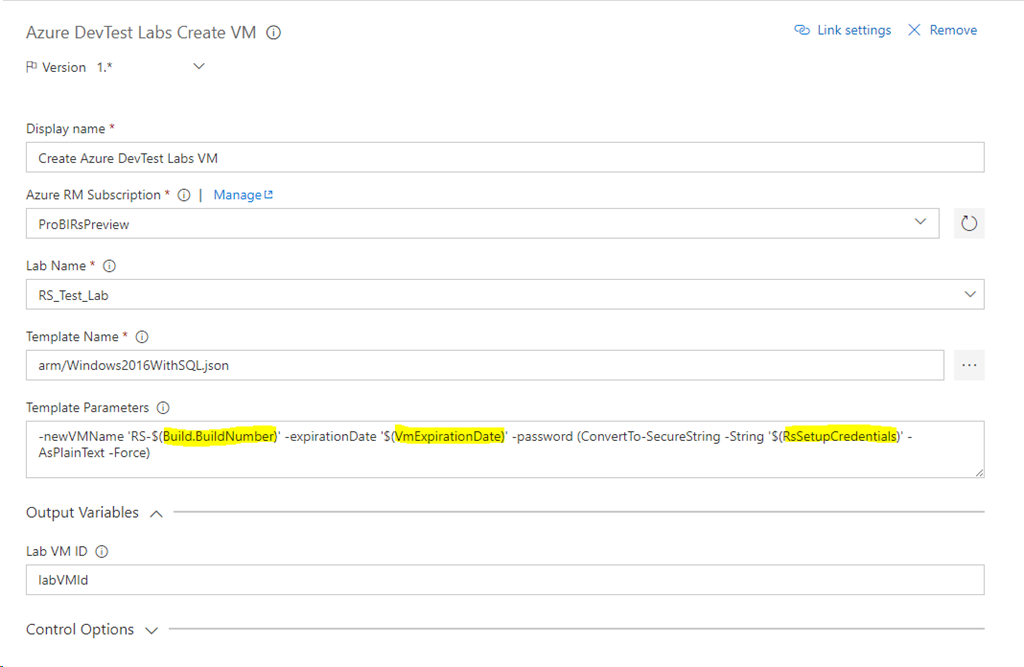
Create Azure DevTest Labs VM
It uses the parameters just created
Important to notice it uses the Build.BuildNumber as the name of the VM so every VM have a unique name, in order to make this work the build name is modified from the default using a dot to a dash $(date:yyyyMMdd)$(rev:.r) to $(date:yyyyMMdd)$(rev:-r) (it is available in the options tab in the build)

Get Lab Machine Parameters is a call to an Azure PowerShell Task with the the following content (the script is taken from Create an Azure RM template)
Param( [string] $labVmId)
$labVmComputeId = (Get-AzureRmResource -Id $labVmId).Properties.ComputeId
# Get lab VM resource group name
$labVmRgName = (Get-AzureRmResource -Id $labVmComputeId).ResourceGroupName# Get the lab VM Name
$labVmName = (Get-AzureRmResource –Id$labVmId).Name
# Get lab VM public IP address
$labVMIpAddress = (Get-AzureRmPublicIpAddress -ResourceGroupName $labVmRgName -Name $labVmName).IpAddress# Get lab VM FQDN
$labVMFqdn = (Get-AzureRmPublicIpAddress -ResourceGroupName $labVmRgName -Name $labVmName).DnsSettings.Fqdn# Set a variable labVmRgName to store the lab VM resource group name
Write-Host "##vso[task.setvariable variable=labVmRgName;]$labVmRgName"# Set a variable labVMIpAddress to store the lab VM Ip address
Write-Host "##vso[task.setvariable variable=labVMIpAddress;]$labVMIpAddress"# Set a variable labVMFqdn to store the lab VM FQDN name
Write-Host "##vso[task.setvariable variable=labVMFqdn;]$labVMFqdn"The most important thing about that script ins the FQDN of the VM that will be used later to deploy the test agent
Deploy Test Agent using the variables created, https and enabling UI tests

Copy Files , it is copying the entire content of the repo from the agent to the VM, it can be changed to copy only the test bits or only the resources needed for your test

Run Tests, executes the test in the remote machine

The final task deletes the machine , it will not be executed in case that any of the test fails so the machine is available for 2 days for investigation.