Using NuGet with TFS Build Automation
In case you aren’t familiar with NuGet, check out this link: https://www.nuget.org
How does NuGet help you with your build automation?
In short, NuGet allows you not to have to check-in all those binaries that you depend on to build and deploy your application. If you use NuGet, it will simply download all the dependencies at build time.
From the link above or from within Visual Studio, you can install NuGet. This will install a Visual Studio plugin that does all the magic. If you want to know more about the magic of NuGet, check out this post by Phil Haack.
A Quick Example:
In this example, I will simply create a project that uses a simple NuGet package (ELMAH) and builds it on a standard build machine. I already have TFS installed with a Build Controller and Agent ready to go.
Note: I am using TFS11 Beta, so any screen shots are subject to change before release. However, everything I am doing should work in Visual Studio 2010 as well.
First, we need to create our sample application.
Here are my steps:
From within Visual Studio, create a new C# Windows Console Application called “SimpleLoggingExample” and add it to source control. (No NuGet stuff yet.)
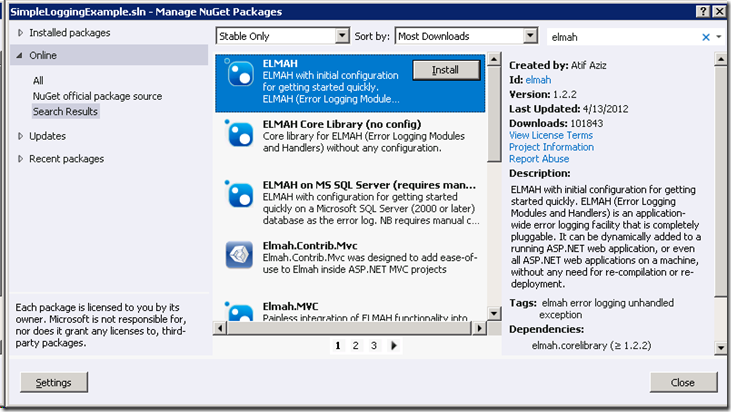
Add the ELMAH NuGet package to our application by right clicking on the solution in Solution Explorer and choosing “Manage NuGet Packages …”. (This dialog is pretty straight forward: click on Online then use the Search box in the upper right corner to find ELMAH).

Now simply click the Install button on the ELMAH package and close the dialog. Now, your solution has the ELMAH package installed and we can start using it.
Go to your Program.cs file and add this code to the Main method:
         static void Main(string[] args)
        {
            Elmah.MemoryErrorLog log = new Elmah.MemoryErrorLog();
            log.Log(new Elmah.Error(new Exception("Hello ELMAH!")));

            List<Elmah.ErrorLogEntry> list = new List<Elmah.ErrorLogEntry>();
            log.GetErrors(0, 100, list);
            foreach (Elmah.ErrorLogEntry err in list)
            {
                Console.WriteLine(err.Error.Exception.Message);
            }
        }
Now save everything and test it, but don’t check-in yet. If you press Ctrl+F5 in Visual Studio, you should get a command window with the output “Hello ELMAH!”.
Now, we need to decide what we want to checkin.
By default, NuGet will add all the files needed to build and run your program to the solution (and source control). If you were to simply check-in everything now, the build would work perfectly and your drop location would include everything you need. However, depending on the NuGet packages that you are using this could lead to a lot of extra files in Source Control that you really don’t want to version. So, how do you avoid checking in all those extra files? It is so simple…
- Right click on the Solution in Solution Explorer
- Click on “Enable NuGet Package Restore”
- Click “Yes” when prompted
- Undo the ‘add’ on the Package folder in your solution
- Go to the Pending Changes window in Visual Studio
- Right click the Packages folder
- Select “Undo”
- Confirm the undo of all the files under that folder.
- Check in the solution from the Pending Changes window (make sure all files are checked/included)
After you finish these steps, you have a solution that can be built on any machine. Simply do a “TF.exe Get” to get the files and then use MSBuild or Visual Studio to build it. Part of the build process will download the package and its dependencies for you!
But how do we get NuGet to work on the build machine?
Simple. The build machine will do the same thing that any of your developers or testers would do, get the files from source control and build them. That’s the beauty of NuGet – it is built into your build system. But, to finish the example, let’s walk through the work you have to do to get this solution to build on your build machine.
- First, with the solution still open in Visual Studio, go to Team Explorer
- In TFS11 Beta, you have to navigate to the Builds page
- Then, click on the “New Build Definition” link
- On the build definition editor window fill in the Build Defaults –> Drop Location (this should be a share usually on the Build Machine itself).
- All the other settings should be automatically filled in because you have the solution open.
- Save the definition
- Go back to the Builds page in Team Explorer
- Right click on the new definition (SimpleLoggingExample) and select “Queue New Build”
- On the Queue Build dialog, click Queue.
This should cause a build to start on your build machine. You can watch the progress of the build from the Builds page or by opening up the build by double clicking on it.
You should notice that it succeeds without any errors. The build machine successfully downloaded the NuGet packages for the build. If you open the drop folder, you can see the evidence of it by the fact that the Elmah.dll assembly is there just as expected. And if you open a command window to this folder, running “SimpleLoggingExample.exe” should work as expected.
Well, that’s it! I was totally surprised by how easy this was to set up and get going. NuGet is definitely changing the way that .net applications are built! And if you are a producer of .net libraries, you may want to consider creating a NuGet package for your library and providing it to the world :)
Happy Building!