WinForms AutoLayout Basics: TableLayoutPanel
So, you are designing a form in Visual Studio and you need the form to size dynamically to its contents. If you try every property on every control you might figure out how to do this. But you would be better off if you had an example. Check out this post and the ones that follow: https://blogs.msdn.com/permanenttan/archive/2006/03/07/545445.aspx. Tan did a lot of the hard work for you. Make sure you thank him :)
But the point of my post is to explain some of the controls and properties that you need to understand before trying this on your own.
Today: TableLayoutPanel
The TableLayoutPanel control is important to understand because every dialog you create will probably use it (once you understand how it works).
Basically, it’s a table with columns and rows. It’s similar to other tables you have used. The key properties are RowCount, ColumnCount, RowStyles, and ColumnStyles. But the TableLayoutPanel also adds properties to any control that resides in it. Those are Row, Column, RowSpan, and ColumnSpan (Cell is also added but is just a wrapper for Row and Column).
RowStyles and ColumnStyles are very similar. A style has a SizeType of AutoSize, Absolute, or Percent. AutoSize will shrink or expand to match its contents. Absolute keeps the row or column set to a fixed size, regardless of the size of the controls in it. Percent keeps the row or column set to a percent of the TableLayoutPanel’s height or width, respectively. Of course, Absolute and Percent require you to specify an amount.
When do you use AutoSize? Absolute? Percent?
Let’s work through an example step by step. I need to create a dialog that allows data entry of a name and a description. The name is a simple text box, but the description is a multi-line text box. The dialog has two buttons: OK and Cancel. It is important that the user be able to size the dialog in both directions and that the description stretch likewise in both directions. Here are the steps:
1. Create a new form in Visual Studio (I am using C#)
2. Set the padding on the form to 12,12,12,12. You may want to change the amount later, but use this for now.
3. Add a TableLayoutPanel to the form. Set Dock to Fill. It starts with two columns and two rows. Now, it’s decision time. Should the labels be on the left or on the top (assuming the language is English)? Should the buttons be at the bottom or on the right? For now I want the labels above the controls and the buttons on the bottom.
4. Keep the columns at two and add 4 more rows. How should you add rows? In the Designer there are two main ways: the Add Row menu item or the Edit Columns and Rows menu item on the Tasks menu of the TLP. For now simply select the Add Row menu four times. Four rows are added to the TLP with Absolute RowStyles (we will fix this later, making any of the rows autosize with nothing in them will cause them to disappear from the designer).
5. In row 0, column 0 put a label. Set the text to “Name:”. Set the Anchor to Left and Right. Set the Margin to 0,0,0,0.
6. In row 1, column 0 put a TextBox. Set the name to “tbName”. Set the Anchor to Left and Right. Set the Margin to 0,5,0,0.
7. In row 2, column 0 put a label. Set the text to “Description:”. Set the Anchor to Left and Right. Set the Margin to 0,6,0,0.
8. In row 3, column 0 put a TextBox. Set the name to “tbDescription”. Set the Anchor to Left, Top, Right and Bottom. Set the Margin to 0,5,0,0. Set MultiLine to True.
9. In row 4, leave it empty.
10. In row 5, column 0 put a button. Set the text to “OK”. Set the name to “buttonOK”. Set the Anchor to Bottom and Right. Set the Margin to 0,0,0,0. Set the DialogResult to OK.
11. In row 5, column 1 put a button. Set the text to “Cancel”. Set the name to “buttonCancel”. Set the Anchor to Bottom and Right. Set the Margin to 6,0,0,0. Set the DialogResult to Cancel.
12. Now that we have our controls in place, we can set the correct RowStyles and ColumnStyles. Select the TLP and choose Edit Columns and Rows from the Tasks menu.
13. It shows the columns by default. The second column is really just there for the Cancel button. We need to make it as small as possible and change the other controls to span across it. Set the style for the second column to AutoSize. This will cause the column to shrink to the width of the Cancel button (the only control in that column). Leave column one alone.
14. In the drop down, select Rows. We want the row that contains the Description text box to expand with the dialog. Set the style for the forth row (row 3 mentioned above) to Percent. We want the row that is empty to be exactly 10 pixels tall. Set the fifth row to Absolute (it should already be that), and set the amout to 10. All other rows should autosize to their contents. Set the first, second, third and sixth rows to AutoSize.
15. Once you click OK, your form should be close to what you want.
16. For the labels and textboxes, set the ColumnSpan to 2. This will cause them to stretch the entire width of the TLP.
17. Finally, let’s finish off the look of the form. Select the form. Set Text to “Edit Item”. Set AcceptButton to buttonOK. Set CancelButton to buttonCancel. Set ShowIcon to false. Set MinimizeBox to false. Set MaximizeBox to false.
Now we have a form to be proud of:
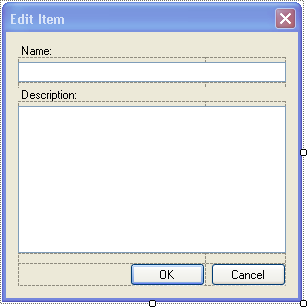
This is not a perfect form. If we localized it, we would still have some work to do, but the basics are there.
Try running the form and stretching it. The controls should behave as you would expect. If you size the form very small you may notice that the form could definitely use a minimum size.