Build PowerShell CmdLets to call SharePoint Web Services using WCF
In this post I'll show you how to build a PowerShell cmdlet that consumes SharePoint web services using WCF. What I like about this approach is that it provides the ability to use some of the SharePoint API without having to be logged in to the SharePoint server. Although you can accomplish the same thing using PowerShell scripts and functions, in this post we'll build a SharePoint cmdlet using C#.
About the Approach
There are several advantages of combining PowerShell and SharePoint web services:
- Consume the SharePoint API without logging on to a SharePoint server
- Provide a layer of abstraction and reusable task-oriented building blocks
- Reduce risk of performance issues caused by PowerShell scripts that don't dispose of unmanaged SharePoint resources
There are also some drawbacks to writing custom cmdlets that consume SharePoint web services:
- SharePoint web services do not expose the full API; you may need to augment them with business-specific functionality
- Cmdlets require compilation and additional overhead over script file
Getting Started
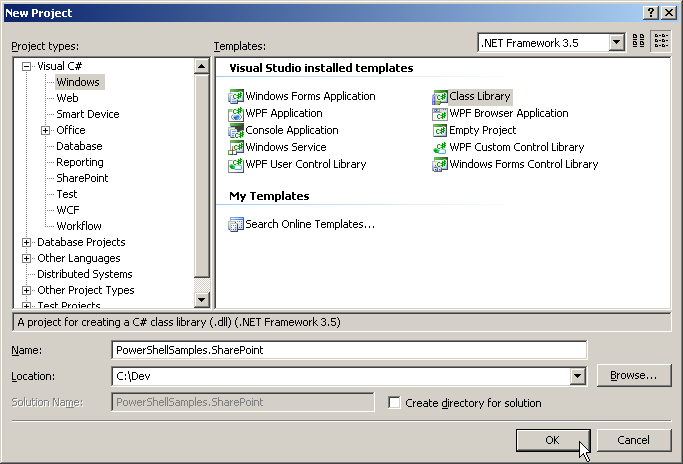
In this walkthrough, I'm using Visual Studio 2008 on a SharePoint virtual machine. Although you could use a Visual Studio PowerShell project template, we'll are going to build everything by hand so there are no mysteries. So let's get started by creating a new class library project:
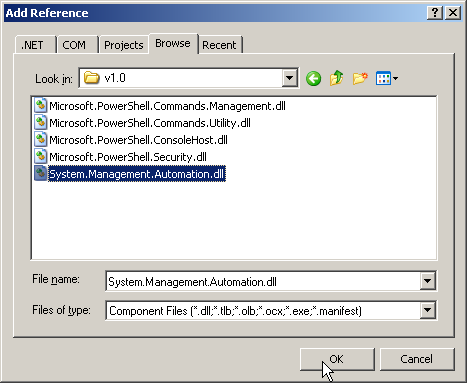
Add a reference to PowerShell which is contained in System.Management.Automation assembly. If you've installed the Windows SDK, you can find it in the following location: C:\Program Files\Reference Assemblies\Microsoft\WindowsPowerShell\v1.0
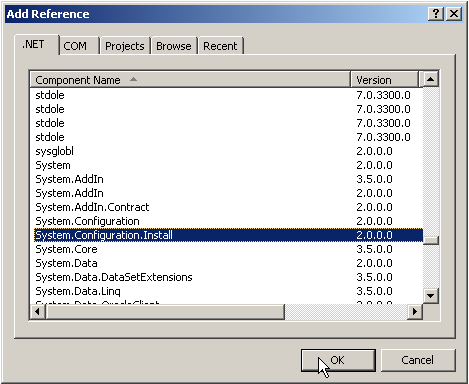
Since we are creating a class that will both describe and install a custom snap in, we need to reference System.Configuration.Install
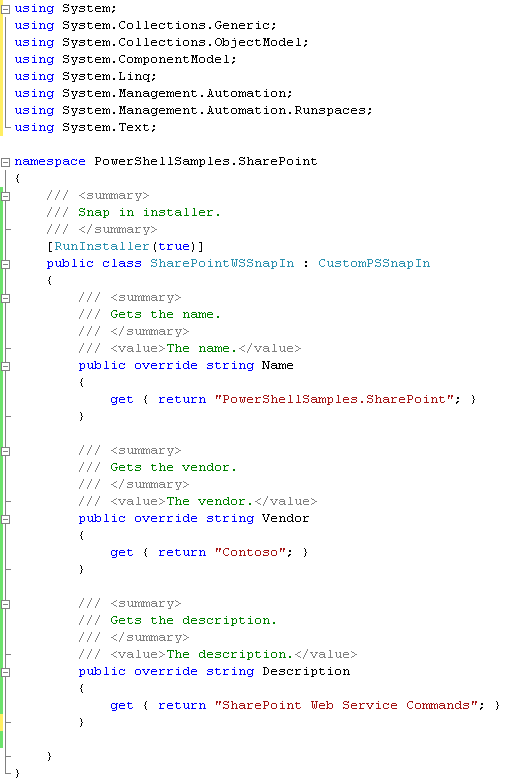
Create the Snap In and Cmdlet
Add a new class that inherits CustomPSSnapIn. Add the RunInstaller attribute to the class and describe the snap in by overriding the Name, Vendor and Description properties. Your code should end up looking like this:
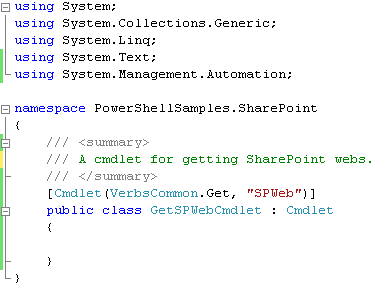
Add a new class that inherits from Cmdlet. We'll build a cmdlet to get information about a SharePoint site, so name it "GetSPWebCmdlet." Add the Cmdlet attribute to the class. You'll notice the cmdlet name, "Get-SPWeb" is a combination of the noun string SPWeb and verb enumeration VerbsCommon.Get specified by the Cmdlet attribute:
Override the Cmdlets property in the snap in class and add the Get-SPWeb cmdlet to the Cmdlets collection:

Configure Visual Studio to Install and Add the Snap In When the Project is Debugged
Before we add any code to the cmdlet, let's configure Visual Studio to automatically deploy the snap in to make debugging easier. We'll use a post-build event to install the snap in, so in the spirit of learning PowerShell, we'll write the post-build script in PowerShell! Add a new text file to your project named PostBuildEvent.ps1. Add the following script to the file:
trap
{
$errorTxt = $_.Exception.Message
write-output "$errorTxt"
break
}
$targetDir = $args[0]
$targetFileName = $args[1]
$snapInName = $args[2]
write-output "Deploying..."
join-path $targetDir $targetFileName
write-output "Snap In Name: $snapInName"
set-location $targetDir
set-alias installutil $env:windir\Microsoft.NET\Framework\v2.0.50727\installutil
installutil $targetFileName
Notice the script file takes some arguments (targetDir, targetFileName and snapInName). Using that information, it installs the SnapIn (and our SharePoint cmdlet). Configure Visual Studio to pass the arguments to the post-build event:

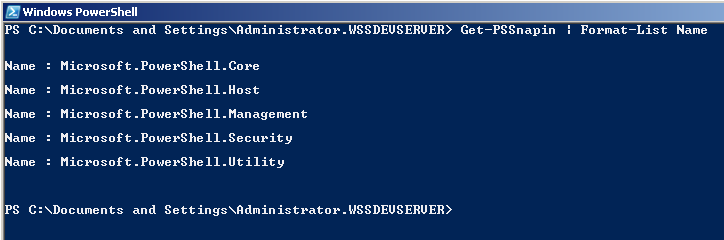
After a SnapIn is installed, you have to add it to your environment before it can be used. As you can see, even though our custom snap in has been installed, it is not listed when you call Get-PSSnapin:
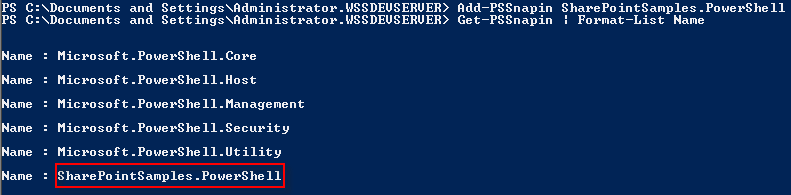
To add it, call Add-PSSnapin passing in the name of the assembly:
We don't want to add the snap in after each code change, so we are going to automate it by adding a console file that will add the snap in into our environment when the project is debugged. Add a new file named SharePointSamples.Console.psc1 to your project. Put the following xml in the file:
<?xml version="1.0" encoding="utf-8"?>
<PSConsoleFile ConsoleSchemaVersion="1.0">
<PSVersion>1.0</PSVersion>
<PSSnapIns>
<PSSnapIn Name="SharePointSamples.PowerShell" />
</PSSnapIns>
</PSConsoleFile>
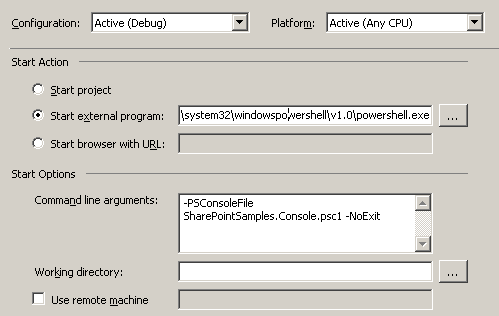
In the project configuration, Debug settings, configure Visual Studio to start PowerShell when you debug and in the command-line arguments section, use the -PSConsoleFile argument to specify the console file you created:
Implement the Cmdlet
Now that deployment and debugging are taken care of, add the following code to the cmdlet:

The cmdlet takes the url of the site as an argument. Arguments are implemented as class properties decorated with the Parameter attribute. The work is implemented in the ProcessRecord method. As you can see, I already did some re-factoring and created a service locator class that will give me an instance of the SharePoint Webs service (using WCF). The code then invokes the GetWeb method and writes out the resulting xml.
Here is the code for the service locator. As you can see it configures the SharePoint Webs proxy:

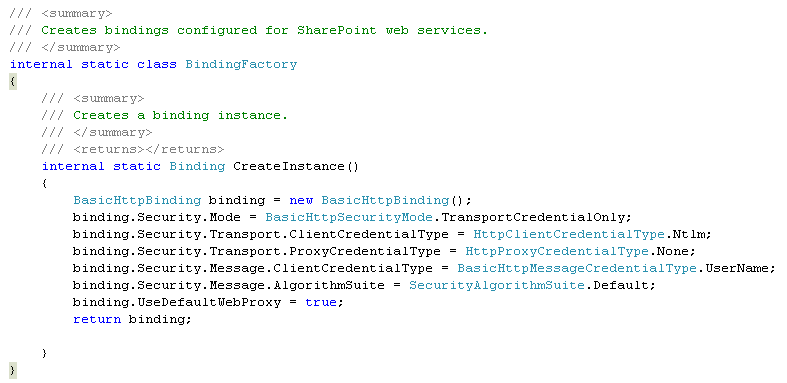
Most of the key WCF configuration settings for integrated authentication are implemented in the BindingFactory class:
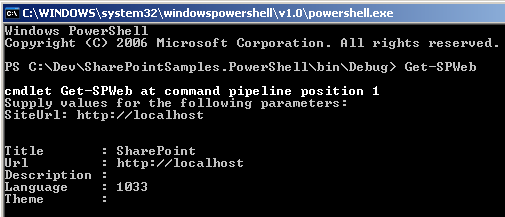
Test the Cmdlet
To test the cmdlet, run the project. When the PowerShell command prompt opens, type Get-SPWeb. You will be prompted for the site url if you don't provide it:
Summary
In this walkthrough, you learned how to leverage PowerShell, WCF and the SharePoint web services to implement a custom cmdlet. Using this approach, you can expand the administrative capabilities of SharePoint and build reusable, task-oriented building blocks to increase your productivity and capability.
Get the code for this article.
Additional Reading
- Visual Studio Build Events With PowerShell
- Extending Windows Powershell with Snap-ins
- Managing SharePoint with PowerShell
- PowerShell & SharePoint - Quick Start
- SharePoint and PowerShell Demo
- Calling SharePoint web services using Visual Studio 2008, WCF, and Windows Authentication
- Five Simple But Powerful PowerShell Functions/Filters for SharePoint