Hello ListViews, so long UITableViews!
After writing apps for the iPhone, you very quickly get to used to UITableViews. A scrolling vertical list is ideally suited to the smaller screen of mobile devices (especially in vertical orientation) and there’s still scope for some advanced user interactions too (pull-to-refresh, or drilling-down to next level of lists for example).
If you are porting an app to Windows 8 then you might want to consider if a vertical list is something you really want. After all, it’s going to look pretty silly on a wide format screen for one thing. Maybe rather than a vertical list, you’ll want to use a grid view to spread out content in more of a rectangular format, one which can re-organize itself nicely to suit the screen size and rotation.
That said, there are times when lists are useful. For example, I’m currently working on an app which displays various pages of information, and which requires a constantly available index - a vertical scrolling list on the side works very nicely for this purpose. The control to create this kind of view is a ListView (or a ListBox, which is a little bit simpler).
Three ways to make a list
Windows is nothing if not flexible, and there are at least three ways to make use of the list control - and that’s just when working with XAML and C# (my currently preferred programming platform). Each of these approaches work in basically the same way: which is to say, different from a UITableView
When working with UITableViews, you recall that you define a callback function or two. When the table is being rendered, your callback is asked to provide the contents of the cell, row-by-row. With the ListView control, think of the control more of an array which you stuff all your values into and then let Windows render it.
“But John”, I hear you say, “that doesn’t sound very flexible..”
To which I say “Shhh, stop interrupting, I’ll get to the cool stuff in the minute. You’ll like.”
Anyway, back to basics.
1. Using XAML
As you should know by know, XAML is the mark-up language you use to define your app’s user interface. Every screen in your app has an XAML file, and a matching C# file. The XAML contains the definitions of the controls, their location on screen and so on, and the C# (the code-behind) does the programming part - reacting to clicks, that kind of thing.
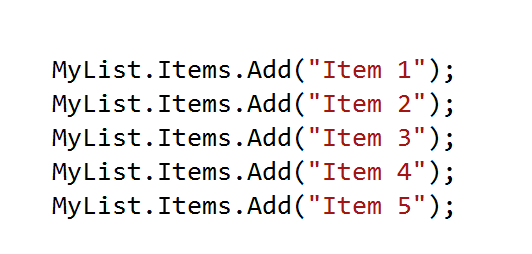
The simplest way to create a ListView is just to define it all - contents and all - in the XAML. This could look as simple as this:

Which creates something which will look similar to this:

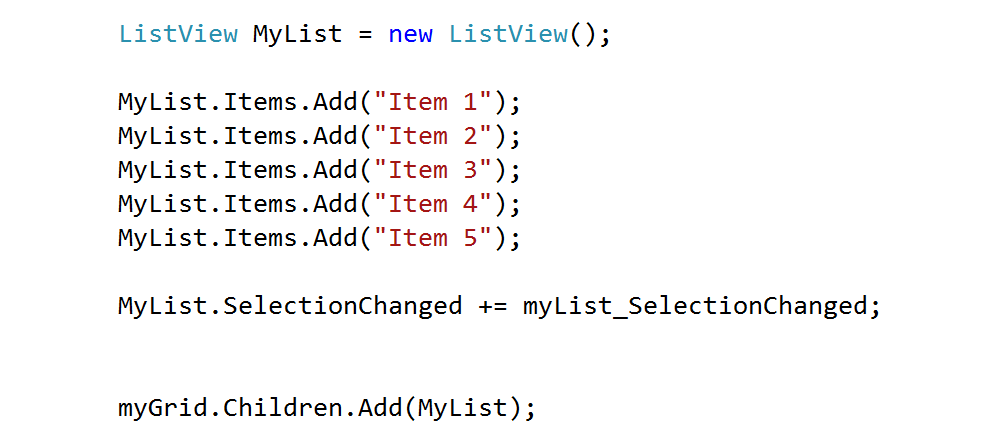
Notice the extra SelectionChanged part in the XAML - that’s the mark-up which triggers a C# function in the code-behind page when the user selects of the items in the list. That’s useful for making your list actually DO something, like act like a menu or select an option or drill-down to a new level.
2. Using XAML and Code Together
The second way to make a list control is to use a mixture of XAML and C#. Keep the XAML as before, but remove the definitions for the items.

Then switch to the C# file, and add the strings there, like this:
You can even do away with the XAML part altogether if you wish, using some C# code like this to create your control:
However, if you do this, then you will miss out on the friendlier XAML way of positioning and tweaking the appearance of the view, especially if you use Blend to do all the positioning and tweaking for you.
3. Programmatically, with style
Now, this is where things start to get interesting. Let’s say you already have the information you need to display in your list in an array. Well you shouldn’t: use a C# List<> instead as it’s better for the environment. So, to re-iterate, you have created a List which contains your items, like this:
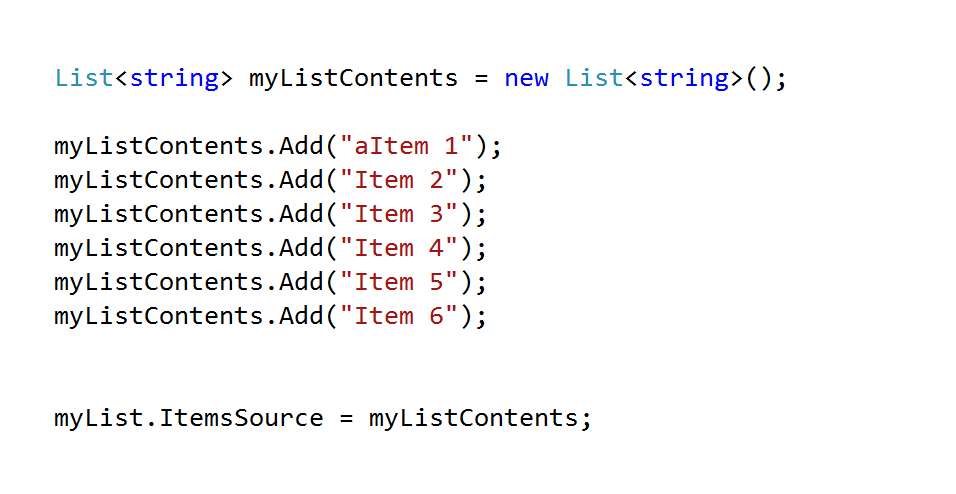
So you say “Yeah, I see what you did there, you set the ItemSource property of the XAML ListView to point to the list array, and so it gets populated from the array automatically.”.
“Yup”, I say.
And then a lightbulb goes on over your head, and you say “Hey! Does that mean if my app changes that array, the ListView will automatically re-draw itself to take it into account?”
“Now you’re getting it!” I say. “To make that happen, we just need to make a tiny change.”
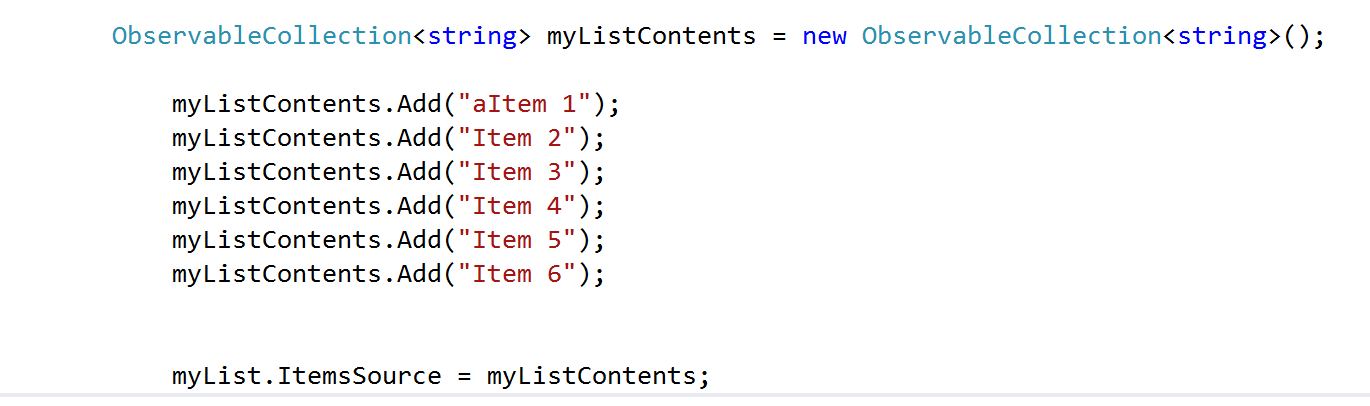
And perhaps a little grudgingly, you admit that’s pretty cool. That’s data binding for you: it does the hard work. If you add or remove an item from that array, the ListView is immediately redrawn - you don’t even need to trigger a refresh.
Customization
So how do you change the appearance of your ListView? Templates. You don’t need to stick to a single line of text as we did in these examples: by using a template you can add images, and multiple lines of styled text. In the same way that a UITableView allows you to create a custom cell view, templates let you mix-up your table to look a little more hip and multimedia.
Several templates are provided for you to use - it only takes change a few lines in your XAML to change from a line of text to fancy cell with styled text and images. You’ll find the details in the topic Item templates for list layouts.
There’s a really good section in the MSDN docs which covers this and a lot more, called Adding ListView and GridView controls. Save that bookmark for when you need to add some controls to your app!