Porting to Windows 8 from iOS - Part 2
Last week I started porting my iOS Astronomy app to Windows 8, and now I've had some time to do a little more work on it. When I last left the app, I had pretty much "ported" it. That is, it worked. Next it was time to get down to the fun stuff - making it an actual, honest-to-Bill Windows 8 app.
The entire point of a new platform such as Windows 8, is that it introduces new features. If you don't take advantage of them, you're missing out. Microsoft really and truly wants your apps, but Microsoft ideally wants your apps to be Windows apps - not just a blind port that could be running on any on thing. You know yourself how a ported app just feels "wrong" when it's on your iPad or iPhone. Something about it just makes your skin crawl, right? Well that's the same in the other direction too: if you don't take advantage of Windows' features, your app will work fine but it'll "feel wrong". So it's time to stop "porting" and being "re-imagining" (or some other better word).
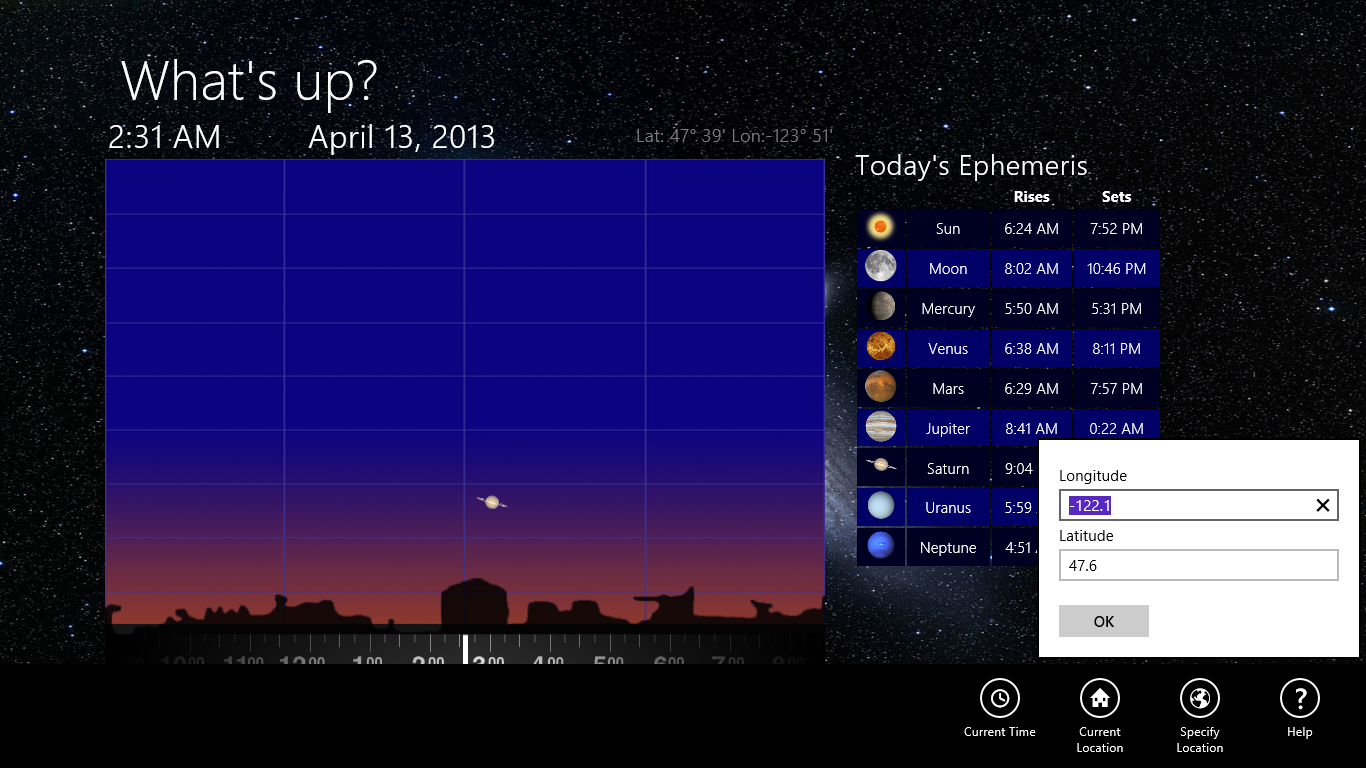
Here's how the app looks like at the moment. I added a nice background image (your Windows 8 app does not have to look super-minimal or "fiercely reduced" to the point of blandness), and I also added some background colors to my table of rise and set times.
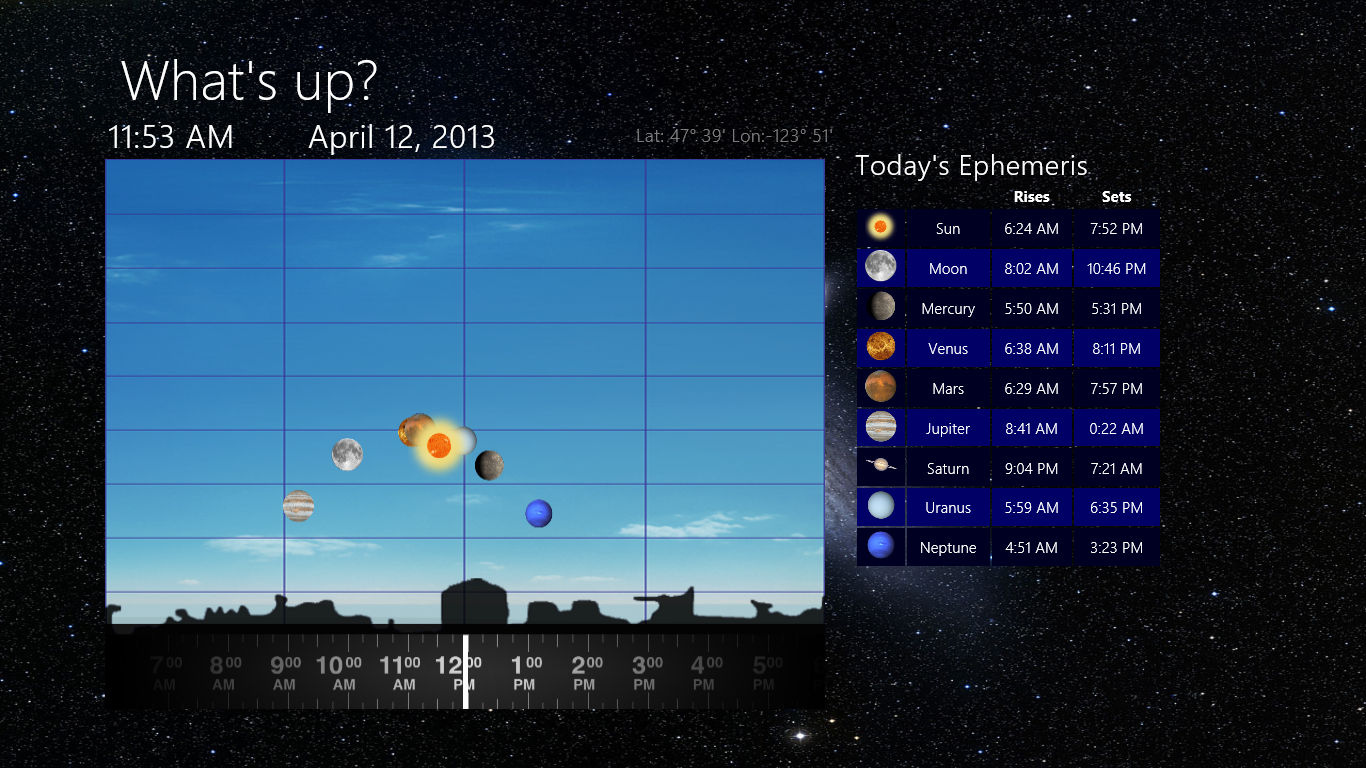
Not too bad, eh? Using the HTML canvas I was able to make a nice scrolling time-strip, something that XAML wasn't ideally suited for, and display the little planet images.
However, now for the fun stuff. In my re-imaginactment of my iPad app, I wanted to make use of the following Windows features:
- Snap Views
- AppBar
- Flyout
- Tiles
.. because you know, why not? That's the fun of having a new platform to play with - new toys!
1. Snap views
Windows 8 allows you to run multiple apps at once (of course), but it also allows you to see two of them at once. If you are running a Windows 8 app, you can drag down from the top and slide over to the side - and the app will "snap" into a new thinner, column view. You can then drag other running apps over from the side, and so share the screen. This is a novel approach to managing things, and it's not too tricky to support. Here's what it would look like if you snapped my app, and then brought in the beautiful Bing Weather app:
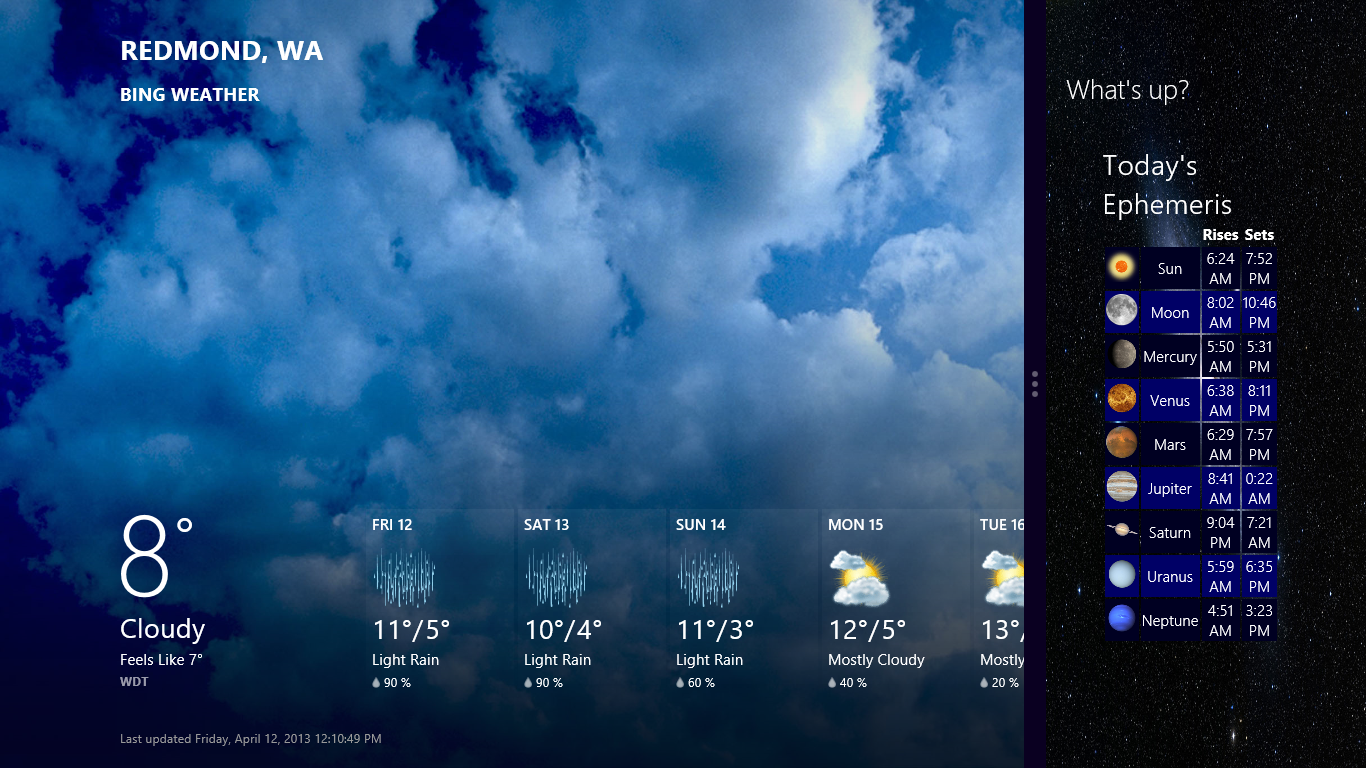
Clearly not a good day for star gazing. That's Redmond weather for you.
The first step in getting this working is to consider how your app would support different screen sizes. Ideally, you will have sections of content in your app that can reposition or resize themselves to take advantage of different screen sizes. In Xcode, you would be playing with struts and springs, or the newer autopositioning features.
As this app is written using JavaScript/HTML, instead I use 'grids'. A grid is a Microsoft addition to the mark-up language that provides a set of flexible cells into which I can place my content. The grid will resize as the screen resizes, and with a little tweaking you can make sure the cells are positioned in the best possible location, no matter the screen size.
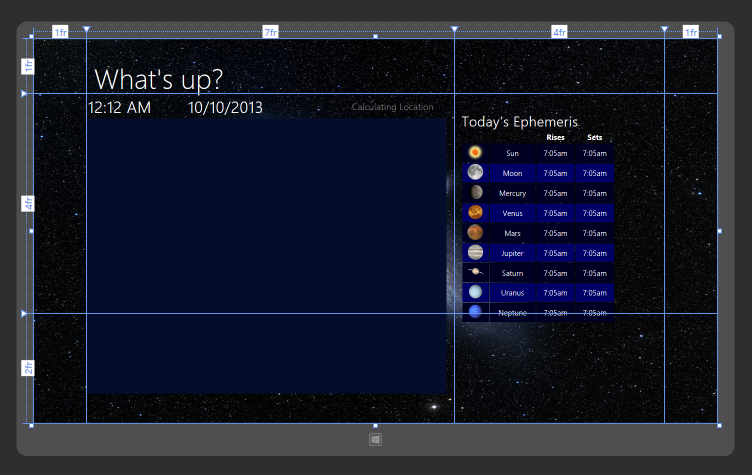
Using a companion to Visual Studio called Blend (which is kind of like Interface Builder, for your old-school Xcode devs), you can quickly preview what the app will look like on different screen sizes. Here you can see my grid highlighted, and how I've placed the two main content sections inside it: the sky view, and the table of rise/set times.
Now, the snap function works because there's a specific section of your app's CSS file that is active in this mode. Here's the CSS in Visual Studio:
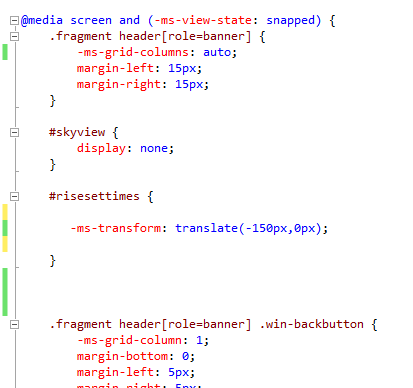
You can see that in snapped view, I've simply hidden the skyview <div> , and then moved the risesettimes <div> . The result is the rise/set table is moved into the visible column and the job is done.
Here are some topics I found useful when trying to get my app to look nice on multiple screen sizes:
- Part 4: Layout and views (Windows Store apps using JavaScript and HTML)
- Guidelines for scaling to screens (Windows Store apps)
2. AppBar
In OSX, you might have your dock set to automatically hide when it's not required. The Windows 8 AppBar is sort of like that - it's an area to hide useful commands off-screen until required. When you swipe up from the bottom of the screen, or right-click with a mouse, the AppBar appears with its little circular buttons. When it's not needed, it goes away (although you can optionally keep it around if you need more often, by making it 'sticky'). Here's a great topic that introduces the AppBar along with some design considerations.
Here's what the AppBar in my app looks like:

If you were writing the app in C#, you would add a XAML control to do this. In JavaScript/HTML, you just add a section to your HTML like this:
<div id="myAppBar" data-win-control="WinJS.UI.AppBar" data-win-options="">
<button data-win-control="WinJS.UI.AppBarCommand" data-win-options="{id:'cmdCurrentTime',label:'Current Time',icon:'clock',section:'global',tooltip:'Use current time'}">
</button>
<button data-win-control="WinJS.UI.AppBarCommand" data-win-options="{id:'cmdCurrentLocation',label:'Current Location',icon:'home',section:'global',tooltip:'Use current location'}">
</button>
<button data-win-control="WinJS.UI.AppBarCommand" data-win-options="{id:'cmdSpecificLocation',label:'Specify Location',icon:'world',section:'global',tooltip:'Choose a location by latitude and longitude'}">
</button>
<button data-win-control="WinJS.UI.AppBarCommand" data-win-options="{id:'cmdHelp',label:'Help',icon:'help',section:'global',tooltip:'Hints and Tips'}">
</button>
</div>
Yup, it's just a <div> with some magic spells that invoke the WinJS library. WinJS is a collection of tools for adding all the Windows 8 coolness to your app when you are developing using JavaScript/HTML. Without WinJS you would pretty much be writing a Web page, rather than an app, so use it - there are list controls, date-time pickers and many other useful additions that will make your app look great (as well as save you weeks of coding).
You might be wondering where the images that are displayed in the AppBar buttons are stored. The good news is that there is a bunch of pre-defined images provided for you to use as your AppBar buttons. If there's a good match, then hurrah! just use the name from this list. If there isn't, you can provide your own PNG file with the image in various states of selected / not selected, and AppBar will use that instead.
In your JavaScript file, you provide the functions, e.g. cmdSpecificLocation(), which are called when the user taps on the buttons. Nothing too difficult there. One thing that did have me scratching my head was how to make the AppBar go away when the user taps a button. By default, the AppBar hangs around until you tap/swipe/click elsewhere on the screen, just in case you aren't finished. This is fine, but in my case it was pretty obvious that the user had made their selection and it was time for the AppBar to go bye-bye. I tried using getElementByID to find the AppBar in my document, but I was flummoxed as to how to send it the "hide()" event.
It turns out that WinJS controls have their own little piece of magic, and so here is how you would ask the AppBar to kindly take a hike:
document.getElementById("myAppBar").winControl.hide();
That ".winControl" part is the secret. Easy when you know how.
3. Flyouts
In Windows 8 it's a "flyout", but to me it's a "pop-up". When you want to get some extra information from the user, perhaps after tapping a button on the AppBar, use a Flyout. Here's one in action:
This is another section of HTML contained in a <div> with some special WinJS magic to make it appear nicely when summoned. The default visual style is provided for free, and the input controls are standard HTML. The button is a <button> object, and when tapped, it calls a function back in your JavaScript. To make the Flyout appear, just call the .show method like this:
document.getElementById("myFlyout").winControl.show(document.getElementById("cmdSpecificLocation"));
In the line above, myFlyout is the little <div> in your HTML which contains the label and text input controls and the <button> .
The element added to the .show (cmdSpecificLocation) is the element on your page to which you want the Flyout to "anchor": that is, the control with which you want it to be associated and appear beside. This probably the button you tapped to make it appear in the first place.
4. Tiles
Static icons on your desktop are so five years ago, darling. One of the neatest Windows features is the ability to have your app's icon actually do something useful, rather than just sit around waiting to be tapped. To do this, you just create an XML template.. and.. well, to be honest it's just a recipe you have to follow and then plug in the text you want to be displayed, along with any images. It's a flexible approach, which reminds me of how the Pocket PC used to have live little plug-ins on its default screen, but I doubt anyone else is old enough to remember that.
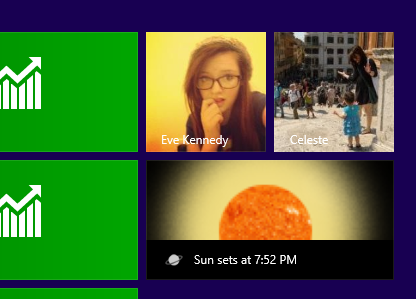
You can specify what you want to appear on these large tiles or their smaller relations - in my case I opted to display information only in the larger tile, like this:
You can find the magic spells you need to use to make tiles happen here.
I found this link useful too.
You can set a time-out for the tile (because there's no point displaying information that's old on a tile) and you can also set up notifications for more advanced scenarios. I opted simply to display the time the Sun sets (handy for vampires using Surface RT).
What's Next?
After all this work, I'm getting ready to send the app to the Windows App Store. I'll document this process for Part 3, so you can share my pain. Not that there will be any, I'm sure ;-)