Using SSIS to Backup and Restore Extremely Large OLAP Databases
Working in the field of Business Intelligence I get the opportunity to work with some really large (read that as multi-terabyte) OLAP databases. Multi-terabyte OLAP databases, while not yet common place, are being seen with greater frequency and they do present a few interesting challenges to developers and administrators. Performance tuning is one of the more obvious challenges, leading to discussions related to selection of the most appropriate storage mode and how to best partition the data. Purely from the perspective of query performance, MOLAP storage is going to provide better performance than would be expected with HOLAP or ROLAP storage. At these sizes, I/O throughput is a concern and there are definite benefits to using the StorageLocation property to distribute partition data across multiple disks.
A less obvious aspect of performance tuning involves the ability to backup and restore these large databases before Mr. Murphy applies his law and it becomes necessary to recover from some form of disaster. Databases can become inaccessible for a number of reasons, including but not limited to hardware failures and BI developers with administrator permissions fully processing dimensions. The prospect of failure and the need to recover from a disaster gives administrators of OLAP databases some really good reasons to be involved in planning and testing of backup and recovery operations.
For reasons I’ll explore in a bit, Analysis Services backup and restore operations on multi-terabyte databases do not occur with lightning speed. Likewise, if it becomes necessary to execute a full process of a multi-terabyte database there’s a pretty good chance that it’s going to take more than just a few hours. Just imagine the fun of explaining to the company CEO, CFO, and CIO that you’ll have their production database back online in a couple of weeks. Therefore, the ability to restore a really big database to a functional state within a reasonable period of time is probably more important than the ability to create a backup in a reasonably short period of time. At least the discussion with the CEO, CFO, and CIO will be substantially less painful if you can say something to the effect of “We should have the database fully restored in a few hours.”
I recently had the opportunity to work with a customer who had a 35 hour window in which to create a backup of an OLAP database that occupied nearly three terabytes on disk. Because of the size of the database, the partitioning strategy involved distributing the data across eight separate LUNs. The reason for the 35 hour window was that a processing job was scheduled to begin execution on Sunday evenings at 11:00 PM. Because the database was in use, the backup job was scheduled to begin on Saturdays at noon. The problem was that the backup job would be terminated after 35 hours when the scheduled processing operation began executing. Since this was a production system, it was absolutely essential that the customer have a database backup and a plan to restore the data in the event of a disaster.
In the absence of a database backup, the alternative was to have the database remain offline for a period of nine (9) days, possibly longer, to allow the database to be fully processed.So what are the options for implementing backup and recovery with very large OLAP databases as well as the drawbacks of each approach? Let’s take a look the following options:
- SAN Snapshot
- Backup and Restore
- Re-deploy and fully process
- Synchronization
1. SAN Snapshot: This is an option that has been explored in several scale-out scenarios solely for the purpose of moving metadata and data files from a dedicated processing server to one or more query servers. (see Carl Rabeler’s whitepaper entitled “Scale-Out Querying with Analysis Services Using SAN Snapshots” https://www.microsoft.com/en-us/download/details.aspx?id=18676). SAN Snapshots are fantastic for backing up one or more LUNs for storage locally or at another site. There are essentially two types of SAN Snapshot. The While this is greatly simplified, it’s sufficient to know that a Copy-on-Write snapshot creates a snapshot of changes to stored data and affords rapid recovery of data. A Split-Mirror snapshot references all of the data on a set of mirrored drives. A Split-Mirror snapshot grabs a snapshot of the entire volume, which simplifies the recovery process. There are, however, some issues inherent in using SAN Snapshots to create “Backups” of databases.
Full recovery using a Copy-on-Write snapshot requires that all previous snapshots be available. Creation of Split-Mirror snapshots tends to be slower than Copy-on-Write snapshots and the storage requirements tend to increase over time. In either case, the storage requirements eventually would become rather onerous since there is no compression. Another consideration is that in order to generate a recoverable snapshot, all of the I/O on the server would have to be stopped. Add to that it’s very likely that the SAN Snapshots will fall to the purview of someone known as a SAN or Storage administrator and not a DBA. (Somehow, I rather doubt that the SAN or Storage Admin will be catching a lot of heat when a critical database goes belly up.) Another important consideration is that each SAN vendor implements SAN Snapshots in a somewhat different manner. In this case a SAN Snapshot was merely an academic discussion given that full snapshots of several volumes, none of which were mirrored, would have been required.
2. Backup and Restore. This is the most readily available approach to backing up and restoring an Analysis Services database as the Backup/Restore functionality is readily available in the product. This functionality can be readily accessed using the GUI in SQL Server Management Studio, using XMLA commands like the following to create a backup:
<Backup xmlns="https://schemas.microsoft.com/analysisservices/2003/engine">
<Object>
<DatabaseID>Adventure Works</DatabaseID>
</Object>
<File>C:\PUBLIC\AWDEMO.ABF</File>
</Backup>
with the following XMLA command to restore:
<Restore xmlns="https://schemas.microsoft.com/analysisservices/2003/engine">
<File>C:\PUBLIC\AWDEMO.ABF</File>
<DatabaseName>Adventure Works</DatabaseName>
</Restore>
implemented via the AMO API using code similar to the following to create a backup:
using System;
using System.Collections.Generic;
using System.Linq;
using System.Text;
using Microsoft.AnalysisServices;
namespace BKUP
{
class Program
{
static void Main(string[] args)
{
Server asServer = new Server();
asServer.Connect("localhost");
Database asDB = asServer.Databases.FindByName("Adventure Works");
asDB.Backup("C:\\PUBLIC\\ASDEMO.ABF");
asServer.Disconnect();
asServer.Dispose();
}
}
}
and the following AMO code to restore the database
using System;
using System.Collections.Generic;
using System.Linq;
using System.Text;
using Microsoft.AnalysisServices;
namespace RESTORE
{
class Program
{
static void Main(string[] args)
{
Server asServer = new Server();
asServer.Connect("localhost");
asServer.Restore("C:\\PUBLIC\\ASDEMO.ABF","Adventure Works",true);
asServer.Disconnect();
asServer.Dispose();
}
}
}
All three are relatively straight forward approaches to backup and restore, using functionality that is built into the product and make this option very appealing. However, there are a few aspects of the native Backup/Restore functionality that make it problematic with extremely large databases. One factor that becomes an extremely important consideration is that the processes for Analysis Services Backup and Restore operations use a limited and fixed number of threads which limits degree of parallelism that can be achieved. The net result is that the native backup/restore operations are roughly comparable in performance to standard file copy operations. While it would be a nice feature to have, Analysis Services doesn’t have functionality similar to the Differential Backups that are available in the SQL Server database engine. In this case, it was known that the database backup was being terminated without completing at 35 hours, so this was obviously not an option. Even if native backup had been an option, we knew that the restore operation would require more than 35 hours making this a non-viable option.
3. Redeploy and fully process. This is obviously one solution, which requires nothing more than having either a copy of the database, in its current state, as a project or the XMLA script to re-create the database. On the positive side, the metadata would be pristine. One slight problem with this approach is that fully processing a multi-terabyte database is typically going to require multiple days, if not weeks, to complete. The amount of time required to fully process a large mission critical database is probably not going to make this an acceptable approach to disaster recovery. In this particular case, fully processing the database would have taken in excess of nine (9) days to complete, so that discussion with the CEO, CFO, and CIO would have been something less than pleasant and cordial.
4. Use Synchronization: Synchronization is another functionality that is natively available in Analysis Services. The product documentation indicates that it can be used to either deploy a database from a staging server to a production server or to synchronize a database on a production server with changes made to the database on a staging server. In any event, the Synchronize functionality does allow an administrator to effectively create and periodically update a copy of an Analysis Services database on another server. This copies the data and metadata from a source server to a destination server. One of the benefits is that the database remains accessible on the destination server, affording users the ability to continue executing queries on the destination server until the synchronization completes and queries are then executed against the newly copied data. Much like Backup/Restore, the Synchronization functionality is readily available in the product and can accessed using the GUI in SQL Server Management Studio or using XMLA commands like the following to the following:
<Synchronize xmlns:xsi="https://www.w3.org/2001/XMLSchema-instance" xmlns:xsd="https://www.w3.org/2001/XMLSchema" xmlns="https://schemas.microsoft.com/analysisservices/2003/engine">
<Source>
<ConnectionString>Provider=MSOLAP;Data Source=MyServer;Integrated Security=SSPI</ConnectionString>
<Object>
<DatabaseID>Adventure Works DW 2012 - EE</DatabaseID>
</Object>
</Source>
<Locations />
<SynchronizeSecurity>SkipMembership</SynchronizeSecurity>
<ApplyCompression>true</ApplyCompression>
</Synchronize>
Using Synchronization for the purpose of creating a “backup” from a production system requires that a destination server that is at least the same service pack level as the Source production server (ideally one would want the identical build number). Using Synchronization also requires that the server being used as the destination have storage capacity equivalent to the source (in this case Production) server. The only server available as a possible destination server was the development server that was being used to make, test, and then push modifications to the design of the database on the production server. For some strange reason, the team doing the database development/modification work had some pretty strong reservations about overwriting the work they were doing in the development environment.
Those were the options that were considered and unfortunately, for one reason or other, none were acceptable. That meant that it was time to start getting creative. I knew that Care Rabeler had done some work with copying databases for a scale out solution, but that was using SAN Snapshots. I was also very aware of a Technet article by Denny Lee and Nicholas Dritsas (https://technet.microsoft.com/library/Cc966449) related to a scale out solution using a SQL Server Integration Services (SSIS) package with Robocopy to copy metadata and data files from multiple databases from a processing server to the data folders of a group of query servers.
Armed with an idea and some information (I know, it’s a dangerous combination) related to using a single instance of the multi-threaded version of Robocopy, it seemed like the beginnings of a pretty tantalizing solution. Rather than copy the entire data directory, all that was really necessary was to copy the data for a single database. The initial plan was to detach the database, use Robocopy to move the data to a “safe” storage location and then re-attach the database. Sounded simple enough, except for a slight complicating factor. The database was nearly three terabytes in size and the data were distributed across eight LUNs.
Detaching and re-attaching an Analysis Services database is a relatively trivial matter that can be easily accomplished from SSMS, but since this was a job that should be scheduled to run on a weekend there was a strong desire to automate the process as much as possible. Building on the prior use of SSIS with Robocopy by Denny Lee and Nicholas Dritsas, it was decided to use an SSIS package to contain and automate the entire process. This had several advantages.
1. This would allow the database to be detached then on success of that operation begin the copy operation
2. Since the data were distributed across eight drives, it would be possible to execute eight instances of Robocopy in parallel (one instance for each drive containing data).
3. Since only the data on each drive was required, it wasn’t necessary to copy the contents of the entire drive which allowed copying a single directory and the subdirectories it contained.
4. Since there were eight LUNs from which data were being copied, it made sense to copy data to eight separate LUNs on a storage server to avoid significant disk I/O contention on the target server.
5. The on completion precedence constraints on the robocopy tasks could be combined with an AND condition so that the database would be re-attached only after all of the data had been copied to a storage location.
A very simple command line utility that could be used to detach or attach a database was really all that was required. Since there wasn't such a utility readily available, it was time to put on the developer hat and start slinging little bit of code. That effort resulted in the following application code:
using System;
using System.Collections.Generic;
using System.Linq;
using System.Text;
using Microsoft.AnalysisServices;
namespace DropAdd
{
class Program
{
static int Main(string[] args)
{
int returnval=0;
switch (args.Count().ToString())
{
case "2":
{
string servername = args[0].ToString().ToUpper().Trim();
string databasename = args[1].ToString().ToUpper().Trim();
ServerApp DetachIt = new ServerApp();
returnval = DetachIt.Detach(servername, databasename);
break;
}
case "3":
{
string servername = args[0].ToString().ToUpper().Trim();
string filepathname = args[1].ToString().ToUpper().Trim();
string databasename = args[2].ToString().ToUpper().Trim();
ServerApp AttachIt = new ServerApp();
returnval = AttachIt.Attach(servername, filepathname, databasename);
break;
}
default:
{
Console.WriteLine("Incorrect number of parameters");
Console.WriteLine("dropadd server_name database_name");
Console.WriteLine("dropadd server_name file_path database_name");
Console.ReadLine();
returnval = 0;
break;
}
}
return returnval;
}
}
class ServerApp
{
public int Attach(string ServerName, string FilePathName, string DatabaseName)
{
Server asServer = new Server();
int outcome = 0;
asServer.Connect(ServerName.ToString().Trim());
try
{
Database AsDB = asServer.Databases.FindByName(DatabaseName.ToString().Trim());
if (AsDB != null)
{
outcome = 0;
}
else
{
asServer.Attach(FilePathName.ToString().Trim());
outcome = 1;
}
}
catch (Exception goof)
{
outcome = 0;
}
finally
{
asServer.Disconnect();
asServer.Dispose();
}
return outcome;
}
public int Detach(string ServerName, string DatabaseName)
{
Server asServer = new Server();
int outcome = 0;
asServer.Connect(ServerName.ToString().Trim());
try
{
Database AsDB = asServer.Databases.FindByName(DatabaseName.ToString().Trim());
if (AsDB != null)
{
AsDB.Detach();
outcome = 1;
}
}
catch (Exception goof)
{
outcome = 0;
}
finally
{
asServer.Disconnect();
asServer.Dispose();
}
return outcome;
}
}
}
Using that code, all that was necessary to detach a database was execute the DropAdd command line utility, passing the Server Name and Database Name as parameters. When it became necessary to attach a database, it was just a matter of executing the DropAdd command line utility passing the Server Name, File path to the database, and Database name as parameters.
Having addressed both detaching and re-attaching the database, it was necessary to consider how to best use Robocopy to move the data from the production server to a storage location. A small scale test using robocopy with the default threading option of 8, worked reasonably well. But since the design of the database distributed data across eight LUNS, it would be necessary to execute robocopy once for each LUN on which data were stored. Running eight instances of robocopy in serial would be a bit time consuming and quite honestly it was suspected that doing so would run well past the 35 hour window for backup creation. An associated problem was determining when the last instance of Robocopy had completed execution. That lead to a decision to execute eight instances of Robocopy in parallel.
The result was the design of an SSIS package looking something like the following:
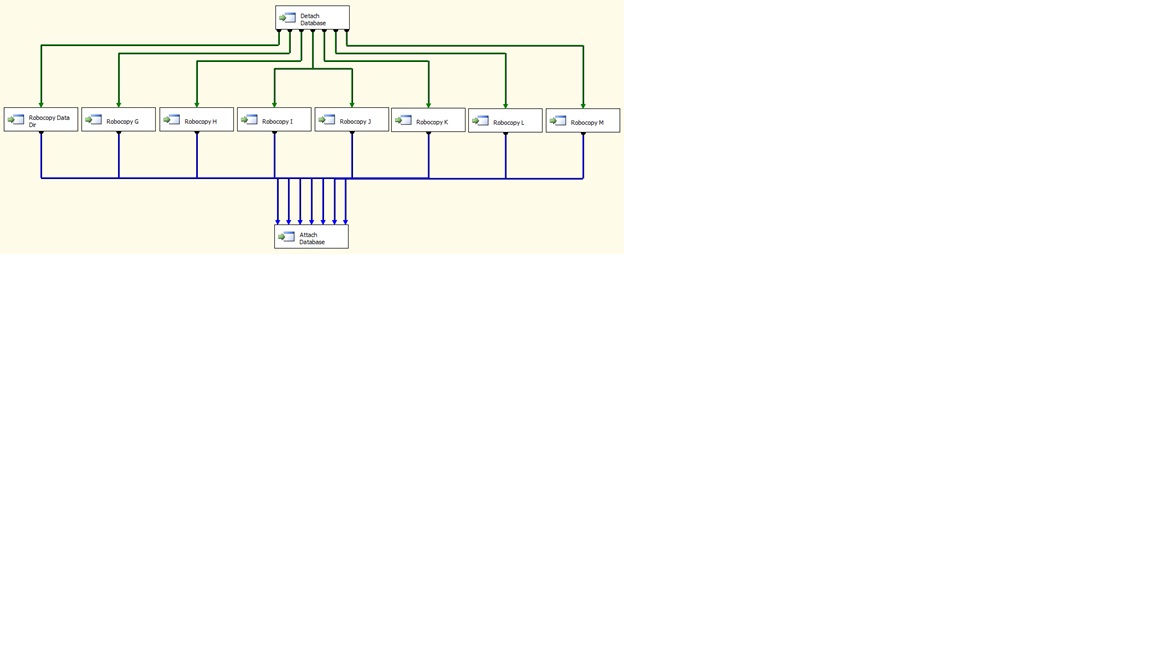
The SSIS package simply consisted of a set of 10 Execute Process tasks, with the following components:
Detach Database Detach the database from the server
Robocopy Data Dir Copy the data from the database directory
Robocopy G Copy data from the Data Directory on the G drive
Robocopy H Copy data from the Data Directory on the H drive
Robocopy I Copy data from the Data Directory on the I drive
Robocopy J Copy data from the Data Directory on the J drive
Robocopy K Copy data from the Data Directory on the K drive
Robocopy L Copy data from the Data Directory on the L drive
Robocopy M Copy data from the Data Directory on the M drive
Attach Database Attached the database on completion of the copies
For the “Detach Database” task, the following properties were set on the Process tab:
Property |
Value |
RequiredFullFileName |
True |
Executable |
C:\CustomApps\DroppAdd.exe |
Arguments |
MyServer “My Big Database” |
FailTaskIfReturnCodeIsNotSuccessValue |
True |
SuccessValue |
1 |
TimeOut |
0 |
WindowStyle |
Hidden |
Precedence Constraint |
Success |
In order to ensure that the data could be copied to a “safe” storage location, it is absolutely essential that the database be detached from the server in order to prevent write operations from processing which could result in files on the destination storage location becoming corrupt.
For the “Robocopy Data Dir” task, the following properties were set on the Process tab:
Property |
Value |
RequiredFullFileName |
True |
Executable |
C:\Windows\System32\Robocopy.exe |
Arguments |
"C:\Program Files\Microsoft SQL Server\MSAS10_50.MSSQLSERVER\OLAP\Data\My Big Database.17.db" "\\StorageServer\e$\Main" /S /PURGE |
FailTaskIfReturnCodeIsNotSuccessValue |
False |
SuccessValue |
1 |
TimeOut |
0 |
WindowStyle |
Hidden |
Precedence Constraint |
Completion |
For the “Robocopy G” task, the following properties were set Process tab:
Property |
Value |
RequiredFullFileName |
True |
Executable |
C:\Windows\System32\Robocopy.exe |
Arguments |
"G:\Program Files\Microsoft SQL Server\ OLAP\Data " "\\StorageServer\G$\G_Drive" /S /PURGE |
FailTaskIfReturnCodeIsNotSuccessValue |
False |
SuccessValue |
1 |
TimeOut |
0 |
WindowStyle |
Hidden |
Precedence Constraint |
Completion |
For the “Robocopy H” task, the following properties were set on the Process tab:
Property |
Value |
RequiredFullFileName |
True |
Executable |
C:\Windows\System32\Robocopy.exe |
Arguments |
"H:\Program Files\Microsoft SQL Server\ OLAP\Data " "\\StorageServer\H$\H_Drive" /S /PURGE |
FailTaskIfReturnCodeIsNotSuccessValue |
False |
SuccessValue |
1 |
TimeOut |
0 |
WindowStyle |
Hidden |
Precedence Constraint |
Completion |
For the “Robocopy I” task, the following properties were set on the Process tab:
Property |
Value |
RequiredFullFileName |
True |
Executable |
C:\Windows\System32\Robocopy.exe |
Arguments |
"I:\Program Files\Microsoft SQL Server\ OLAP\Data " "\\StorageServer\I$\I_Drive" /S /PURGE |
FailTaskIfReturnCodeIsNotSuccessValue |
False |
SuccessValue |
1 |
TimeOut |
0 |
WindowStyle |
Hidden |
Precedence Constraint |
Completion |
For the “Robocopy J” task, the following properties were set on the Process tab:
Property |
Value |
RequiredFullFileName |
True |
Executable |
C:\Windows\System32\Robocopy.exe |
Arguments |
"J:\Program Files\Microsoft SQL Server\ OLAP\Data " "\\StorageServer\J$\J_Drive" /S /PURGE |
FailTaskIfReturnCodeIsNotSuccessValue |
False |
SuccessValue |
1 |
TimeOut |
0 |
WindowStyle |
Hidden |
Precedence Constraint |
Completion |
For the “Robocopy K” task, the following properties were set on the Process tab:
Property |
Value |
RequiredFullFileName |
True |
Executable |
C:\Windows\System32\Robocopy.exe |
Arguments |
"K:\Program Files\Microsoft SQL Server\ OLAP\Data " "\\StorageServer\K$\K_Drive" /S /PURGE |
FailTaskIfReturnCodeIsNotSuccessValue |
False |
SuccessValue |
1 |
TimeOut |
0 |
WindowStyle |
Hidden |
Precedence Constraint |
Completion |
For the “Robocopy L” task, the following properties were set on the Process tab:
Property |
Value |
RequiredFullFileName |
True |
Executable |
C:\Windows\System32\Robocopy.exe |
Arguments |
"L:\Program Files\Microsoft SQL Server\ OLAP\Data " "\\StorageServer\L$\L_Drive" /S /PURGE |
FailTaskIfReturnCodeIsNotSuccessValue |
False |
SuccessValue |
1 |
TimeOut |
0 |
WindowStyle |
Hidden |
Precedence Constraint |
Completion |
For the “Robocopy M” task, the following properties were set on the Process tab:
Property |
Value |
RequiredFullFileName |
True |
Executable |
C:\Windows\System32\Robocopy.exe |
Arguments |
"M:\Program Files\Microsoft SQL Server\ OLAP\Data " "\\StorageServer\M$\M_Drive" /S /PURGE |
FailTaskIfReturnCodeIsNotSuccessValue |
False |
SuccessValue |
1 |
TimeOut |
0 |
WindowStyle |
Hidden |
Precedence Constraint |
Completion |
For the “Attach Database” task, the following properties were set on the Process tab:
Property |
Value |
RequiredFullFileName |
True |
Executable |
C:\CustomApps\DroppAdd.exe |
Arguments |
MyServer "C:\Program Files\Microsoft SQL Server\MSAS10_50.MSSQLSERVER\OLAP\Data\My Big Database.17.db" “My Big Database” |
FailTaskIfReturnCodeIsNotSuccessValue |
True |
SuccessValue |
1 |
TimeOut |
0 |
WindowStyle |
Hidden |
Precedence Constraint |
None |
This all assumed that the account that would be executing the job had Administrator permissions for the Analysis Services service, as well as sufficient permissions to access files on each of the drives that contained data. It also required that the account have sufficient permissions to write to the destination drives that were being used to store the files of what would become an uncompressed backup.
It seemed prudent to compare performance with the built-in backup functionality, so being an intrepid soul, I decided to test it out with a version of the Adventure Works database which had been modified to distribute partitions relatively evenly across eight logical drives. The native Backup functionality required 55 seconds to create the backup on an 8 core machine with 24 Gb of RAM. Feeling very confident with the newly minted solution, it was a bit disappointing to find that it took right at 53 seconds to create the backup. However, since Robocopy can be used to copy only changed files, it was decided to process three or four partitions then run the comparison test again. This time, backup again required 55 seconds but the SSIS solution completed in 11 seconds. A good indication that even though a full “backup” of the multi-terabyte database may not be achieved on the first execution there was an extremely good chance that we would have a complete copy following a second execution of the SSIS package.
That meant it was time for the acid test to see how well this solution would perform in the production environment. When the backup window opened, the SSIS package was executed. Approaching the 35 hour mark, the SSIS package had not yet completed execution so it was decided to terminate the package and run the “Attach Database” task to re-attach the database. Somewhat disappointing, but it was encouraging to find that the formerly empty E drive now contained approximately 2.5 Terabytes of data so it was not a total failure. On that basis, it decided to leave the solution in place and allow it to run during the next “backup” window.
When the next backup window opened, the SSIS package began executing, and it was extremely encouraging to find that it completed in seven hours. Checking the E drive, it now contained nearly three terabytes of data. The first thought was “SUCCESS” and now it’s time for a nice cold beer. Of course the second thought was something to the effect of “OK, what happens when one of the disks goes belly up or one of the developers does a full process on one of the dimensions.” Followed by “we have a Backup solution and an uncompressed Backup but no way to restore it.”
Time to go back to work to build another SSIS package that could be used to restore the database. But since we had a “backup” solution, the restore would be simple. It was just a matter of reverse engineer the “backup” solution. This task, however, would be simpler since we would be able to recycle the logic and some of the bits used to create the “backup” solution. It was known that the DropAdd code could be re-used to detach and attach the database. It was also a relatively trivial matter to simply change the order of the parameters passed to the tasks that executed robocopy. Designing a process to restore the database presented a new challenge, in the form of “What happens in the case of a total system failure and it becomes necessary to restore the database to a new but identically configured server?” That would require creating a directory that would contain the database. The result was an SSIS package similar to what you see below:
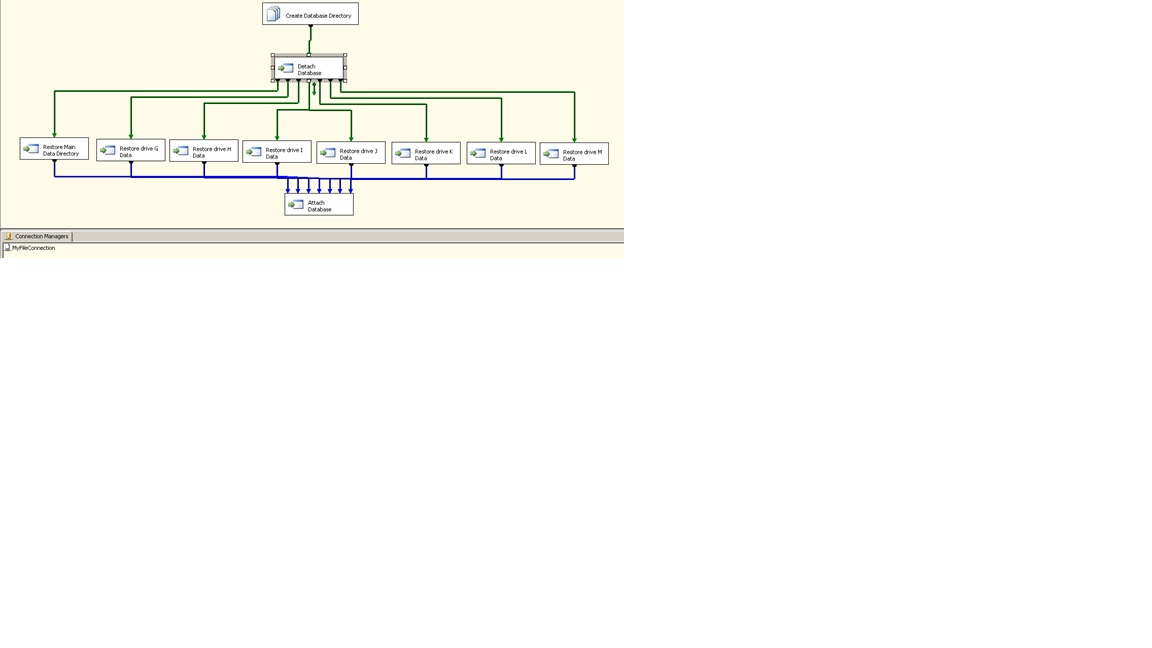
The "Restore" SSIS package consisted of a set of 1 File Connection Manager, 1 File System Task and 10 Execute Process tasks, with the following components:
MyFileConnection File Connection Manager
Create Database Directory Create the Database Directory if it did not exist
Detach Database Detach the database from the server
Restore Main Data Directory Copy data from backup to the database directory
Restore drive G Data Copy data from backup to the G drive
Restore drive H Data Copy data from backup to the H drive
Restore drive I Data Copy data from backup to the I drive
Restore drive J Data Copy data from backup to the J drive
Restore drive K Data Copy data from backup to the K drive
Restore drive L Data Copy data from backup to the L drive
Restore drive M Data Copy data from backup to the M drive
Attach Database Re-attach the database on completion of the copies
For the “MyFileConnection” File Connection Manager set the following properties on the Process tab:
Property |
Value |
UsageType |
Create Folder |
Folder |
C:\Program Files\Microsoft SQL Server\MSAS10_50.MSSQLSERVER\OLAP\Data\My Big Database.17.db |
For the “Create Database Directory” task, the following properties were set on the Process tab:
Property |
Value |
UseDirectoryIfExists |
True |
Name |
Create Database Directory |
Description |
File System Task |
Operation |
Create Directory |
IsSourcePathVariable |
False |
SourceConnection |
MyFileConnection |
WindowStyle |
Hidden |
Precedence Constraint |
Success |
For the “Detach Database” task, the following properties were set on the Process tab:
Property |
Value |
RequiredFullFileName |
True |
Executable |
C:\CustomApps\DroppAdd.exe |
Arguments |
MyServer “My Big Database” |
FailTaskIfReturnCodeIsNotSuccessValue |
False |
SuccessValue |
1 |
TimeOut |
0 |
WindowStyle |
Hidden |
Precedence Constraint |
Success |
In this case, it wasn’t really desirable to require success of the detach operation, given that one possible scenario was that the database had never existed on the server and the database was being restored to a “clean” environment.
For the “Restore Main Data Directory” task, the following properties were set on the Process tab:
Property |
Value |
RequiredFullFileName |
True |
Executable |
C:\Windows\System32\Robocopy.exe |
Arguments |
"\\StorageServer\e$\Main" "C:\Program Files\Microsoft SQL Server\MSAS10_50.MSSQLSERVER\OLAP\Data\My Big Database.17.db" /S /PURGE |
FailTaskIfReturnCodeIsNotSuccessValue |
False |
SuccessValue |
1 |
TimeOut |
0 |
WindowStyle |
Hidden |
Precedence Constraint |
Completion |
For the “Restore drive G Data” task, the following properties were set on the Process tab:
Property |
Value |
RequiredFullFileName |
True |
Executable |
C:\Windows\System32\Robocopy.exe |
Arguments |
"\\StorageServer\G$\G_Drive" "G:\Program Files\Microsoft SQL Server\ OLAP\Data " /S /PURGE |
FailTaskIfReturnCodeIsNotSuccessValue |
False |
SuccessValue |
1 |
TimeOut |
0 |
WindowStyle |
Hidden |
Precedence Constraint |
Completion |
For the “Restore drive H Data” task, the following properties were set on the Process tab:
Property |
Value |
RequiredFullFileName |
True |
Executable |
C:\Windows\System32\Robocopy.exe |
Arguments |
"\\StorageServer\H$\H_Drive" "H:\Program Files\Microsoft SQL Server\ OLAP\Data " /S /PURGE |
FailTaskIfReturnCodeIsNotSuccessValue |
False |
SuccessValue |
1 |
TimeOut |
0 |
WindowStyle |
Hidden |
Precedence Constraint |
Completion |
For the “Restore drive I Data” task, the following properties were set on the Process tab:
Property |
Value |
RequiredFullFileName |
True |
Executable |
C:\Windows\System32\Robocopy.exe |
Arguments |
"\\StorageServer\I$\I_Drive" "I:\Program Files\Microsoft SQL Server\ OLAP\Data " /S /PURGE |
FailTaskIfReturnCodeIsNotSuccessValue |
False |
SuccessValue |
1 |
TimeOut |
0 |
WindowStyle |
Hidden |
Precedence Constraint |
Completion |
For the “Restore drive J data” task, the following properties were set on the Process tab:
Property |
Value |
RequiredFullFileName |
True |
Executable |
C:\Windows\System32\Robocopy.exe |
Arguments |
"\\StorageServer\J$\J_Drive" "J:\Program Files\Microsoft SQL Server\ OLAP\Data " /S /PURGE |
FailTaskIfReturnCodeIsNotSuccessValue |
False |
SuccessValue |
1 |
TimeOut |
0 |
WindowStyle |
Hidden |
Precedence Constraint |
Completion |
For the “Restore Drive K Data” task, the following properties were set on the Process tab:
Property |
Value |
RequiredFullFileName |
True |
Executable |
C:\Windows\System32\Robocopy.exe |
Arguments |
"\\StorageServer\K$\K_Drive" "K:\Program Files\Microsoft SQL Server\ OLAP\Data " /S /PURGE |
FailTaskIfReturnCodeIsNotSuccessValue |
False |
SuccessValue |
1 |
TimeOut |
0 |
WindowStyle |
Hidden |
Precedence Constraint |
Completion |
For the “Restore drive L Data” task, the following properties were set on the Process tab:
Property |
Value |
RequiredFullFileName |
True |
Executable |
C:\Windows\System32\Robocopy.exe |
Arguments |
"\\StorageServer\L$\L_Drive" "L:\Program Files\Microsoft SQL Server\ OLAP\Data " /S /PURGE |
FailTaskIfReturnCodeIsNotSuccessValue |
False |
SuccessValue |
1 |
TimeOut |
0 |
WindowStyle |
Hidden |
Precedence Constraint |
Completion |
For the “Restore drive M Data” task, the following properties were set on the Process tab:
Property |
Value |
RequiredFullFileName |
True |
Executable |
C:\Windows\System32\Robocopy.exe |
Arguments |
"\\StorageServer\M$\M_Drive" "M:\Program Files\Microsoft SQL Server\ OLAP\Data " /S /PURGE |
FailTaskIfReturnCodeIsNotSuccessValue |
False |
SuccessValue |
1 |
TimeOut |
0 |
WindowStyle |
Hidden |
Precedence Constraint |
Completion |
For the “Attach Database” task, we set the following properties on the Process tab:
Property |
Value |
RequiredFullFileName |
True |
Executable |
C:\CustomApps\DroppAdd.exe |
Arguments |
MyServer "C:\Program Files\Microsoft SQL Server\MSAS10_50.MSSQLSERVER\OLAP\Data\My Big Database.17.db" “My Big Database” |
FailTaskIfReturnCodeIsNotSuccessValue |
True |
SuccessValue |
1 |
TimeOut |
0 |
WindowStyle |
Hidden |
Precedence Constraint |
None |
For due diligence, it was decided to test the “Restore/Disaster Recovery” package using the same version of Adventure Works that was used for initial testing of the “Backup” package. It was not entirely surprising that copying and attaching the database in that scenario was comparable to restoring from a backup. To test a recovery scenario, it was decided to create a new “backup” using the backup SSIS package, execute a ProcessFull on the Customers dimension and then run the SSIS package to restore the database. It was very encouraging to find that the database was restored to full functionality in roughly 10 seconds.
It didn’t take a long time to receive a painful reminder of the reason that a disaster recovery strategy is important, especially with extremely large databases. Shortly after both the “Backup” and “Restore” SSIS packages were completed, one of the developers on the team managed to accidentally execute a ProcessFull on one of the dimensions used in all of the cubes contained in the database. At this point, there was a choice to be made. Fully processing the database would require a minimum of 9 days, and quite probably longer than that. The “Restore” SSIS package had undergone limited testing but the testing that had been done was extremely encouraging. Ultimately, the “Restore” SSIS package was run and roughly eight (yes, 8) hours later a fully functional multi-terabyte production database was back online.