Walkthrough: Windows Azure Table Storage (Nov 2009 and later)
This walkthrough covers what I found to be the simplest way to get a sample up and running on Windows Azure that uses the Table Storage Service. It serves as an introduction to both Windows Azure cloud services as well as using table storage. Although there is a wealth of information out there on Windows Azure - I try to tie together a lot of that information for folks of all levels to consume.
I originally wrote this walkthrough well over a year ago for our very first public release of Windows Azure at PDC ‘08.
Much has changed in the last year, and this post is an update to that original post that will work with our PDC ‘09 and v1.0 release of the Windows Azure Tools.
So what's changed from a dev perspective? Overall not a lot, mainly because table storage leverages ADO.NET Data Services and that is the core of how you work with Table Storage. The way you connect to Windows Azure Storage has changed, namespaces, class names have changed and there have been a few other tweaks.
To be clear, this post is not trying to be comprehensive or trying to dive deep in the technology, it just serves as an introduction to how the Table Storage Service works. Also, please take a look at the Quick Lap Around the Tools before doing this walkthrough.
Note: The code for this walkthrough is attached to this blog post.
After you have completed this walkthrough, you will have a Web Role that is a simple ASP.NET Web Application that shows a list of Contacts and allows you to add to and delete from that list. Each contact will have simplified information: just a name and an address (both strings).
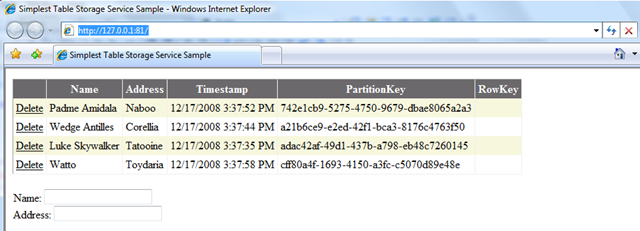
Table Storage Concepts
The Windows Azure Table Storage Services provides queryable structured storage. Each account can have 0..n tables, i.e. an unlimited number of tables and entities with no limit on the table size. (the combined size of an entity cannot exceed 1MB however)

Each entity and a table always has three properties, the PartitionKey, the RowKey and Timestamp that are not shown in above for space/legibility reasons. Together these form a unique key for an entity.
Additionally, currently the only index and all results are returned sorted by PartitionKey and then by RowKey.
Design of the Sample
When a request comes in to the UI, it makes its way to the Table Storage Service as follows (click for larger size):

The UI class (the aspx page and its code behind) is data bound through an ObjectDataSource to the WebRole1.ContactDataSource which creates the connection to the Table Storage service gets the list of Contacts and Inserts to, and Deletes from, the Table Storage.
The WebRole1.ContactDataModel class acts as the data model object and the WebRole1.ContactDataServiceContext derives from TableServiceContext which handles the authentication process and allows you to write LINQ queries, insert, delete and save changes to the Table Storage service.
Creating the Cloud Service Project
1. Start Visual Studio as an administrator (Screen shots below are from VS 2008, VS 2010 is also supported)
2. Create a new project: File | New Project
3. Under the Visual C# node (VB is also supported), select the “Cloud Service” project type then select the “Windows Azure Cloud Service” project template. Set the name to be “SimpleTableSample”. Hit OK to continue.

This will bring up a dialog to add Roles to the Cloud Service.
4. Add an ASP.NET Web Role to the Cloud Service, we’ll use the default name of “WebRole1”. Hit OK.

Solution explorer should look as follows:

5. We now want to setup the the data model for the entity. Right-click on WebRole1 in the Solution Explorer and select “Add Class”. Call this class “ContactDataModel.cs” and hit OK.
6. Add a using directive to the storage client library – a .NET library for using Windows Azure Storage. The assembly reference was already added by Visual Studio.
using Microsoft.WindowsAzure.StorageClient;
7. Make the ContactDataModel class derive from the TableServiceEntity class. This brings in the PartitionKey, RowKey and Timestamp properties. (not necessary to derive from TableServiceEntity, but a convenience)
8. For simplicity, we’ll just assign a new Guid as the PartitionKey to ensure uniqueness even though generally a GUID is not a good partition key. If we were really building an address book, using a partition key that maps to a popular search field would be a good approach (contact name for example).
In this case, since the PartitionKey is set and the RowKey to is set to a constant hard coded value (String.Empty) the storage system distributes the data over many storage nodes prioritizing scalability (spreading load over multiple servers) over the faster performance of operations on multiple entities in a single partition. (entity locality)
The key message here is that you’ll want to think about and make the right decision for your application/scenarios. To learn more read the Programming Table Storage White Paper on windowsazure.com.
 public class ContactDataModel :TableServiceEntity
{
    public ContactDataModel(string partitionKey, string rowKey)
        : base(partitionKey, rowKey)
    {
    }

    public ContactDataModel(): this(Guid.NewGuid().ToString(), String.Empty)
    {
    }

    public string Name { get; set; }
    public string Address { get; set; }
}
9. Now add the ContactDataServiceContext to the Web Role that derives from TableServiceContext. Right click on WebRole1 and select Add | Class… Name the class ContactDataServiceContext.cs.
10. Add the using directives.
 using Microsoft.WindowsAzure;
using Microsoft.WindowsAzure.StorageClient;
11. Set the base class to be TableServiceContext.
12. We’ll use the ContactDataServiceContext later to write queries, insert, remove and save changes to the table storage. One of the key things it does is provide the IQueryable<T> property that corresponds to a table.
 public class ContactDataServiceContext : TableServiceContext
{
    public ContactDataServiceContext(string baseAddress, StorageCredentials credentials)
        : base(baseAddress, credentials)
    {
    }

    public const string ContactTableName = "ContactTable";

    public IQueryable<ContactDataModel> ContactTable
    {
        get
        {
            return this.CreateQuery<ContactDataModel>(ContactTableName);
        }
    }
}
Every IQueryable<T> property corresponds to a table in table storage.
13. Let’s now add the ContactDataSource class. We'll fill this class out over the course of the next few steps. This is the class the does all the hookup between the UI and the table storage service. Right click on WebRole1 | Add | Class… and enter the file name to be “ContactDataSource.cs”.
14. Add a reference to the System.Data.Services.Client assembly. Right click on the References node under WebRole1 and select Add Reference…

Then scroll down in the list and select System.Data.Services.Client and click OK.

15. Now add the using directives to the top of the ContactDataSource.cs file.
 using Microsoft.WindowsAzure;
using Microsoft.WindowsAzure.StorageClient;
using System.Data.Services.Client;
16. For simplicity, use the instantiation of the ContactDataSource class as the location to setup the connection to Windows Azure Storage. This involves reading a connection string from the Windows Azure settings and creating the ContactDataServiceContext with that connection information.
 public class ContactDataSource
{
    private ContactDataServiceContext _ServiceContext = null;

    public ContactDataSource()
    {
        var storageAccount = CloudStorageAccount.FromConfigurationSetting("DataConnectionString");
        _ServiceContext = new ContactDataServiceContext(storageAccount.TableEndpoint.ToString(), storageAccount.Credentials);   }
17. Setup the “DataConnectionString” setting by opening up the configuration UI for WebRole1. Right click on the WebRole1 node under the Roles folder in the SimpleTableStorage cloud service project and select “Properties”.

18. Switch to the Settings tab and click “Add Setting”. Name it DataConnectionString, set the type to ConnectionString and click on the “…” button on the far right.

Hit “OK” to set the credentials to use Development Storage. We’ll first get this sample working on development storage then convert it to use cloud storage later.
19. If you actually instantiated the ContactDataSource and ran this app, you would find that the CloudStorageAccount.FromConfigurationSetting() call would fail with the following message:
ConfigurationSettingSubscriber needs to be set before FromConfigurationSetting can be used
This message is in fact incorrect – I have a bug filed to get this fixed and should be fixed in the next release (after our November 2009 release), to say “Configuration Setting Publisher” and not “ConfigurationSettingSubscriber”.
To resolve this, we need to add a bit of template code to the WebRole.cs file in WebRole1. Add the following to the WebRole.OnStart() method.
using Microsoft.WindowsAzure;
 #region Setup CloudStorageAccount Configuration Setting Publisher

// This code sets up a handler to update CloudStorageAccount instances when their corresponding
// configuration settings change in the service configuration file.
CloudStorageAccount.SetConfigurationSettingPublisher((configName, configSetter) =>
{
    // Provide the configSetter with the initial value
    configSetter(RoleEnvironment.GetConfigurationSettingValue(configName));

    RoleEnvironment.Changed += (sender, arg) =>
    {
        if (arg.Changes.OfType<RoleEnvironmentConfigurationSettingChange>()
            .Any((change) => (change.ConfigurationSettingName == configName)))
        {
            // The corresponding configuration setting has changed, propagate the value
            if (!configSetter(RoleEnvironment.GetConfigurationSettingValue(configName)))
            {
                // In this case, the change to the storage account credentials in the
                // service configuration is significant enough that the role needs to be
                // recycled in order to use the latest settings. (for example, the
                // endpoint has changed)
                RoleEnvironment.RequestRecycle();
            }
        }
    };
});
#endregion
The comments (which I wrote and is included in the samples) should explain what is going on if you care to know. In a nutshell, this code bridges the gap between the Microsoft.WindowsAzure.StorageClient assembly and the Microsoft.WindowsAzure.ServiceRuntime library – the Storage Client library is agnostic to the Windows Azure runtime as it can be used in non Windows Azure applications.
This code essentially says how to get a setting value given a setting name and sets up an event handler to handle setting changes while running in the cloud (because the ServiceConfiguration.cscfg file was updated in the cloud).
20. We need some code to ensure that the tables we rely on get created. Add the code to create the tables if they don't exist to the ContactDataSource constructor:
 public ContactDataSource()
{
    var storageAccount = CloudStorageAccount.FromConfigurationSetting("DataConnectionString");
    _ServiceContext = new ContactDataServiceContext(storageAccount.TableEndpoint.ToString(), storageAccount.Credentials);

    // Create the tables
    // In this case, just a single table.
    storageAccount.CreateCloudTableClient().CreateTableIfNotExist(ContactDataServiceContext.ContactTableName);
}
Note: For production code you'll want to optimize the reading of the configuration settings and making a call to create the tables to improve perf -- the focus of this post is to keep things simple.
Add the following code to the ContactDataSource.cs file:
 public IEnumerable<ContactDataModel> Select()
{
    var results = from c in _ServiceContext.ContactTable
                  select c;

    var query = results.AsTableServiceQuery<ContactDataModel>();
    var queryResults = query.Execute();

    return queryResults;
}

public void Delete(ContactDataModel itemToDelete)
{
    _ServiceContext.AttachTo(ContactDataServiceContext.ContactTableName, itemToDelete, "*");
    _ServiceContext.DeleteObject(itemToDelete);
    _ServiceContext.SaveChanges();
}

public void Insert(ContactDataModel newItem)
{
    _ServiceContext.AddObject(ContactDataServiceContext.ContactTableName, newItem);
    _ServiceContext.SaveChanges();
}
Note: in the Select() method, the TableServiceQuery<T> class enables you to have finer grained control over how you get the data.
Note: the use of AttachTo() in the Delete() method to connect to and remove the row.
22. The UI is defined in the aspx page and consists of 3 parts. The GridView which will display all of the rows of data, the FormView which allows the user to add rows and the ObjectDataSource which databinds the UI to the ContactDataSource.
23. The GridView is placed after the first <div>. Note that in this sample, we’ll just auto-generate the columns and show the delete button. The DataSourceId is set the ObjectDataSource which will be covered below.
     <asp:GridView
        id="contactsView"
        DataSourceId="contactData"
        DataKeyNames="PartitionKey"
        AllowPaging="False"
        AutoGenerateColumns="True"
        GridLines="Vertical"
        Runat="server"
        BackColor="White" ForeColor="Black"
        BorderColor="#DEDFDE" BorderStyle="None" BorderWidth="1px" CellPadding="4">
        <Columns>
            <asp:CommandField ShowDeleteButton="true"  />
        </Columns>
        <RowStyle BackColor="#F7F7DE" />
        <FooterStyle BackColor="#CCCC99" />
        <PagerStyle BackColor="#F7F7DE" ForeColor="Black" HorizontalAlign="Right" />
        <SelectedRowStyle BackColor="#CE5D5A" Font-Bold="True" ForeColor="White" />
        <HeaderStyle BackColor="#6B696B" Font-Bold="True" ForeColor="White" />
        <AlternatingRowStyle BackColor="White" />
    </asp:GridView>
24. The Form view to add rows is really simple, just labels and text boxes with a button at the end to raise the “Insert” command. Note that the DataSourceID is again set to the ObjectDataProvider and there are bindings to the Name and Address.
     <br />
    <asp:FormView
        id="frmAdd"
        DataSourceId="contactData"
        DefaultMode="Insert"
        Runat="server">
        <InsertItemTemplate>
            <asp:Label
                    id="nameLabel"
                    Text="Name:"
                    AssociatedControlID="nameBox"
                    Runat="server" />
            <asp:TextBox
                    id="nameBox"
                    Text='<%# Bind("Name") %>'
                    Runat="server" />
            <br />
            <asp:Label
                    id="addressLabel"
                    Text="Address:"
                    AssociatedControlID="addressBox"
                    Runat="server" />
            <asp:TextBox
                    id="addressBox"
                    Text='<%# Bind("Address") %>'
                    Runat="server" />
            <br />
            <asp:Button
                    id="insertButton"
                    Text="Add"
                    CommandName="Insert"
                    Runat="server"/>
        </InsertItemTemplate>
    </asp:FormView>
25. The final part of the aspx is the definition of the ObjectDataSource. See how it ties the ContactDataSource and the ContactDataModel together with the GridView and FormView.
     <%-- Data Sources --%>
    <asp:ObjectDataSource runat="server" ID="contactData"     TypeName="WebRole1.ContactDataSource"
        DataObjectTypeName="WebRole1.ContactDataModel"
        SelectMethod="Select" DeleteMethod="Delete" InsertMethod="Insert">
    </asp:ObjectDataSource>
26. Build. You should not have any compilation errors.
27. F5 to debug. You will see the app running in the Development Fabric using the Table Development Storage

28. Now I want to switch this to use Windows Azure Storage, not the development storage. The first step is to go to the Windows Azure Developer Portal and create a storage account.
Login and click on “New Service”, and select “Storage Account”:

Fill out the service name, the public name and optionally choose a region. You will be brought to a page that contains the following (note I rubbed out the access keys):

29. You will use the first part of the endpoint, (jnakstorageaccount) and the one of the access keys to fill out your connection string.
30. Open the WebRole1 config again, bring up Settings | DataConnectionString and fill out the account name and the account key and hit OK.

31. Hit F5 to run the application again.
This time you will be running against cloud storage – note that the data you entered when running against the development storage is no longer there.
Important Note: Before deploying to the cloud, the DiagnosticsConnectionString also needs to use storage account credentials and not the development storage account.
32. Please see the Deploying a Cloud Service walkthrough to learn how to deploy this to the Windows Azure cloud.
And there you have it, a walkthrough of using Windows Azure Table Storage – for more information and to dig deeper, definitely check out the white paper here: Windows Azure Table – Programming Table Storage and the docs in MSDN that cover what subsets of ADO.NET Data Services work with table storage here: https://msdn.microsoft.com/en-us/library/dd135720.aspx and here: https://msdn.microsoft.com/en-us/library/dd894032.aspx