How to: Add an HTTPS Endpoint to a Windows Azure Cloud Service
Back in May I posted about Adding an HTTPS Endpoint to a Windows Azure Cloud Service and with the November 2009 release of the Windows Azure Tools, that article is now obsolete.
In the last week I received a number of requests to post a new article about how to add HTTPS endpoints with the November 2009 release and later and I’m always happy to oblige!
To illustrate how to add an HTTPS endpoint to a Cloud Service, I’ll start with the thumbnail sample from the Windows Azure SDK – the web role in that sample only has an http endpoint and I’ll walkthrough the steps to add an HTTPS endpoint to that web role.
Open the Windows Azure SDK folder, for me, that's C:\Program Files\Windows Azure SDK\v1.0 and unzip the samples-cs.zip file to a writeable location.
In the samples folder, there is a sample called “Thumbnails”, open the solution Thumbnails.sln in Visual Studio. (2008 or 2010 will work)
Hit F5 to run the application and make sure everything works as expected.
If you aren’t familiar with this sample, it allows you to select an image locally via the web role which will upload that image to blob storage and will communicate the location to the worker via a queue. The worker will generate a thumbnail for that image and the web role displays the thumbnail.
The process to add an HTTPS endpoint is a 3 step process.
- Configure the endpoint
- Upload the certificate to the Cloud
- Configure the SSL certificate (and then point the endpoint to that certificate)
Adding the HTTPS Endpoint
To configure the endpoint, open up the configuration UI on the WebRole by right clicking on the Thumbnails_WebRole node under the Roles node in the Solution Explorer and selecting “Properties”.

Switch to the Endpoints tab and click the checkbox to select “HTTPS”.

This will add the HTTPS endpoint but not specify the certificate.
Switch to the Configuration page and uncheck the Launch browser for: HTTP endpoint option, by unselecting this option, on run or debug of the cloud service, the default browser will only be launched for the HTTPS endpoint.

HTTPS Endpoints on the Local Development Fabric
Click on the Debug menu, Debug | Start Debugging to package and run the cloud service on the local development fabric.
The development simulation always uses a self-signed certificate issued to and issued by 127.0.0.1 which corresponds to the local host. This certificate is installed as part of the Windows Azure Tools + SDK.
This is an important thing to note as the certificate configuration I'm about to describe below only applies when the application is running on the cloud.
By default, this certificate is not root trusted and running an application with an https endpoint on the development fabric will result in a certificate error on the local development fabric. Click on “Continue to this website (not recommended)” to browse to the web site:

For more information about the certificate Windows Azure installs including how to get rid of the certificate error when running on the development fabric -- see the end of this post.
The Certificate
To configure a certificate for use in the cloud, you will need a certificate which will be uploaded to the cloud and to configure that certificate for the role.
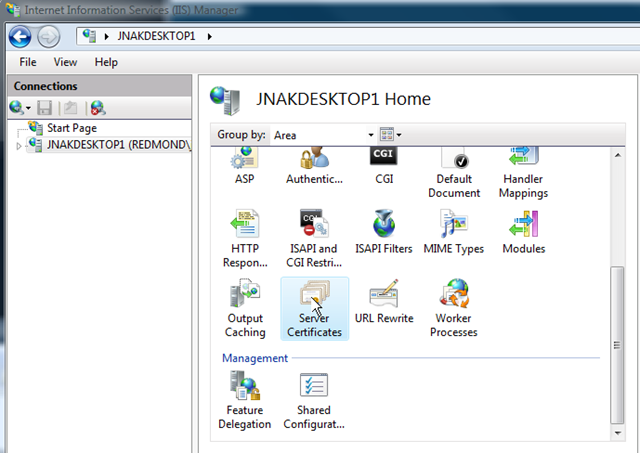
For the purpose of this article, we’ll create and use a self-signed certificate. Create a self-signed certificate by opening the IIS Manager.
Open the IIS Manager and select “Server Certificates”.
Select “Create Self-Signed Certificate…” under the “Actions” heading on the far right of the dialog.

After creating the cert, click on “Export…” to export the certificate to a pfx file. Provide a password you’ll remember.

The benefit of using IIS to create the certificate is that it is the easiest way I know to create a certificate that has the appropriate settings and an exportable private key.
Uploading the Certificate
We’ll now proceed with the upload step. Navigate the to Windows Azure Developer Portal and select a Hosted Service – this will be the same Hosted Service that you will deploy your application to later.
On the Certificates heading at the bottom of that page, select “Manage”.

This will bring you to the following page:

Upload the certificate by entering the name of the pfx file and the corresponding password you entered during the export step above and click “upload”
Copy the certificate Thumbprint to your clipboard after it is installed to your Hosted Service Component.

Configuring the Certificate
Go back to the Visual Studio Thumbnails_WebRole configuration UI, click on the Certificates tab and click “Add Certificate”.
Give the certificate a name (i.e. sslCert), paste in the Thumbprint in the Thumbprint field (you copied it to your clipboard after uploading the certificate to the portal) and leave the store location and name at the default of LocalMachine and My.

The certificates configuration page allows you to specify for a given role what certificates should be installed to the VM instances for that role and in which stores to install those certificates.
In this case, you are telling Windows Azure to install the certificate you uploaded via the Portal to all VM instances that are created for the Thumbnails_WebRole web role.
Switch to the Endpoints tab and select “sslCert” for the HTTPS certificate.
Now deploy your application to the same Hosted Service in the Cloud where you uploaded the certificate.
Once the application is deployed, you will be able to access it via http and https. You can see from the screen shot below, the certificate I uploaded is being used for the https endpoint for the cloud service I deployed:

Note: Since we uploaded a self-signed certificate, your web browser will display a certificate error when browsing to your https endpoint, using a real signed certificate will solve this problem.
Also note that you may have to add intermediate certificates to complete the certificate chain. You can do this by uploading additional certificates via the Portal and configuring those certificates in the Certificates tab of the role configuration UI. (more on this in a subsequent post)
Known Issues:
If you forget to set the SSL certificate name for the HTTPS endpoint on the Endpoints page of the role configuration UI, you'll still be able to run on the local development fabric (as per above, it always uses the installed certificate) but when you publish, it will fail with an error in the error list:
No SSL certificate specified for https input endpoint 'HttpsIn' of role 'Thumbnails_WebRole'
Windows Explorer (and your default browser) will still come up and the Thumbnails.cspkg file will appear as a 0 byte file which is misleading. We will be fixing this in a future release such that it is more obvious that there was an error.
Specifying the SSL Certificate Used by the Development Fabric to be Trusted
To find the certificate that is installed by Windows Azure, run the Microsoft Management Console by typing “mmc" from in the start menu.
Select “Add/Remove Snap-in…”:

And select “Certificates”, “Computer Account”:

Click “Next” for “Local Computer. then hit “OK”.
Under Personal\Certificates, you will see the 127.0.01 certificate that was installed.

Because the certificate is not root trusted, it’s installed to the Personal store, when you run applications that have an SSL endpoint on the local development fabric, the web browser will come up with a certificate error indicating that “There is a problem with this website’s security certificate”.
This is expected. Click on “Continue to this website (not recommended)” to browse to the web site:
If you would like to make the certificate root trusted and therefore not see the Certificate errors, you can install the certificate to the “Trusted Root Certification Authorities” Certificate store. Simply drag it to the “Trusted Root Certification Authorities” folder in the mmc window. (you can also move it to the Current User TRCA store if you prefer)
To be on the safe side, please don’t trust any HTTPS web sites with any valued information on a machine where you have made this change.
Now if you made the 127.0.0.1 certificate root trusted, when you run the application, the web site will come up without the error:
