Windows Azure Walkthrough: Table Storage
Please see the updated post for November 2009 and later.
This walkthrough covers what I found to be the simplest way to get a sample up and running on Windows Azure that uses the Table Storage Service. It is not trying to be comprehensive or trying to dive deep in the technology, it just serves as an introduction to how the Table Storage Service works.
Please take the Quick Lap Around the Tools before doing this walkthrough.
Note: The code for this walkthrough is attached, you will still have to add and reference the Common and StorageClient projects from the Windows Azure SDK.
After you have completed this walkthrough, you will have a Web Role that is a simple ASP.Net Web Application that shows a list of Contacts and allows you to add to and delete from that list. Each contact will have simplified information: just a name and an address (both strings).
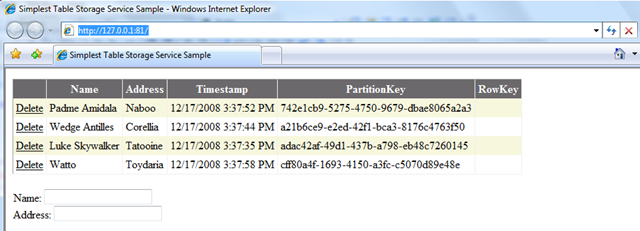
Table Storage Concepts
The Windows Azure Table Storage Services provides queryable structured storage. Each account can have 0..n tables.

Design of the Sample
When a request comes in to the UI, it makes its way to the Table Storage Service as follows (click for larger size):

The UI class (the aspx page and it’s code behind) is data bound through an ObjectDataSource to the SimpleTableSample_WebRole.ContactDataSource which creates the connection to the Table Storage service gets the list of Contacts and Inserts to, and Deletes from, the Table Storage.
The SimpleTableSample_WebRole.ContactDataModel class acts as the data model object and the SimpleTableSample_WebRole.ContactDataServiceContext derives from TableStorageDataServiceContext which handles the authentication process and allows you to write LINQ queries, insert, delete and save changes to the Table Storage service.
Creating the Cloud Service Project
1. Start Visual Studio as an administrator
2. Create a new project: File à New à Project
3. Select “Web Cloud Service”. This will create the Cloud Service Project and an ASP.Net Web Role. Call it “SimpleTableSample”

4. Find the installation location of the Windows Azure SDK. By default this will be: C:\Program Files\Windows Azure SDK\v1.0
a. Find the file named “samples.zip”
b. Unzip this to a writeable location
5. From the samples you just unzipped, add the StorageClient\Lib\StorageClient.csproj and HelloFabric\Common\Common.csproj to your solution by right-clicking on the solution in Solution Explorer and selecting Add à Existing Project.

a. Common and StorageClient and libraries that are currently distributed as samples that provide functionality to help you build Cloud Applications. Common adds Access to settings and logging while StorageClient provides helpers for using the storage services.
6. From your Web Role, add references to the Common and StorageClient projects you just added along with a reference to System.Data.Services.Client


7. Add a ContactDataModel class to your Web Role that derives from TableStorageEntity. For simplicity, we’ll just assign a new Guid as the PartitionKey to ensure uniqueness. This default of assigning the PartitionKey and setting the RowKey to a hard coded value (String.Empty) gives the storage system the freedom to distribute the data.
using Microsoft.Samples.ServiceHosting.StorageClient;
 public class ContactDataModel : TableStorageEntity
{
    public ContactDataModel(string partitionKey, string rowKey)
        : base(partitionKey, rowKey)
    {
    }

    public ContactDataModel()
        : base()
    {
        PartitionKey = Guid.NewGuid().ToString();
        RowKey = String.Empty;
    }

    public string Name
    {
        get;
        set;
    }

    public string Address
    {
        get;
        set;
    }
}
8. Now add the ContactDataServiceContext to the Web Role that derives from TableStorageDataServiceContext.
a. We’ll use this later to write queries, insert, remove and save changes to the table storage.
using Microsoft.Samples.ServiceHosting.StorageClient;
 internal class ContactDataServiceContext : TableStorageDataServiceContext
{
    internal ContactDataServiceContext(StorageAccountInfo accountInfo)
        : base(accountInfo)
    {
    }

    internal const string ContactTableName = "ContactTable";

    public IQueryable<ContactDataModel> ContactTable
    {
        get
        {
            return this.CreateQuery<ContactDataModel>(ContactTableName);
        }
    }
}
9. Next add a ContactDataSource class. We'll fill this class out over the course of the next few steps. This is the class the does all the hookup between the UI and the table storage service. Starting with the first part of the constructor, a StorageAccountInfo class is instantiated in order to get the settings required to make a connection to the Table Storage Service. (note that this is just the first part of the constructor code, the rest is in step 12)
 using Microsoft.Samples.ServiceHosting.StorageClient;
using System.Data.Services.Client;
 public class ContactDataSource
{
    private ContactDataServiceContext _ServiceContext = null;

    public ContactDataSource()
    {
        // Get the settings from the Service Configuration file
        StorageAccountInfo account =
 StorageAccountInfo.GetDefaultTableStorageAccountFromConfiguration();
10. In order for the StorageAccountInfo class to find the configuration settings, open up ServiceDefinition.csdef and add the following to <WebRole/>. These define the settings.
     <ConfigurationSettings>
      <Setting name="AccountName"/>
      <Setting name="AccountSharedKey"/>
      <Setting name="TableStorageEndpoint"/>
    </ConfigurationSettings>
11. Likewise, add the actual local development values to the ServiceConfiguration.cscfg file. Note that the settings between both files have to match exactly otherwise your Cloud Service will not run.
- When you run in the Cloud, the AccountName and AccountSharedKey will be set to the values you will get back from the Portal for your account. The TableStorageEndpoint will be set the URL for the Table Storage Service: https://table.core.windows.net
- Because these are set in the ServiceConfiguration.cscfg file, these values can be updated even after deploying to the cloud by uploading a new Service Configuration.
- For the local development case, the local host and port 10002 (by default) will be used as the Table Storage Endpoint. The AccountName and AccountSharedKey are hard coded to a value that the Development Storage service is looking for (it’s the same for all 3, Table, Blob and Queue services).
     <ConfigurationSettings>
      <Setting name="AccountName" value="devstoreaccount1"/>
      <Setting name="AccountSharedKey"
 value="Eby8vdM02xNOcqFlqUwJPLlmEtlCDXJ1OUzFT50uSRZ6IFsuFq2UVErCz4I6tq/K1SZFPTOtr/KBHBeksoGMGw=="/>
      <Setting name="TableStorageEndpoint"
    value="https://127.0.0.1:10002/"/>
    </ConfigurationSettings>
12. Next, continue to fill out the constructor (just after the call to GetDefaultTableStorageAccountFromConfiguration ()) by instantiating the ContactDataServiceContext. Set the RetryPolicy that applies only to the methods on the DataServiceContext (i.e. SaveChanges() and not the query. )
     // Create the service context we'll query against
    _ServiceContext = new ContactDataServiceContext(account);
    _ServiceContext.RetryPolicy = RetryPolicies.RetryN(3, TimeSpan.FromSeconds(1));
}
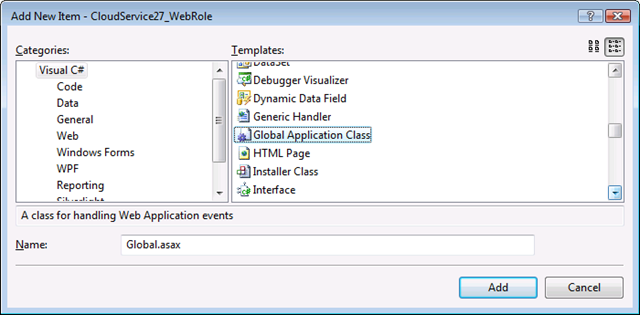
13. We need some code to ensure that the tables we rely on get created. We'll do this on first request to the web site -- which can be done by adding code to one of the handlers in the global application class. Add a global application class by right clicking on the web role and selecting Add -> New Item -> Global Application Class. (see this post for more information)
14. Add the following code to global.asax.cs to create the tables on first request:
using Microsoft.Samples.ServiceHosting.StorageClient;
 protected void Application_BeginRequest(object sender, EventArgs e)
{
    HttpApplication app = (HttpApplication)sender;
    HttpContext context = app.Context;

    // Attempt to peform first request initialization
    FirstRequestInitialization.Initialize(context);

}
And the implementation of the FirstRequestInitialization class:
 internal class FirstRequestInitialization
{
    private static bool s_InitializedAlready = false;
    private static Object s_lock = new Object();


    // Initialize only on the first request
    public static void Initialize(HttpContext context)
    {
        if (s_InitializedAlready)
        {
            return;
        }

        lock (s_lock)
        {
            if (s_InitializedAlready)
            {
                return;
            }

            ApplicationStartUponFirstRequest(context);
            s_InitializedAlready = true;
        }
    }

    private static void ApplicationStartUponFirstRequest(HttpContext context)
    {
        // This is where you put initialization logic for the site.
        // RoleManager is properly initialized at this point.

        // Create the tables on first request initialization as there is a performance impact
        // if you call CreateTablesFromModel() when the tables already exist. This limits the exposure of
        // creating tables multiple times.

        // Get the settings from the Service Configuration file
        StorageAccountInfo account = StorageAccountInfo.GetDefaultTableStorageAccountFromConfiguration();

        // Create the tables
        // In this case, just a single table.
        // This will create tables for all public properties that are IQueryable (collections)
        TableStorage.CreateTablesFromModel(typeof(ContactDataServiceContext), account);
    }
}
15. When running in the real cloud, this code is all that is needed to create the tables for your Cloud Service. The TableStorage class reflects over the ContactDataServiceContext classs and creates a table for each IQueryable<T> property where the columns of that table are based on the properties of the type T of the IQueryable<T>.
a. There is a bit more to do in order to get this to work in the local Development Storage case, more on that later.
16. At this point, it’s just a matter of filling out the ContactDataSource class with methods to query for the data, insert and delete rows. This is done through LINQ and using the ContactDataServiceContext.
a. Note: in the Select() method, the TableStorageDataServiceQuery<T> class enables you to have finer grained control over how you get the data.
i. Execute() or ExecuteWithRetries() will access the data store and return up to the first 1000 elements.
ii. ExecuteAll() or ExecuteAllWithRetries() will return all of the elements with continuation as you enumerate over the data.
iii. ExecuteWithRetries() and ExecuteAllWithRetries() uses the retry policy set on the ContactDataServiceContext for the queries.
b. Note: the use of AttachTo() in the Delete() method to connect to and remove the row.
 public IEnumerable<ContactDataModel> Select()
{
    var results = from c in _ServiceContext.ContactTable
                  select c;

    TableStorageDataServiceQuery<ContactDataModel> query =
  new TableStorageDataServiceQuery<ContactDataModel>(results as DataServiceQuery<ContactDataModel>);
    IEnumerable<ContactDataModel> queryResults = query.ExecuteAllWithRetries();
    return queryResults;
}

public void Delete(ContactDataModel itemToDelete)
{
    _ServiceContext.AttachTo(ContactDataServiceContext.ContactTableName, itemToDelete, "*");
    _ServiceContext.DeleteObject(itemToDelete);
    _ServiceContext.SaveChanges();
}

public void Insert(ContactDataModel newItem)
{
    _ServiceContext.AddObject(ContactDataServiceContext.ContactTableName, newItem);
    _ServiceContext.SaveChanges();
}
17. The UI is defined in the aspx page and consists of 3 parts. The GridView which will display all of the rows of data, the FormView which allows the user to add rows and the ObjectDataSource which databinds the UI to the ContactDataSource.
18. The GridView is placed after the first <div>. Note that in this sample, we’ll just auto-generate the columns and show the delete button. The DataSourceId is set the ObjectDataSource which will be covered below.
     <asp:GridView
        id="contactsView"
        DataSourceId="contactData"
        DataKeyNames="PartitionKey"
        AllowPaging="False"
        AutoGenerateColumns="True"
        GridLines="Vertical"
        Runat="server"
        BackColor="White" ForeColor="Black"
        BorderColor="#DEDFDE" BorderStyle="None" BorderWidth="1px" CellPadding="4">
        <Columns>
            <asp:CommandField ShowDeleteButton="true"  />
        </Columns>
        <RowStyle BackColor="#F7F7DE" />
        <FooterStyle BackColor="#CCCC99" />
        <PagerStyle BackColor="#F7F7DE" ForeColor="Black" HorizontalAlign="Right" />
        <SelectedRowStyle BackColor="#CE5D5A" Font-Bold="True" ForeColor="White" />
        <HeaderStyle BackColor="#6B696B" Font-Bold="True" ForeColor="White" />
        <AlternatingRowStyle BackColor="White" />
    </asp:GridView>
19. The Form view to add rows is really simple, just labels and text boxes with a button at the end to raise the “Insert” command. Note that the DataSourceID is again set to the ObjectDataProvider and there are bindings to the Name and Address.
     <br />
    <asp:FormView
        id="frmAdd"
        DataSourceId="contactData"
        DefaultMode="Insert"
        Runat="server">
        <InsertItemTemplate>
            <asp:Label
                    id="nameLabel"
                    Text="Name:"
                    AssociatedControlID="nameBox"
                    Runat="server" />
            <asp:TextBox
                    id="nameBox"
                    Text='<%# Bind("Name") %>'
                    Runat="server" />
            <br />
            <asp:Label
                    id="addressLabel"
                    Text="Address:"
                    AssociatedControlID="addressBox"
                    Runat="server" />
            <asp:TextBox
                    id="addressBox"
                    Text='<%# Bind("Address") %>'
                    Runat="server" />
            <br />
            <asp:Button
                    id="insertButton"
                    Text="Add"
                    CommandName="Insert"
                    Runat="server"/>
        </InsertItemTemplate>
    </asp:FormView>
20. The final part of the aspx is the definition of the ObjectDataSource. See how it ties the ContactDataSource and the ContactDataModel together with the GridView and FormView.
     <%-- Data Sources --%>
    <asp:ObjectDataSource runat="server" ID="contactData"
    TypeName="SimpleTableSample_WebRole.ContactDataSource"
        DataObjectTypeName="SimpleTableSample_WebRole.ContactDataModel"
        SelectMethod="Select" DeleteMethod="Delete" InsertMethod="Insert">
    </asp:ObjectDataSource>
21. Build. You should not have any compilation errors, all 4 projects in the solution should build successfully.
22. Create Test Storage Tables. As mentioned in step 15, creating tables in the Cloud is all done programmatically, however there is an additional step that is needed in the local Development Storage case.
a. In the local development case, tables need to be created in the SQL Express database that the local Development Storage uses for its storage. These need to correspond exactly to the runtime code. This is due to a current limitation in the local Development Storage.
b. Right click on the Cloud Service node in Solution Explorer named “Create Test Storage Tables” that runs a tool that uses reflection to create the tables you need in a SQL Express database whose name corresponds to your Solution name.

i. ContactDataServiceContext is the type that the tool will look for and use to create those tables on your behalf.
ii. Each IQueryable<T> property on ContactDataServiceContext will have a table created for it where the columns in that table will correspond to the public properties of the type T of the IQueryable<T>.
23. F5 to debug. You will see the app running in the Development Fabric using the Table Development Storage

Please see the Deploying a Cloud Service to learn how to modify the configuration of this Cloud Service to make it run on Windows Azure.