Web Standards Design with SharePoint, Part 5 (a.k.a. Rendering Semantic HTML Using the XsltListViewWebPart)
In part 4 of this series, I provided a sample SharePoint Server 2010 solution solution based on Dan Cederholm's Tugboat sample site (from his most recent book, Handcrafted CSS : More Bulletproof Web Design).
In that sample, however, all of the content on the home page of the site is rendered as static HTML. In other words, it doesn't truly leverage the power of SharePoint in order to make the site dynamic based on content stored throughout the site.
In this post, I'll show you how to take a small part of the home page (specifically This Week's Specials) and render it from items specified in a SharePoint list.
In case you aren't yet familiar with the Tugboat sample site, the following screenshot shows the site home page.
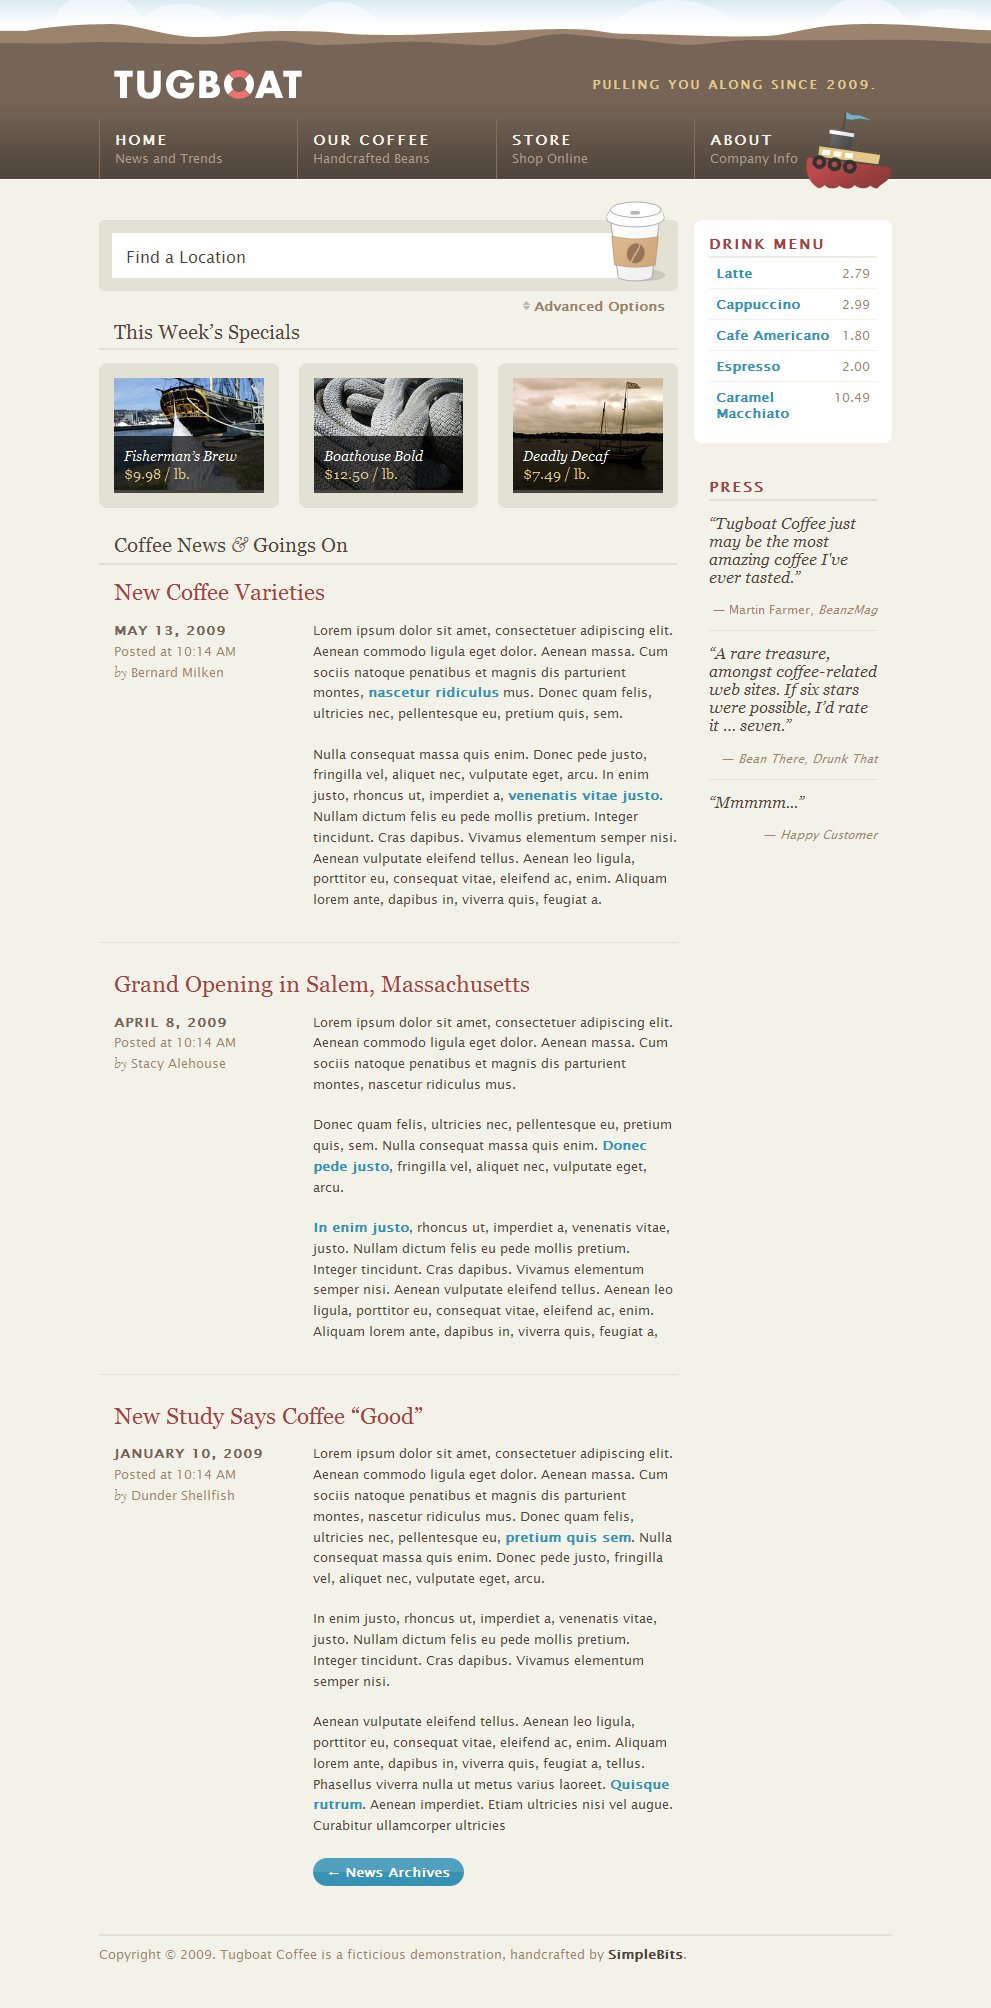
Figure 1: Tugboat - Home page
When I put on my "SharePoint Architect" hat and look at the content in the This Week's Specials section, I see a SharePoint list with columns like Title (e.g. "Fisherman's Brew"), Price (e.g. "$9.98 / lb."), and Rollup Image (e.g. "/PublishingImages/boat.jpg").
Depending on the size of the fictitious Tugboat Coffee company, we might choose to use the Business Connectivity Services in SharePoint 2010 to pull this data from some external system. However, for the sake of this sample, let's assume that Tugboat isn't anywhere near being considered a threat to Starbucks, and we want to start out by managing the "weekly specials" using a simple SharePoint list.
Let's start by designing the custom SharePoint list used to specify the data for the weekly specials.
My decision to use the Title and Rollup Image columns should be relatively straightforward. When you create a custom list in SharePoint, you get a Title column by default (so it just makes sense to use that for the name of the product). Similarly, the Publishing Image column type (used for the Rollup Image column) provides the best user experience for selecting an image from the SharePoint site (as opposed to creating a custom column using the Hyperlink or Picture column type).
However, we need to think a little bit about the Price column. We could certainly choose to add a custom column using the Single line of text column type, which would contain values like "$9.98 / lb." However, besides putting an unnecessary burden on the people maintaining the data in the list -- because they would need to explicitly type in the currency symbol and unit of measure when adding new items to the list -- using a Single line of text column type for the price wouldn't really be leveraging the full power of SharePoint. It would also allow for mistakes like:
- "9.98 / lb." (no currency symbol)
- "$9.98" (missing " / lb." from the price)
- "$9.98/lb." (no spaces)
- "$9.98 /lb." (inconsistent spacing)
- "$9.98 / lb" (missing period on the abbreviation)
- "$9.98 / bl." (yikes, what is a "bl."?!)
Therefore, let's instead break the price into two parts: Unit Price and Unit of Measure. We can then use a calculated column for Price ( in order to concatenate the values specified in the other two columns).
| Title | Unit Price | Unit of Measure | Price | Rollup Image |
|---|---|---|---|---|
| Fisherman's Brew | $9.98 | / lb. | $9.98 / lb. | /PublishingImages/boat.jpg |
| Boathouse Bold | $12.50 | / lb. | $12.50 / lb. | /PublishingImages/ropes.jpg |
| Deadly Decaf | $7.49 | / lb. | $7.49 / lb. | /PublishingImages/fame.jpg |
Here's a breakdown of the custom SharePoint list:
- Name: Specials
- Description: Items in this list appear in the "This Week's Specials" section of the site home page.
- Columns:
- Title (Single line of text, Required)
- Unit Price (Currency, Required)
- Unit of Measure (Choice, Required)
- Choices:
- / lb. (default value)
- ea.
- Choices:
- Price (Calculated)
- Formula:
- =DOLLAR([Unit Price]) & " " &[Unit of Measure]
- Formula:
- Rollup Image (Publishing Image, Required)
- Created By (Person or Group)
- Modified By (Person or Group)
Important
Even though the Unit Price column is defined using the Currency type and specifies a Currency format of $123,456.00 (United States) , you must specify the DOLLAR function in the formula for the calculated column. Otherwise, the values in the Price column would not appear as expected (e.g. "12.5 / lb.").
Note
I chose to name the list "Specials" instead of "Weekly Specials" for a reason. If this were a real world solution, then there would be a significant chance the business rules would change over time (for example to show "Today's Specials" or "This Month's Specials"). By simply naming the list "Specials", we can avoid tightly coupling the implementation to the current business rules.
Assuming you are proficient in SharePoint, within a matter of a few minutes you should be able to create the list and populate the sample data shown in the following screenshot.
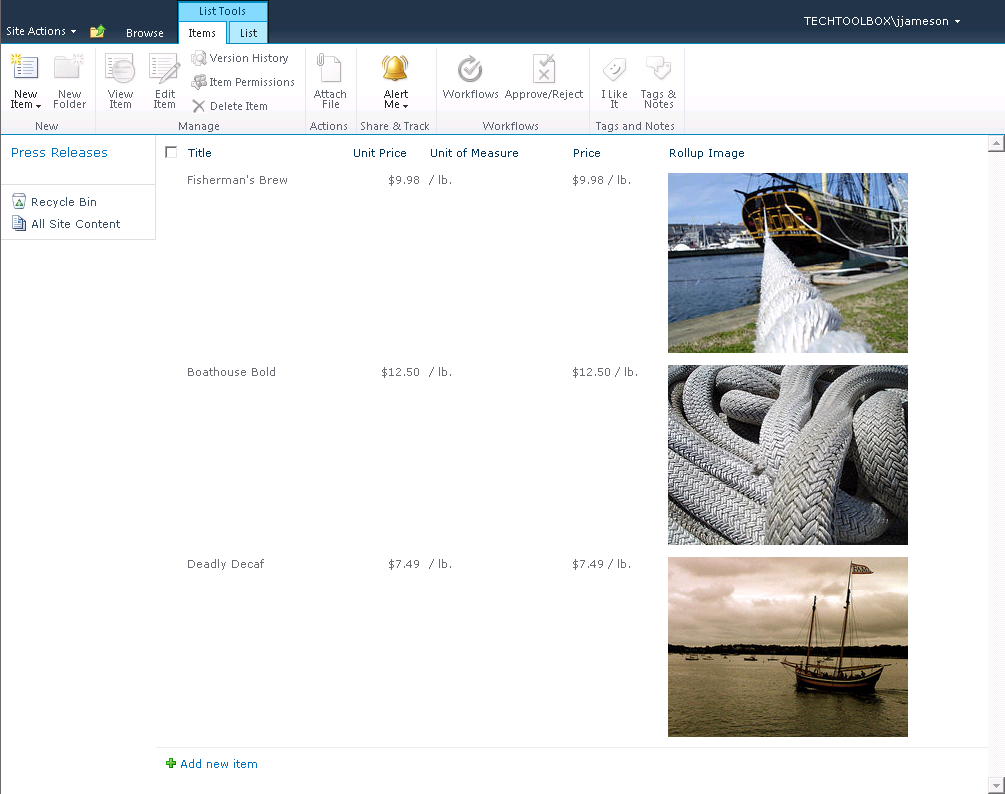
Figure 2: Specials list
The next step is to render the items in the list using the semantic markup previously specified using static HTML. In other words, instead of rendering the SharePoint list items in a table, we need to render them using an ordered list (along with the corresponding CSS class names):
<h2>This Week's Specials</h2>
<ol class='specials group'>
<li class='group'>
<div class='special'>
<div class='special-img'>
<a href='#'>
<img src='/PublishingImages/boat.jpg' alt='coffee' />
<span><strong>Fisherman’s Brew</strong>
<em>$9.98 / lb.</em></span></a>
</div>
</div>
</li>
<li class='group'>
<div class='special'>
<div class='special-img'>
<a href='#'>
<img src='/PublishingImages/ropes.jpg' alt='coffee' />
<span><strong>Boathouse Bold</strong>
<em>$12.50 / lb.</em></span></a>
</div>
</div>
</li>
<li class='group third'>
<div class='special'>
<div class='special-img'>
<a href='#'>
<img src='/PublishingImages/fame.jpg' alt='coffee' />
<span><strong>Deadly Decaf</strong>
<em>$7.49 / lb.</em></span></a>
</div>
</div>
</li>
</ol>
Start SharePoint Designer 2010 and open the site containing the Specials list. In the Site Objects pane, click Site Pages. In the ribbon, click Web Part Page and then select the first page layout (i.e. the layout with exactly one Web Part zone) to create a new page (Untitled_1.aspx).
Click the new page to view the settings for the page. In the Customization section, click Edit file.
In the page editor, in the Insert tab on the ribbon, click Data View and then click Specials to insert a new Web Part. Select the List View Web Part, click the Design tab on the ribbon, click Customize XSLT, and then click Customize Entire View.
Switch to the Code view for the page and locate the <WebPartPages:XsltListViewWebPart> element. Right-click the <xsl:stylehsheet> element within the <xsl> element for the Web Part, click Select Tag, and then delete the default XSL stylesheet.
Note that the XsltListViewWebPart provides a <dsQueryResponse> XML document containing the items from underlying the SharePoint list. Each list item is represented as a row:
<dsQueryResponse ViewStyleID="" BaseViewID="1" TemplateType="100" RowLimit="30">
<Rows>
<Row ID="1"
PermMask="0x7fffffffffffffff"
Title="Fisherman&#39;s Brew"
UnitPrice="$9.98" UnitPrice.="9.98000000000000"
UnitOfMeasure="/ lb."
Price="9.98 / lb."
PublishingRollupImage="<img alt="" src="/PublishingImages/boat.jpg" style="border:px solid" />" />
<Row ID="2"
PermMask="0x7fffffffffffffff"
Title="Boathouse Bold"
UnitPrice="$12.50"
... />
<Row ID="3"
PermMask="0x7fffffffffffffff"
Title="Deadly Decaf"
... />
</Rows>
</dsQueryResponse>
Tip
To view the "raw" XML document, insert the XSLT identity transform into the <xsl> element of the XsltListViewWebPart, save the page, and then browse to the page in Internet Explorer.
At this point, I recommend using Visual Studio to create two files (e.g. Specials.xml and Specials.xslt) for development purposes. Paste the data that you want to transform into the XML file (i.e. the <dsQueryResponse> document). Then iterate on the XSLT file until you get the final HTML that you are looking for.
Since we know that we want to generate HTML from the XML document, start by specifying the corresponding output element and a template that simply emits a heading:
 <?xml version="1.0" encoding="utf-8"?>
<xsl:stylesheet version="1.0"
  xmlns:xsl="https://www.w3.org/1999/XSL/Transform"
  xmlns:msxsl="urn:schemas-microsoft-com:xslt"
  exclude-result-prefixes="msxsl">

  <xsl:output method='html' indent='yes'/>

  <xsl:template match='dsQueryResponse'>
    <h2>This Week's Specials</h2>
  </xsl:template>
</xsl:stylesheet>
Next, enhance the dsQueryResponse template to output an ordered list. Add a second XSL template to render a list item element containing the value of the Title field for each "row" of data (in other words, for each SharePoint list item):
 <?xml version="1.0" encoding="utf-8"?>
<xsl:stylesheet version="1.0"
  xmlns:xsl="https://www.w3.org/1999/XSL/Transform"
  xmlns:msxsl="urn:schemas-microsoft-com:xslt"
  exclude-result-prefixes="msxsl">

  <xsl:output method='html' indent='yes'/>

  <xsl:template match='dsQueryResponse'>
    <h2>This Week's Specials</h2>
    <ol class='specials group'>
      <xsl:apply-templates select='Rows/Row'/>
    </ol>
  </xsl:template>

  <xsl:template match='Row'>
    <li>
      <xsl:value-of select='@Title'/>
    </li>
  </xsl:template>
</xsl:stylesheet>
At this point, the HTML rendered by the XsltListViewWebPart is:
This Week’s Specials
- Fisherman's Brew
- Boathouse Bold
- Deadly Decaf
As you can see, we need to tweak the XSLT a little bit in order to render special characters as expected (such as an encoded apostrophe). This is simply a matter of adding the disable-output-escaping attribute:
 <?xml version="1.0" encoding="utf-8"?>
<xsl:stylesheet version="1.0"
  xmlns:xsl="https://www.w3.org/1999/XSL/Transform"
  xmlns:msxsl="urn:schemas-microsoft-com:xslt"
  exclude-result-prefixes="msxsl">

  <xsl:output method='html' indent='yes'/>

  <xsl:template match='dsQueryResponse'>
    <h2>This Week's Specials</h2>
    <ol class='specials group'>
      <xsl:apply-templates select='Rows/Row'/>
    </ol>
  </xsl:template>

  <xsl:template match='Row'>
    <li>
      <xsl:value-of select='@Title' disable-output-escaping='yes'/>
    </li>
  </xsl:template>
</xsl:stylesheet>
Now that we have the basic implementation working, let's replace the content of the <li> element with the actual markup from the static HTML, and replace the various pieces of content with corresponding placeholders:
 <?xml version="1.0" encoding="utf-8"?>
<xsl:stylesheet version="1.0"
  xmlns:xsl="https://www.w3.org/1999/XSL/Transform"
  xmlns:msxsl="urn:schemas-microsoft-com:xslt"
  exclude-result-prefixes="msxsl">

  <xsl:output method='html' indent='yes'/>

  <xsl:template match='dsQueryResponse'>
    <h2>This Week's Specials</h2>
    <ol class='specials group'>
      <xsl:apply-templates select='Rows/Row'/>
    </ol>
  </xsl:template>

  <xsl:template match='Row'>
    <li class='group'>
      <div class='special'>
        <div class='special-img'>
          <a href='#'>
            <xsl:value-of select='@PublishingRollupImage'
                disable-output-escaping ='yes'/>
            <xsl:text> </xsl:text>
            <span>
              <strong>
                <xsl:value-of select='@Title' disable-output-escaping ='yes'/>
              </strong>
              <xsl:text> </xsl:text>
              <em>
                <xsl:value-of select='@Price'/>
              </em>
            </span>
          </a>
        </div>
      </div>
    </li>
  </xsl:template>
</xsl:stylesheet>
At this point, our HTML is very close to what we want it to be:
This Week’s Specials
Obviously the image URLs are invalid (outside the context of the SharePoint site -- due to server-relative URLs), but that's okay...the images should appear as soon as we view this within the actual SharePoint site.
However, there is still one minor discrepancy between the dynamic HTML generated using the above XSLT and the original static HTML created by Dan. The problem is that the third list item needs to have an additional CSS class name specified (in other words, for the last item in the list we need to render <li class="group third"> instead of <li class="group">).
Fortunately, this is very easy to achieve using a little more XSLT. Here is the final version of the XSL stylesheet that I developed to render items in the Specials list to match the original HTML specified by the Web designer (Dan):
 <xsl:stylesheet version='1.0'
    xmlns:xsl='https://www.w3.org/1999/XSL/Transform'
    xmlns:msxsl='urn:schemas-microsoft-com:xslt'
    xmlns:ddwrt2='urn:frontpage:internal'
    exclude-result-prefixes='msxsl'>
  <xsl:output method='html' indent='yes'/>
  <xsl:template match='dsQueryResponse'>
    <h2>This Week's Specials</h2>
    <ol class='specials group'>
      <xsl:apply-templates select='Rows/Row'/>
    </ol>
  </xsl:template>

  <xsl:template match='Row'>
    <li>
      <xsl:choose>
        <xsl:when test='position() = 3'>
          <xsl:attribute name='class'>group third</xsl:attribute>
        </xsl:when>
        <xsl:otherwise>
          <xsl:attribute name='class'>group</xsl:attribute>
        </xsl:otherwise>
      </xsl:choose>
      <div class='special'>
        <div class='special-img'>
          <a href='#'>
            <xsl:value-of select='@PublishingRollupImage'
                disable-output-escaping ='yes'/>
            <xsl:text> </xsl:text>
            <span>
              <strong>
                <xsl:value-of select='@Title' disable-output-escaping ='yes'/>
              </strong>
              <xsl:text> </xsl:text>
              <em>
                <xsl:value-of select='@Price'/>
              </em>
            </span>
          </a>
        </div>
      </div>
    </li>
  </xsl:template>
</xsl:stylesheet>
Copy this into the the <xsl> element for the Web Part (using SharePoint Designer) and save the page. Then view the page in Internet Explorer to verify that it renders the expected HTML.
Once you have a test page rendering the SharePoint list items using the HTML you want (rather than the out-of-the-box table-based layout), you can export the Web Part to a .webpart file and subsequently import it onto the home page (at which point, the custom Tugboat CSS rules will be applied and the content should exactly match the static HTML previously used to render This Week's Specials).
There's still quite a bit I want to cover on this topic, but I need to move on to my "day job". In my next post, I'll show you how to programmatically configure the Specials list (yep, you guessed it...upon feature activation), add some sample items to the list, and replace the static HTML content on the home page with an instance of the XsltListViewWebPart configured with the custom XSLT.
There are also some "bugs" in this new solution. For example, what happens if there are more than three items in the Specials list? Don't worry, this is easy to fix -- thanks to the power of SharePoint.
Stay tuned...
Update (2011-05-02)
The next post in this series is now available.