Claims Login Web Part for SharePoint Server 2010
In my previous post, I provided the step-by-step process I use for configuring claims-based authentication in SharePoint Server 2010.
If you follow those steps, then when you browse to the home page of the site and click Sign In, you'll be redirected to the out-of-the-box login page (/_login/default.aspx) shown in Figure 1. Note that since the Web application is configured to support both Forms-Based Authentication (FBA) and Windows authentication, the login page requires you to specify the type of credentials to use to logon to the SharePoint site.
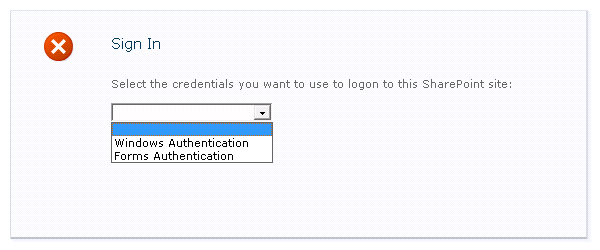
Figure 1: Default login page in SharePoint Server 2010 (/_login/default.aspx)
If you click Forms Authentication in the dropdown list, you are redirected to the default login form (/_forms/default.aspx), shown in Figure 2.
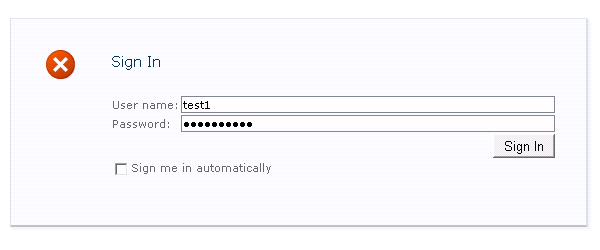
Figure 2: Default form for FBA in SharePoint Server 2010 (/_forms/default.aspx)
Note that if you click Windows Authentication in the dropdown list, you are presented with the login dialog provided by the Web browser (or, if you are logged into a workstation with domain credentials, and you are using Internet Explorer -- and you've added the site to your Local intranet zone -- then instead you are transparently authenticated with the site).
While the sign-in experience shown in the preceeding screenshots is great for prototypes and proofs-of-concept (for example, to demonstrate why claims-based authentication in SharePoint 2010 is much better than FBA in Microsoft Office SharePoint Server 2007), it obviously isn't going to be sufficient for real world solutions. Instead we need a "branded" login page like the one shown in Figure 3.
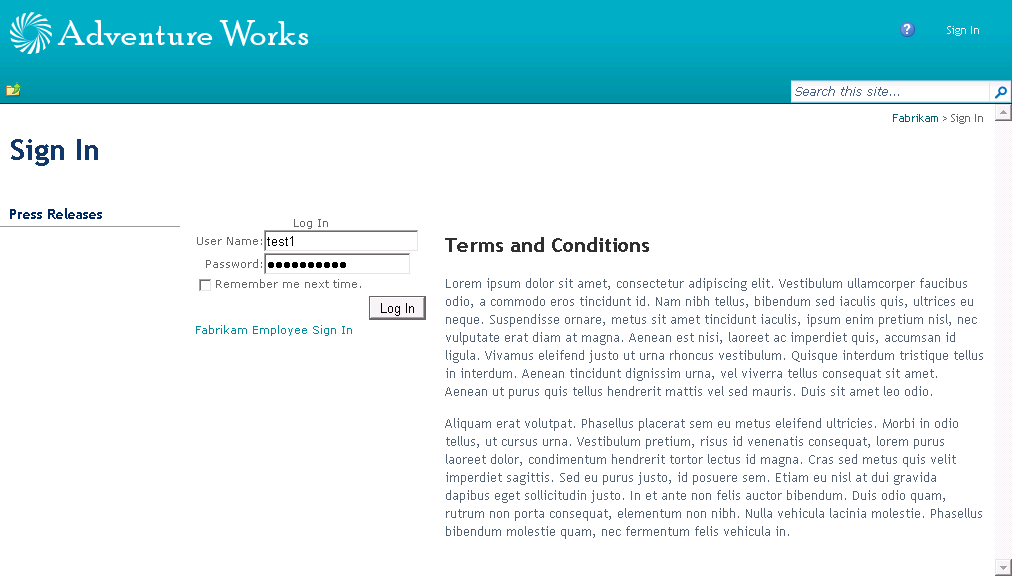
Figure 3: Custom login page in SharePoint Server 2010
Note that I didn't expend significant effort trying to get the custom login page to look great. Rather I wanted to focus on the core functionality. There's definitely signficant room for improvement in the look-and-feel area (for example, using a custom page layout to get rid of the left navigation (i.e. Press Releases) that we probably wouldn't want to show on a real site. [Also note that I didn't even bother to replace the default "Adventure Works" in the masthead with "Fabrikam".]
However, the user experience is already substantially improved by eliminating the dropdown list of available authentication types. Instead, we assume that most users of the site will be customers or partners that login using FBA. Fabrikam employees simply need to click the Fabrikam Employee Sign In link in order to authenticate with their Windows (i.e. domain) credentials.
Now, if all we wanted was to replace the out-of-the-box login pages with the custom page shown in Figure 3, there are plenty of references out there already that show you how to do this. [Just search the Internet for something like SharePoint claims custom login page and you'll find lots of examples that essentially demonstrate the same concept.]
However, rather than replacing the OOTB sign-in experience with a custom application page, I wanted instead to create a custom Claims Login Form Web Part. Why, you ask? Well, imagine that we need to change the Terms and Conditions shown in the sample above or we want to add some other content to the page.
If the custom login page is implemented as an application page, then it will most likely require a developer to modify the content on the page and provide an updated build (although this content could theoretically be stored somewhere else and dynamically inserted into the page, but then you're simply writing a lot of unnecessary custom code).
By using a Web Part instead of an application page, we can leverage all the great Web Content Management features in SharePoint in order to create the custom sign-in page and maintain it going forward (including using approval workflows to ensure changes are reviewed before customers see them on the site).
Consequently, I set out upon creating what I call the "Claims Login Form Web Part" (it's a mouthful, I know).
I started out with a very basic implementation:
 using ...

namespace Fabrikam.Demo.Web.UI.WebControls
{
    [ToolboxItemAttribute(false)]
    public class ClaimsLoginFormWebPart : WebPart
    {
        private Login loginForm;

        protected override void CreateChildControls()
        {
            base.CreateChildControls();

            this.loginForm = new Login();

            this.loginForm.Authenticate += new AuthenticateEventHandler(
                LoginForm_Authenticate);

            this.loginForm.LoggedIn += new System.EventHandler(
                LoginForm_LoggedIn);

            this.Controls.Add(loginForm);
        }

        private void LoginForm_Authenticate(
            object sender,
            AuthenticateEventArgs e)
        {
            if (e == null)
            {
                throw new ArgumentNullException("e");
            }

            e.Authenticated = SPClaimsUtility.AuthenticateFormsUser(
                new Uri(SPContext.Current.Web.Url),
                this.loginForm.UserName,
                this.loginForm.Password);
        }

        private void LoginForm_LoggedIn(
            object sender,
            EventArgs e)
        {
            if (e == null)
            {
                throw new ArgumentNullException("e");
            }

            string membershipProviderName = "FabrikamSqlMembershipProvider";
            string roleProviderName = "FabrikamSqlRoleProvider";

            SecurityToken token =
                SPSecurityContext.SecurityTokenForFormsAuthentication(
                    new Uri(SPContext.Current.Web.Url),
                    membershipProviderName,
                    roleProviderName,
                    this.loginForm.UserName,
                    this.loginForm.Password);

            SPFederationAuthenticationModule.Current.SetPrincipalAndWriteSessionToken(
                    token);

            RedirectToSuccessUrl();
        }

        /// <summary>
        /// The following method was snarfed from
        /// Microsoft.SharePoint.IdentityModel.Pages.IdentityModelSignInPageBase.
        /// </summary>
        private void RedirectToSuccessUrl()
        {
            string uriString = null;
            if (
                this.Context == null
                || this.Context.Request == null
                || this.Context.Request.QueryString == null)
            {
                uriString = null;
            }
            else if (
                string.IsNullOrEmpty(
                    this.Context.Request.QueryString["loginasanotheruser"]) == false
                && string.Equals(
                    this.Context.Request.QueryString["loginasanotheruser"],
                    "true",
                    StringComparison.OrdinalIgnoreCase)
                && string.IsNullOrEmpty(
                    this.Context.Request.QueryString["Source"]) == false)
            {
                uriString = this.Context.Request.QueryString["Source"];
            }
            else if (string.IsNullOrEmpty(
                this.Context.Request.QueryString["ReturnUrl"]) == false)
            {
                uriString = this.Context.Request.QueryString["ReturnUrl"];
            }

            if (uriString == null)
            {
                uriString = "/";
            }

            Debug.WriteLine(
                string.Format(
                    CultureInfo.CurrentCulture,
                    "Successfully authenticated, redirecting to {0}.",
                    uriString));

            SPRedirectFlags trusted = SPRedirectFlags.Default;
            if (((SPControl.GetContextWeb(this.Context) == null)
                && Uri.IsWellFormedUriString(uriString, UriKind.Absolute))
                && (SPWebApplication.Lookup(new Uri(uriString)) != null))
            {
                trusted = SPRedirectFlags.Trusted;
            }

            SPUtility.Redirect(uriString, trusted, this.Context);
        }
    }
}
Note that, thanks to the OOTB ASP.NET Login control, very little custom code is required for the Claims Login Form Web Part. In fact, I think there are more lines of code to redirect the request after successful login, than there are to actually perform the claims authentication.
The implementation above actually works as expected -- well, up to a point.
The problem is that when you click the out-of-the-box Sign Out link anytime after authenticating via the custom Web Part, a rather nasty unhandled exception occurs:
 [ArgumentException: Exception of type 'System.ArgumentException' was thrown.
Parameter name: encodedValue]
Microsoft.SharePoint.Administration.Claims.SPClaimEncodingManager.DecodeClaimFromFormsSuffix(String encodedValue) +25829214
Microsoft.SharePoint.Administration.Claims.SPClaimProviderManager.GetProviderUserKey(String encodedSuffix) +73
Microsoft.SharePoint.ApplicationRuntime.SPHeaderManager.AddIsapiHeaders(HttpContext context, String encodedUrl, NameValueCollection headers) +845
Microsoft.SharePoint.ApplicationRuntime.SPRequestModule.PreRequestExecuteAppHandler(Object oSender, EventArgs ea) +352
System.Web.SyncEventExecutionStep.System.Web.HttpApplication.IExecutionStep.Execute() +80
System.Web.HttpApplication.ExecuteStep(IExecutionStep step, Boolean& completedSynchronously) +171
Obviously this exception doesn't occur when authenticating using the OOTB login pages. I also verified that it doesn't occur when using a custom application page for FBA and claims. This really had me stumped for a little while since my Web Part was calling the exact same code as the custom application page in order to perform the claims authentication.
Using Fiddler, I observed the following cookie when authenticating with the OOTB login page:
- Cookies / Login
- Cookie
- FedAuth
- 77u/PD94...
- FedAuth
- Cookie
I noticed a similar cookie when authenticating with the custom application page (e.g. /_layouts/Fabrikam/SignIn.aspx).
However, when I logged in using the Claims Login Form Web Part, I found that there were two cookies:
- Cookies / Login
- Cookie
- .ASPXAUTH=1D0DDE35...
- FedAuth
- 77u/PD94...
- Cookie
When I then clicked Sign Out, I noticed that while the "FedAuth" cookie was removed from the subsequent request, the ".ASPXAUTH" cookie was not. In other words, the presence of an ".ASPXAUTH" cookie (without a "FedAuth" cookie) causes SharePoint Server 2010 to "blow chunks."
To remedy the issue, I moved the code in the LoginForm_LoggedIn event handler into the LoginForm_Authenticate event handler. Since the user is redirected upon successful login, this prevents the ASP.NET Login control from generating the ".ASPXAUTH" cookie. With this change, the OOTB Sign Out link started working as expected.
I then moved on to making the Claims Login Form Web Part more robust by adding the following features:
- Adding a Web Part property to allow the "Remember me" checkbox to be hidden
- Replacing the hard-coded membership and role provider names
- Rendering an "Employee Sign In" link to support Windows authentication (as shown in Figure 3)
- Hiding the login form when the user is already authenticated (in case somebody decides, for example, to drop an instance of the Claims Login Form Web Part on the home page of the site)
- Disable the form fields and validator controls when the page is in edit mode (so that content authors don't have to enter "bogus" credentials in order to save changes to the page)
- Inheriting from my custom SslRequiredWebPart to automatically redirect from HTTP to HTTPS (except in development environments, of course)
- Show a warning when the connection is not secure (i.e. in development environments or when the SSL redirect has been explicitly disabled via the Web.config file)
- Better error messages when a user is locked out or when the account is not approved (in order to avoid confusing and frustrating users)
- Detecting the scenario where the user clicks the "Sign In" link on the custom sign-in page (instead of immediately entering credentials) and redirect to "/" (instead of "/_layouts/Authenticate.aspx?...") in order to avoid an "Access Denied" error
Sample SharePoint solution
I've attached a complete Visual Studio 2010 solution in case you are interested in seeing the Claims Login Form Web Part in action.
Here are the instructions to deploy the Fabrikam Demo sample to your own SharePoint environment. First, download the attachment and unzip the files. Then you simply need to create the ASP.NET membership database and run a few PowerShell scripts, as described below.
To deploy the Fabrikam Demo for claims authentication to SharePoint:
Create three service accounts for the Fabrikam Demo Site:
- {DOMAIN}\svc-web-fabrikam - used as the application pool identity for the new Fabrikam Web site
- {DOMAIN}\svc-sp-psr - object cache user account providing Full Read access to Web applications (https://technet.microsoft.com/en-us/library/ff758656.aspx)
- {DOMAIN}\svc-sp-psu - object cache user account providing Full Control access to Web applications
Complete the procedures detailed in Step 1 from my previous post to create and configure the FabrikamDemo database (i.e. the ASP.NET membership/role database).
Complete the procedures detailed in Step 5 from my previous post to add the Web.config modifications for claims-based authentication to the following sites:
- SharePoint Central Administration v4
- Security Token Service
Note
You do not need to manually add the Web.config modifications for the "Fabrikam" Web application because this is done automatically upon activation of a feature (Fabrikam Demo - Web Application Configuration).
On the Start menu, click All Programs, click Microsoft SharePoint 2010 Products, right-click SharePoint 2010 Management Shell, and then click Run as administrator. If prompted by User Account Control to allow the program to make changes to the computer, click Yes.
From the Windows PowerShell command prompt, change to the directory containing the deployment scripts (Demo\Dev\SharePointClaimsAuthentication\Source\DeploymentFiles\Scripts), and run the following scripts:
& '.\Create Web Application.ps1'
& '.\Create Site Collections.ps1'
& '.\Enable Anonymous Access.ps1'
& '.\Configure Object Cache User Accounts.ps1'
& '.\Add Event Log Sources.ps1'
& '.\Add Solutions.ps1'
& '.\Deploy Solutions.ps1'
& '.\Activate Features.ps1'
At this point you should be able to browse to the Fabrikam site and click the Sign In link to view the Claims Login Form Web Part. In order to actually login, you'll need to first add a user to the FabrikamDemo database (refer to Step 6 in my previous post for instructions on how to do this).
Update (2011-02-26)
There was a bug in the original version of the code sample when logging in as an FBA user over HTTPS (while attempting to determine the membership and role providers from the IIS settings). This has been fixed in the updated attachment.