Automated Deployments to DEV from the Latest Build Folder
Last month I wrote a post detailing how to increment the assembly version for each build. However, incrementing the assembing version is only part of my recommended build and deployment process.
The following figure illustrates how deployments to the Development environment (DEV) are automated using the "latest" folder from the Builds share on the Release Server.
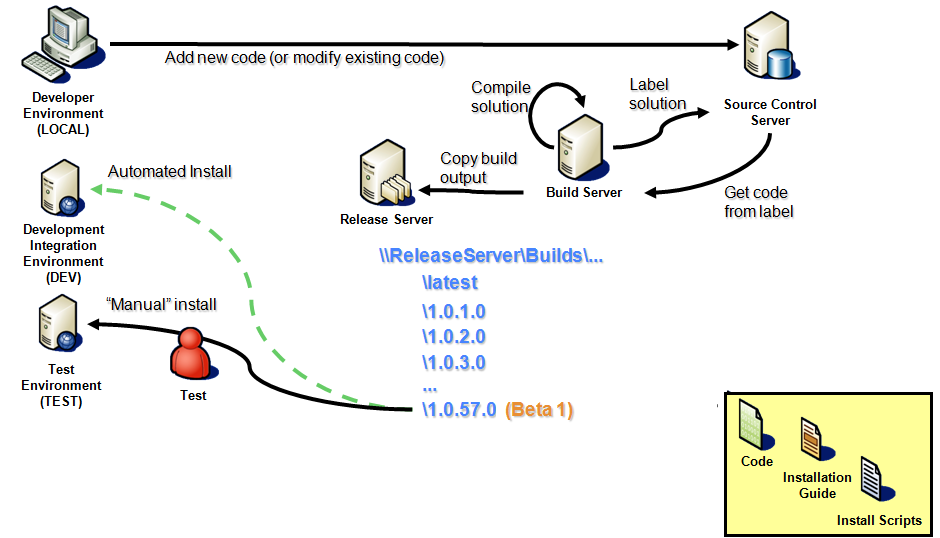
Figure 1: Automated deployment to DEV using the "latest" folder
Note
At some point since I created my Build and Deployment slide in PowerPoint years ago, I started naming the folder _latest instead of Latest (so that, by default, it appears above all of the version folders in Windows Explorer).
The _latest folder greatly simplifies the automated deployment process by:
- Eliminating the need to determine which version (folder) to install from when deploying to DEV
- Avoiding the need to detect a broken build and abort the deployment
If a build is broken (for example, a developer checks in code that doesn't compile) then the automated deployment process deploys the build as usual, except that the _latest folder contains the last good build (not the broken build).
To copy the build to the _latest folder, I add a custom target to the TFSBuild.proj file:
   <Target Name="CopyBuildToLatestFolder">
    <CreateItem Include="$(DropLocation)\$(BuildNumber)\**\*.*" >
      <Output TaskParameter="Include" ItemName="FilesToCopy"/>
    </CreateItem>
    <RemoveDir Directories="$(DropLocation)\_latest" />
    <Copy
      SourceFiles="@(FilesToCopy)"
      DestinationFiles="@(FilesToCopy->'$(DropLocation)\_latest\\%(RecursiveDir)%(Filename)%(Extension)')"/>
  </Target>
Then I override the AfterDropBuild target to invoke the custom target -- but only if the build was successful:
   <!-- After dropping a successful build, copy it to the "_latest" folder. -->
  <Target Name="AfterDropBuild"
    Condition=" '$(IsDesktopBuild)' != 'true' ">
    <GetBuildProperties
      TeamFoundationServerUrl="$(TeamFoundationServerUrl)"
      BuildUri="$(BuildUri)">
      <Output TaskParameter="CompilationSuccess" PropertyName="BuildCompilationSuccess" />
    </GetBuildProperties>

    <CallTarget Targets="CopyBuildToLatestFolder"
      Condition=" '$(BuildCompilationSuccess)' == 'True' "/>
  </Target>
Some people deploy their solution as part of the build process (in other words, they'll put some deployment steps in their MSBuild file). However, I like to keep the build and deployment pieces separate.
To be honest, in all the years that I've been using this automated build and deployment process, I've used nothing more than a simple scheduled task to deploy the solution (using the out-of-the-box Task Scheduler in Windows).
For example, on the current project that I am working on, I created a scheduled task on the DEV server (named something like Install Fabrikam Portal - Latest Build) that runs every night (shortly after the daily build process completes). [Note that the client name has been replaced to protect the innocent ;-) ]
The first step (i.e. action) in the scheduled task rebuilds a custom database for the solution:
- Program/script: "C:\NotBackedUp\Builds\Fabrikam\Portal\_latest\BusinessModel\Database\Deployment\Rebuild Database.cmd"
- Arguments: > "C:\NotBackedUp\Rebuild Database - DEV.log" 2>&1
- Start in: C:\NotBackedUp\Builds\Fabrikam\Portal\_latest\BusinessModel\Database\Deployment
The second step in the scheduled task redeploys all of the custom SharePoint WSPs and features for the solution:
- Program/script: "C:\NotBackedUp\Builds\Fabrikam\Portal\_latest\Portal\DeploymentFiles\Scripts\Redeploy Features.cmd"
- Arguments: > "C:\NotBackedUp\Redeploy Features - DEV.log" 2>&1
- Start in: C:\NotBackedUp\Builds\Fabrikam\Portal\_latest\Portal\DeploymentFiles\Scripts
Assuming this scheduled task completes successfully, each morning we have a freshly rebuilt Development environment with the latest build of our solution.
If the scheduled task fails, we can examine the log files to determine what went wrong.
Note that there are a number of enhancements in Team Foundation Server 2010 related to the build and deployment process. The process I've shown here is based on TFS 2008 (although it dates back to the old days of Visual SourceSafe and NAnt).