Forms-Based Authentication in MOSS 2007 -- The Easy Way
In one of Saturday's posts, I demonstrated how to implement a custom error page on an Internet site powered by Microsoft Office SharePoint Server (MOSS) 2007. For that post I captured various screenshots and sample code from one of my local development VMs using a freshly rebuilt Web application for Fabrikam Technologies (my favorite fictitious manufacturing company).
Two important aspects of the Fabrikam site are that it is configured for anonymous access (since the vast majority of Internet sites are browsed anonymously) and that it supports Forms-Based Authentication (FBA) to authenticate certain individuals. For example, manufacturing representatives and value-added resellers (VARs) for Fabrikam products would typically have logins to the site to provide them personalized content as well as grant them access to restricted information (e.g. sales collateral).
So the question I have this morning is this...
How long would it take you to create a new SharePoint Web application (https://fabrikam), create the corresponding site collection using the Publishing Portaltemplate, extend it to create an alternate access mapping for the Internet zone (https://www.fabrikam.com), enable anonymous access, and configure FBA on the site (including configuring the membership and role providers)? One hour? 30 minutes? How about 15 minutes? Do you think it's possible to do all this in just a few minutes?
If you have a well documented Installation Guide -- not unlike the ones I've created for various clients ;-) -- then you should be able to go through all of these steps in about 15 minutes. However, you're definitely going to be moving through the steps fairly quickly, so you had better be careful not to make any mistakes or omit any steps. This also assumes that you copy/paste the Web.config modifications for the membership and role providers, because I doubt many people -- if anyone -- could type those in from scratch in that amount of time.
For LOCAL and DEV environments, I like to be able to rebuild the Web applications quickly and with relatively little effort. Consequently, I tend to automate as much as I can using scripts, custom STSADM commands, and custom SharePoint features (deployed via Web Solution Packages -- WSPs).
As you might be aware by now, I'm also a big fan of scenario-based development. Therefore, let's use the following scenario to drive the the remainder of this post:
Doug has recently joined the team responsible for developing the Internet site for Fabrikam Technologies. Consequently Doug needs to get his local development environment created and configured as quickly as possible in order to start being a productive team member.
After creating a new Windows Server 2008 VM, Doug installs SQL Server 2008 and Visual Studio 2008. He then installs MOSS 2007 and subsequently creates a new SharePoint "farm" (which in this case is comprised only of his single VM) and a corresponding Shared Services Provider (SSP). Doug then gets the latest version of the Fabrikam solution from Team Foundation Server and builds the solution. Finally, he creates a new Web application (https://fabrikam-local) that is extended to the Internet zone (https://www-local.fabrikam.com) and configured for anonymous access and Forms-Based Authentication.
For the purposes of this post, we'll focus on the last part of this scenario -- specifically, making it quick and easy for Doug to create a local instance of the Fabrikam site and ensure it is configured as expected.
When doing scenario-based development, I often like to start with the end user experience and then figure out the steps to make that user experience a reality. In this case, let's say that after getting the Fabrikam solution from TFS and building the solution, Doug opens a command prompt and runs the following commands:
 set FABRIKAM_DEMO_URL=https://fabrikam-local
set FABRIKAM_BUILD_CONFIGURATION=Debug
set FABRIKAM_DEMO_APP_POOL_PASSWORD={some password}
cd \NotBackedUp\Fabrikam\Demo\Main\Source\StsAdm\Commands\DeploymentFiles\Scripts
"Add Solution.cmd"
"Deploy Solution.cmd"
cd ..\..\..\..\DeploymentFiles\Scripts
"Create Web Applications.cmd"
cd ..\..\Web\DeploymentFiles\Scripts
"Add Solution.cmd"
"Deploy Solution.cmd"
"Activate Features.cmd"
After these twelve steps are complete, Doug is able to browse to https://www-local.fabrikam.com and view the home page of the site as an anonymous user.
It seems pretty straightforward, doesn't it? Let's dive into the details, step-by-step...
Step 1 - Set FABRIKAM_DEMO_URL environment variable
set FABRIKAM_DEMO_URL=https://fabrikam-local
By default, the scripts for deploying the Fabrikam solution install Release builds to https://fabrikam . However, the scripts use environment variables to specify parameters that, well, vary by environment -- such as the default URL for the Fabrikam site. Following the recommended naming conventions, Doug uses https://fabrikam-local for the site on his local VM and therefore sets the FABRIKAM_DEMO_URL environment variable accordingly.
Step 2 - Set FABRIKAM_BUILD_CONFIGURATION environment variable
set FABRIKAM_BUILD_CONFIGURATION=Debug
While we would obviously never want to deploy Debug builds to the Production environment (only Release builds), we almost always deploy Debug builds to LOCAL and DEV environments (in order to make it easier to troubleshoot issues). Since the deployment scripts default to Release builds, Doug needs to set the FABRIKAM_BUILD_CONFIGURATION environment variable to Debug.
Note
FABRIKAM_BUILD_CONFIGURATION and FABRIKAM_DEMO_URL would typically be set using system environment variables as illustrated in the following figure. That way, the variables would only need to be set once per environment.
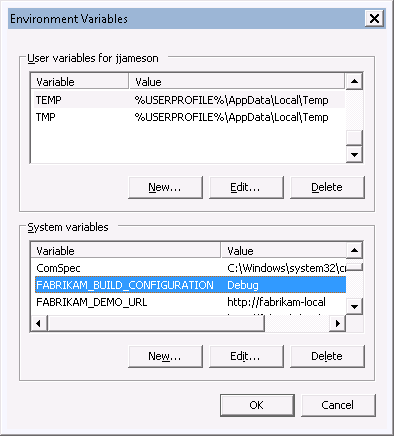
Figure 1: Setting environment variables
Step 3 - Set FABRIKAM_DEMO_APP_POOL_PASSWORD environment variable
set FABRIKAM_DEMO_APP_POOL_PASSWORD={some password}
When creating the Web application for the Fabrikam site, a new application pool is created as necessary using the corresponding service account (e.g. %USERDOMAIN%\svc-web-fabrikam or %USERDOMAIN%\svc-web-fabrikam-dev). The FABRIKAM_DEMO_APP_POOL_PASSWORD environment variable is used to avoid specifying the actual password for the service account in the script that creates the Web application.
Note that this password only needs to be set when creating (or recreating) the Web application. In other words, unlike the FABRIKAM_BUILD_CONFIGURATION and FABRIKAM_DEMO_URL environment variables, FABRIKAM_DEMO_APP_POOL_PASSWORD should never be set as a system environment variable but rather always set temporarily via a command prompt.
Step 4 - Change to the deployment scripts folder for the custom STSADM commands
cd \NotBackedUp\Fabrikam\Demo\Main\Source\StsAdm\Commands\DeploymentFiles\Scripts
While the STSADM utility in WSS v3 provides an operation to create a new Web application (specifically, stsadm.exe -o extendvs), it does not provide the ability to extend a Web application to a different IIS Web site (for example, to create a site for the Internet zone). Fortunately, it's not very difficult to extend the STSADM utility and create your own custom commands.
In order to use the custom STSADM commands for the Fabrikam solution, the corresponding WSP must first be added and deployed.
Step 5 - Add the solution for the custom StsAdm.exe commands (Fabrikam.Demo.StsAdm.Commands.wsp)
"Add Solution.cmd"
While it's certainly possible to invoke the STSADM utility directly in order to add a WSP to a SharePoint farm, I recommend using a standard set of "DR.DADA" scripts to make this easier and less prone to human error.
Step 6 - Deploy Fabrikam.Demo.StsAdm.Commands.wsp
"Deploy Solution.cmd"
After the WSP containing the custom STSADM commands has been deployed, it is now possible to extend a Web application to a different IIS Web site from the command-line and enable FBA on the site (instead of having to do these two things via SharePoint Central Administration).
Note that at this point in the process, all that Doug has done is prepare his environment to create the Web applications. The actual Web applications are not created until step 8.
Step 7 - Change to the top-level deployment scripts folder
cd ..\..\..\..\DeploymentFiles\Scripts
The Fabrikam solution is organized hierarchically by feature areas and WSPs. In addition to the scripts used to deploy each WSP (like the ones shown in steps 5 and 6), there are also deployments scripts scoped to the entire solution. One of these is used to create the Fabrikam Web applications.
Step 8 - Create the Fabrikam Web applications
"Create Web Applications.cmd"
This script performs the following:
- Creates the Fabrikam Web application (e.g. https://fabrikam-local)
- Resets IIS (which is recommended in SharePoint Central Administration whenever you create a new Web application)
- Extends the Fabrikam Web application to the Internet zone (e.g. https://www-local.fabrikam.com)
- Enables FBA on the Internet zone
- Creates the root site collection (using the Publishing Portal template)
Note that enabling FBA is performed in this step, whereas configuring FBA is not performend until step 12 below. In other words, at this point, all we have essentially done is scripted the process that would normally be completed on the Edit Authentication page in Central Administration (Central Administration > Application Management > Authentication Providers).
Step 9 - Change to the deployment scripts folder for the custom Fabrikam Web solution
cd ..\..\Web\DeploymentFiles\Scripts
Additional configuration of the Fabrikam site -- such as enabling anonymous access and adding the various FBA Web.config entries -- is performed using a custom SharePoint feature (Fabrikam.Demo.Web.FormsBasedAuthenticationConfiguration). This feature is part of Fabrikam.Demo.Web.wsp -- which is deployed using the scripts in the Web\DeploymentFiles\Scripts folder.
Step 10 - Add the custom Fabrikam Web solution (Fabrikam.Demo.Web.wsp)
"Add Solution.cmd"
Similar to step 5, a script is used to add Fabrikam.Demo.Web.wsp to the SharePoint farm.
Step 11 - Deploy Fabrikam.Demo.Web.wsp
"Deploy Solution.cmd"
After the WSP is added to the farm, it must be deployed before the features can be activated.
Step 12 - Activate the features in the Fabrikam Web solution
"Activate Features.cmd"
As mentioned in step 9, the process of configuring FBA on the Fabrikam site is performed using a custom feature (Fabrikam.Demo.Web.FormsBasedAuthenticationConfiguration). Activating this feature on the Web application performs the following:
- Adds the connection string for the membership database to the Web.config files
- Adds the Web.config changes for Forms-Based Authentication, specifically the
<authentication>,<membership>, and<roleManager>elements - Enables anonymous access on the top-level site (a.k.a. the "root Web")
- Creates a custom SharePoint timer job to set the default role provider in the Web.config file for the Internet zone
Or, for those of you that prefer to read code instead...
             string databaseServer = webApp.ContentDatabases[0].Server;
            AddConnectionStringWebConfigModifications(webApp, databaseServer);

            AddAuthenticationWebConfigModifications(webApp);
            AddMembershipWebConfigModifications(webApp);
            AddRoleManagerWebConfigModifications(webApp);

            webApp.Update();
            SharePointWebConfigHelper.ApplyWebConfigModifications(webApp);

            EnableAnonymousAccessOnRootWeb(webApp);

            ConfigureSqlRoleProviderJob.Register(webApp);
Note how I infer the database server from the content database for the Web application. In other words, the Fabrikam solution assumes that the membership database resides on the same SQL Server instance as the SharePoint content database. This ensures the feature works as expected in LOCAL and DEV (where SQL Server runs on the same server as MOSS 2007) and in TEST and PROD (where SQL Server runs on a separate server or cluster).
Let's peek under the covers of each these helper methods...
AddConnectionStringWebConfigModifications
The AddConnectionStringWebConfigModifications method adds the following elements to the Web.config files:
   <connectionStrings>
    <add name="FabrikamDemo"
      connectionString="Server={databaseServer};
Database=FabrikamDemo;
Integrated Security=true" />
  </connectionStrings>
The FabrikamDemo database contains the tables and stored procedures used by the membership and role providers.
AddAuthenticationWebConfigModifications
The AddAuthenticationWebConfigModifications method adds the following elements to the Web.config files:
     <authentication mode="{Windows|Forms}">
      <forms
        defaultUrl="/"
        timeout="60" />
    </authentication>
Note that SharePoint automatically sets the mode attribute correctly in the two Web.config files for the Web application; in other words, mode="Windows" in the Web.config file for the default zone (e.g. https://fabrikam-local) and mode="Forms" in the Web.config file for the Internet zone (e.g. https://www-local.fabrikam.com). Consequently, we only need to add the <forms /> element -- and, fortunately, there's no harm in specifying the <forms /> element even when mode="Windows".
AddMembershipWebConfigModifications
The AddMembershipWebConfigModifications method adds the following elements to the Web.config files:
     <membership defaultProvider="FabrikamSqlMembershipProvider">
      <providers>
        <clear />
        <add name="FabrikamSqlMembershipProvider"
          type="System.Web.Security.SqlMembershipProvider, System.Web,
            Version=2.0.0.0, Culture=neutral, PublicKeyToken=b03f5f7f11d50a3a"
          applicationName="Fabrikam Site"
          connectionStringName="FabrikamDemo"
          enablePasswordReset="true"
          enablePasswordRetrieval="false"
          passwordFormat="Hashed"
          requiresQuestionAndAnswer="true"
          requiresUniqueEmail="true" />
      </providers>
    </membership>
Note that the collection of membership providers is cleared in the Web.config file, thus making FabrikamSqlMembershipProvider the only provider available to use (as opposed to the default providers specified in machine.config).
AddRoleManagerWebConfigModifications
The AddRoleManagerWebConfigModifications method adds the following elements to the Web.config files:
     <roleManager defaultProvider="AspNetWindowsTokenRoleProvider" enabled="true">
      <providers>
        <remove name="AspNetSqlRoleProvider" />
        <add name="FabrikamSqlRoleProvider"
          type="System.Web.Security.SqlRoleProvider, System.Web,
            Version=2.0.0.0, Culture=neutral, PublicKeyToken=b03f5f7f11d50a3a"
          applicationName="Fabrikam Site"
          connectionStringName="FabrikamDemo" />
      </providers>
    </roleManager>
Notice that the default role provider is set to AspNetWindowsTokenRoleProvider, because this is required when accessing the site via the intranet URL using Windows Authentication. Also note that the collection of role providers is not cleared, but rather the default AspNetSqlRoleProvider is explicitly removed instead. In other words, we want to use either AspNetWindowsTokenRoleProvider (for the default/intranet URL) or FabrikamSqlRoleProvider (for the Internet zone). More on the FabrikamSqlRoleProvider in a moment...
SharePointWebConfigHelper.ApplyWebConfigModifications
After "queuing up" our Web.config modifications (using SPWebConfigModification via the custom SharePointWebConfigHelper class), we then must apply them in order to actually make the changes to the configuration files.
EnableAnonymousAccessOnRootWeb
Most of the work in enabling anonymous access on the top-level site is performed using a method in the custom SharePointWebHelper class. However, first we must get the root SPWeb from the SPWebApplication:
         internal static void EnableAnonymousAccessOnRootWeb(
            SPWebApplication webApp)
        {
            Debug.Assert(webApp != null);

            using (SPSite site = webApp.Sites["/"])
            {
                SharePointWebHelper.EnableAnonymousAccess(site.RootWeb);
            }
        }
Here's the relevant code from the SharePointWebHelper class:
         /// <summary>
        /// Ensures anonymous access is enabled on the specified site.
        /// </summary>
        /// <param name="web">The site on which anonymous access should be
        /// enabled.</param>
        public static void EnableAnonymousAccess(
            SPWeb web)
        {
            if (web == null)
            {
                throw new ArgumentNullException("web");
            }

            Logger.LogDebug(
                CultureInfo.InvariantCulture,
                "Enabling anonymous access on site ({0})...",
                web.Url);

            SPBasePermissions anonymousPermissionMask =
                SPBasePermissions.Open
                | SPBasePermissions.ViewFormPages
                | SPBasePermissions.ViewListItems
                | SPBasePermissions.ViewPages
                | SPBasePermissions.ViewVersions;

            if (web.AnonymousPermMask64 ==
                anonymousPermissionMask)
            {
                Logger.LogDebug(
                    CultureInfo.InvariantCulture,
                    "Anonymous access is already enabled on site ({0}).",
                    web.Url);

                return;
            }

            if (web.HasUniqueRoleAssignments == false)
            {
                web.BreakRoleInheritance(true);
            }

            web.AnonymousPermMask64 = anonymousPermissionMask;
            web.Update();

            Logger.LogInfo(
                CultureInfo.InvariantCulture,
                "Successfully enabled anonymous access on site ({0}).",
                web.Url);
        }
ConfigureSqlRoleProviderJob
Currently, the SPWebConfigModification class doesn't provide a way to make Web.config changes for a specific zone. Consequently, the default role provider can't be set to two different values in the Web.config files using the SPWebConfigModification class.
Instead, I created a custom SharePoint timer job that reads the Web.config file for the Internet zone and updates the default role provider if it is not currently set to FabrikamSqlRoleProvider. The custom timer is created upon activation of the FBA configuration feature (and removed when the feature is deactivated). I scheduled the timer job to run every two minutes (which seems reasonable given the minimal amount of work performed by the timer job).
 using System;
using System.Configuration;
using System.Diagnostics;
using System.Security.Permissions;
using System.Web.Configuration;

using Microsoft.SharePoint;
using Microsoft.SharePoint.Administration;
using Microsoft.SharePoint.Security;

using Fabrikam.Demo.CoreServices.Logging;

namespace Fabrikam.Demo.Web.FormsBasedAuthenticationConfiguration
{
    /// <summary>
    /// SharePoint timer job that ensures the default role provider for the
    /// Internet zone is set to "FabrikamSqlRoleProvider".
    /// </summary>
    /// <remarks>
    /// The
    /// <see cref="Microsoft.SharePoint.Administration.SPWebConfigModification"/>
    /// class does not currently provide a way to make Web.config modifications
    /// for a specific zone. To circumvent this limitation, a custom timer job
    /// is used to set the default role provider in the Web.config file
    /// corresponding to the Internet zone.</remarks>
    [CLSCompliant(false)]
    public class ConfigureSqlRoleProviderJob : SPJobDefinition
    {
        /// <summary>
        /// The name of the job.
        /// </summary>
        public const string JobName =
            "Fabrikam-ConfigureSqlRoleProviderJob";

        /// <summary>
        /// Initializes a new instance of the
        /// <see cref="ConfigureSqlRoleProviderJob"/> class.
        /// </summary>
        public ConfigureSqlRoleProviderJob() { }

        /// <summary>
        /// Initializes a new instance of the
        /// <see cref="ConfigureSqlRoleProviderJob"/> class.
        /// </summary>
        /// <param name="webApp">The Web application to configure the SQL role
        /// provider on.</param>
        public ConfigureSqlRoleProviderJob(
            SPWebApplication webApp)
            : base(JobName, webApp, null, SPJobLockType.None)
        {
        }

        /// <summary>
        /// Executes the job definition.
        /// </summary>
        /// <param name="targetInstanceId">Not used (for this job type).</param>
        [SharePointPermission(SecurityAction.LinkDemand, ObjectModel = true)]
        public override void Execute(
            Guid targetInstanceId)
        {
            base.Execute(targetInstanceId);

            ConfigureSqlRoleProviderOnInternetZone(this.WebApplication);
        }

        internal static void ConfigureSqlRoleProviderOnInternetZone(
            SPWebApplication webApp)
        {
            if (webApp == null)
            {
                throw new ArgumentNullException("webApp");
            }

            SPIisSettings iisSettings = webApp.IisSettings[SPUrlZone.Internet];

            // HACK: It would be preferable to simply check the value of
            // iisSettings.RoleManager for the expected value. However, this
            // property was not always found to be consistent with the value
            // specified in the Web.config file.

            Configuration config = WebConfigurationManager.OpenWebConfiguration(
                "/",
                iisSettings.ServerComment);

            RoleManagerSection roleManagerSection =
                (RoleManagerSection) config.GetSection(
                    "system.web/roleManager");

            if (roleManagerSection == null)
            {
                throw new InvalidOperationException(
                    "The system.web/roleManager section was not found in the"
                        + " config file.");
            }

            if (roleManagerSection.DefaultProvider
                == "FabrikamSqlRoleProvider")
            {
                Logger.LogDebug(
                    "The default role provider for the Internet zone is set to"
                        + " the expected value (FabrikamSqlRoleProvider).");

                return;
            }

            Logger.LogDebug(
                "Setting default role provider for the Internet zone to"
                    + " FabrikamSqlRoleProvider...");

            roleManagerSection.DefaultProvider = "FabrikamSqlRoleProvider";
            config.Save();

            Logger.LogInfo(
                "Successfully set default role provider for the Internet zone"
                    + " to FabrikamSqlRoleProvider.");
        }

        internal static string PreferredTitle
        {
            get { return "Fabrikam - Configure SQL Role Provider"; }
        }

        internal static void Register(
            SPWebApplication webApp)
        {
            if (webApp == null)
            {
                throw new ArgumentNullException("webApp");
            }

            ConfigureSqlRoleProviderJob job =
                webApp.JobDefinitions.GetValue<ConfigureSqlRoleProviderJob>(
                    JobName);

            if (job == null)
            {
                Logger.LogDebug(
                    "Creating new job for configuring SQL role provider...");

                job = new ConfigureSqlRoleProviderJob(webApp);

                job.Title = PreferredTitle;

                SPMinuteSchedule schedule = new SPMinuteSchedule();
                schedule.BeginSecond = 0;
                schedule.EndSecond = 59;
                schedule.Interval = 2;

                job.Schedule = schedule;
                job.Update();

                Logger.LogInfo(
                    "Successfully created new job for configuring SQL role"
                        + " provider.");
            }
        }

        internal static void Unregister(
            SPWebApplication webApp)
        {
            if (webApp == null)
            {
                throw new ArgumentNullException("webApp");
            }

            ConfigureSqlRoleProviderJob job =
                webApp.JobDefinitions.GetValue<ConfigureSqlRoleProviderJob>(
                    JobName);

            if (job != null)
            {
                Logger.LogDebug(
                    "Deleting job for configuring SQL role provider...");

                job.Delete();

                Logger.LogInfo(
                    "Successfully deleted job for configuring SQL role"
                        + " provider.");
            }
        }
    }
}
Wrapping It Up
I've pared down my sample Fabrikam solution so that it just contains the bare minimum for creating the Fabrikam Web application and configuring anonymous access and FBA on the site.
Assuming you have a MOSS 2007 development environment, you should be able to download the attachment to this post, extract the files, build it, and -- following the steps above -- deploy the solution in about 15 minutes, if not considerably less. On my VM, it takes about 7 minutes to rebuild the Fabrikam site.
While it might sound like there's a lot of custom code here, I just checked Visual Studio and it reports there are less than 500 lines of code in the solution. Note that this doesn't include the various scripts (in case you consider those to be "code"). Also note that about half of the code is for the custom STSADM commands for extending the Web application and enabling FBA.
Tip
If you haven't seen Gary Lapointe's custom STSADM commands already, I encourage you to take a look at them. You can find them on his blog: https://stsadm.blogspot.com. The custom STSADM commands used in the Fabrikam solution for extending (and unextending) the Web application were originally based on Gary's code.
I should also point out that I explicitly left out the detailed steps for creating the service account used by the app pool as well as the FabrikamDemo database (since these are expected to be one-time operations for each environment). Use aspnet_regsql.exe to create the membership database and then use SQL Server Management Studio to add the Fabrikam service account (e.g. %USERDOMAIN%\svc-web-fabrikam-dev) to the following database roles in the FabrikamDemo database:
- aspnet_Membership_BasicAccess
- aspnet_Membership_ReportingAccess
- aspnet_Roles_BasicAccess
- aspnet_Roles_ReportingAccess
Once you've done this, you should be able to add a user (using the IIS 7 console) and subsequently click the Sign In link on the home page of your local Fabrikam site to login.
To remove (or prepare to rebuild) the Fabrikam Web application, run the following:
 cd \NotBackedUp\Fabrikam\Demo\Main\Source\DeploymentFiles\Scripts
"Delete Web Applications.cmd"
"Retract Solutions.cmd"
"Delete Solutions.cmd"
The STSADM utility will complain a little while retracting the solutions (since the Web application was deleted prior to retracting Fabrikam.Demo.Web.wsp), but don't worry, it all gets cleaned up regardless of the warnings.
If the warnings during the "retract solutions" step really bother you, then you can use the scripts specific to each WSP in order to retract and delete them (retract Fabrikam.Demo.Web.wsp first, then delete the Web applications, then retract Fabrikam.Demo.StsAdm.Commands.wsp, and finally delete the two WSPs from SharePoint).
In my next post, I cover a similar method for configuring AJAX in SharePoint applications.