Build and Deployment Overview
This post provides a high-level walkthrough of the build and deployment process that I typically recommend on projects that I am involved with. It includes a series of illustrations that capture key concepts at various points in time. Specific parts of the process -- such as the development and build environments, versioning, and source control -- have already been covered in previous posts.
The following figure illustrates the initial build and deployment of the solution.
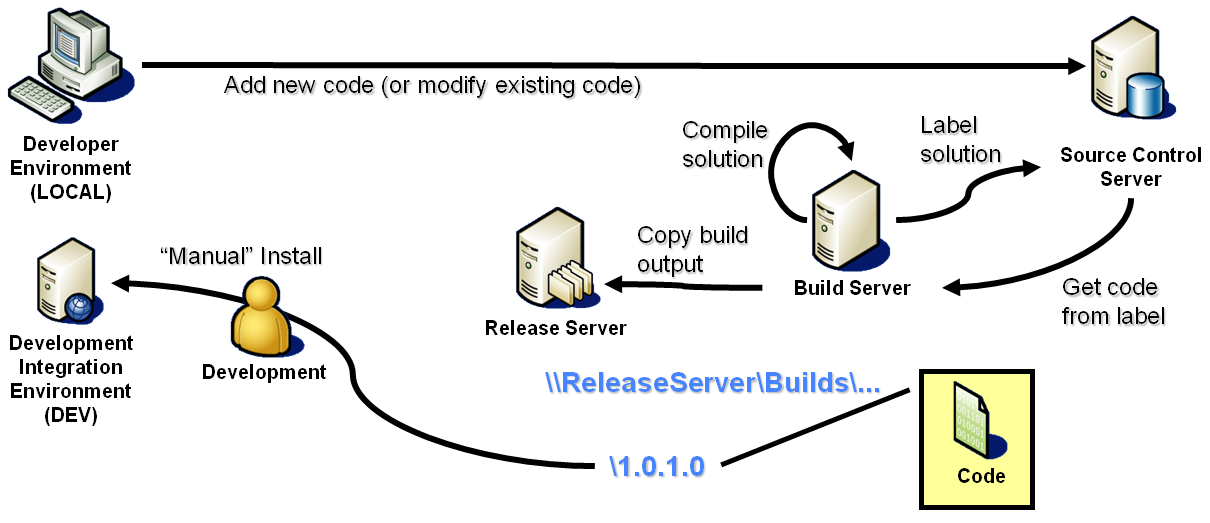
Figure 1: Initial build and deployment of the solution
Note the following key steps (corresponding to the various arrows in Figure 1):
- Using their local environments, members of the Development team add new code – or modify existing code – and subsequently check the code into the source control system.
- On the Build Server, the entire solution is labeled in the source control system to “snapshot” the exact state of the solution at the point in time just prior to the build. The label includes the version number (for example, 1.0.1.0 in the case of the initial build).
- Using the label established in the previous step, all of the source code for the solution is copied from the Source Control Server to the Build Server, thereby ensuring that what is compiled into a specific version of the solution is based on the corresponding version of the source code in the source control system.
- The solution is then compiled on the Build Server.
- Next, the output of the build is copied from the Build Server to the Release Server (in a subfolder on the Builds share). The location of the build output on the Release Server includes the build number (e.g. 1.0.1.0) as well as the build configuration such as Debug or Release (note that the build configuration is not illustrated in Figure 1). The initial build often contains nothing more than the compiled code, which may be a group of assemblies (i.e. a number of EXE and/or DLL files) or a setup package (i.e. an MSI or CAB file) but most likely does not have an installation guide or installation scripts.
- The solution is then installed by the Development team into the Development Integration Environment (DEV). This initial installation is typically performed manually (for example, by copying files, registering assemblies, modifying the server configuration, and/or interactively stepping through a setup program).
Figure 2 shows a subsequent build of the solution.
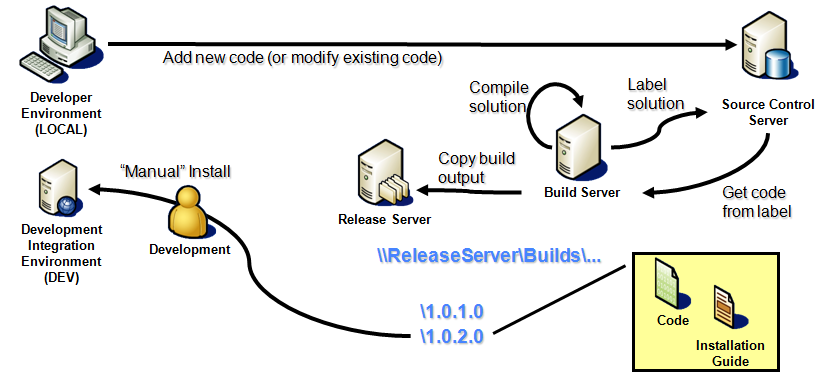
Figure 2: Subsequent build and deployment (with draft of installation guide)
The steps performed in the initial build (illustrated in Figure 1) are repeated in this subsequent build. The key difference illustrated in Figure 2 is the inclusion of the installation guide (which documents the manual steps performed by the Development team during the initial deployment). The new build (in this example, 1.0.2.0) is then deployed to the DEV environment by following the installation guide.
While this deployment process is functional -- in that a new build of the solution is successfully deployed to the DEV environment -- it requires too much manual effort to sustain the process. Figure 3 shows yet another subsequent build in which the manual installation to DEV has been replaced by an automated process.
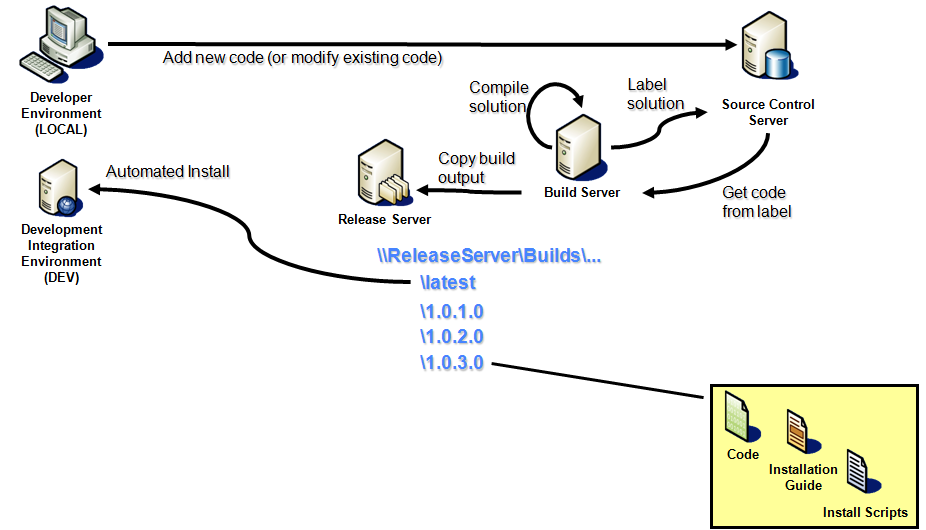
Figure 3: Automated build and deployment (with install scripts and updated installation guide)
Note that in Figure 3, the automated installation process actually installs version 1.0.3.0 but installs it from the Latest folder on the Release Server. At the point in time represented in Figure 3, the contents of the Latest and 1.0.3.0 folders are identical. Using this mirrored structure greatly simplifies the automated installs of the latest build into the DEV environment. Also note that the build illustrated in Figure 3 includes install scripts, in addition to the build output (i.e. compiled code) and the installation guide (which has been updated to specify the install scripts to be used for installing the solution). These install scripts are a key piece of the automated installation process -- and subsequent “manual” installs into other environments (as described below).
Note that the process illustrated in Figure 3 does not require any manual intervention and can therefore be performed on a scheduled basis (à la, the “daily build”) or ad hoc, simply by executing the scheduled task as desired. Each subsequent build includes the source code changes checked-in to the source control system -- thus incorporating new features and bug fixes -- and is automatically installed into the DEV environment -- thus providing visibility to all team members on the progress of development. This is particularly useful for the Test team (in order to create test cases).
Note
The daily build provides a “heartbeat” of the development effort that can be monitored regularly by all team members – not just the Development team.
As this cycle repeats (as more features are implemented in the solution), the Test team – in conjunction with the Development team -- identifies a specific build of the solution to promote to the TEST environment. This is illustrated in Figure 4.
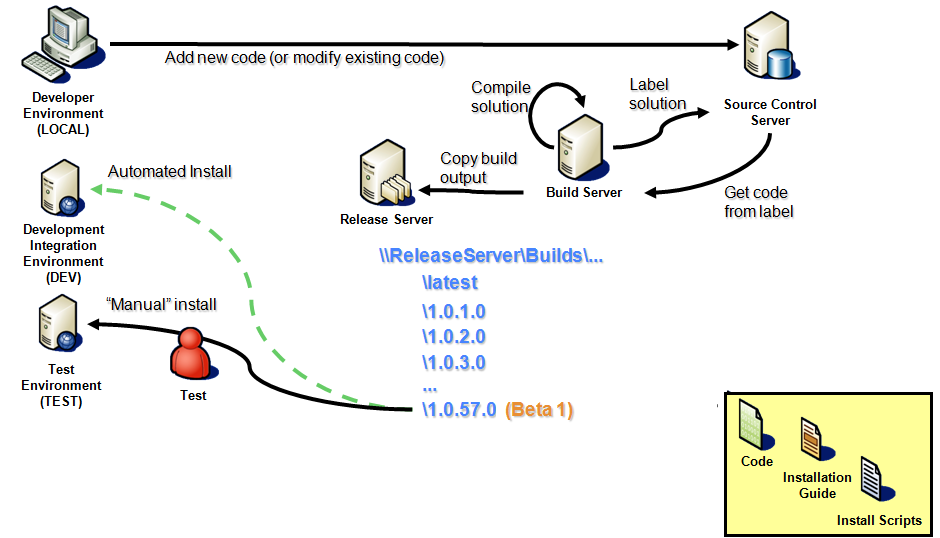
Figure 4: Installing the Beta 1 version to TEST
Note the following key concepts illustrated in the previous figure:
- The build selected by the Test team does not necessarily correspond to the latest build -- as indicated by the ellipsis (…) after 1.0.57.0 in Figure 4. It is common for a later build of the solution to be running in the DEV environment, as a result of the daily build.
- At one point in time, the version of the solution selected by the Test team was automatically installed to the DEV environment – as indicated by the dashed line in the previous figure.
- Before installing the selected build to the TEST environment, the corresponding label in the source control system is annotated – as indicated by (Beta 1) in Figure 4. This allows the Development team to quickly get the version of the source code in order to debug problems encountered in the TEST environment.
- The Test team installs the solution in the TEST environment by following the installation guide (which details the install scripts and configuration steps to be used).
Just as the daily build process (illustrated in Figure 3) is repeated throughout the development process, the promotion of selected builds to TEST is also periodically repeated, albeit much less frequently. This is illustrated in Figure 5 with the first “release candidate” of the solution.
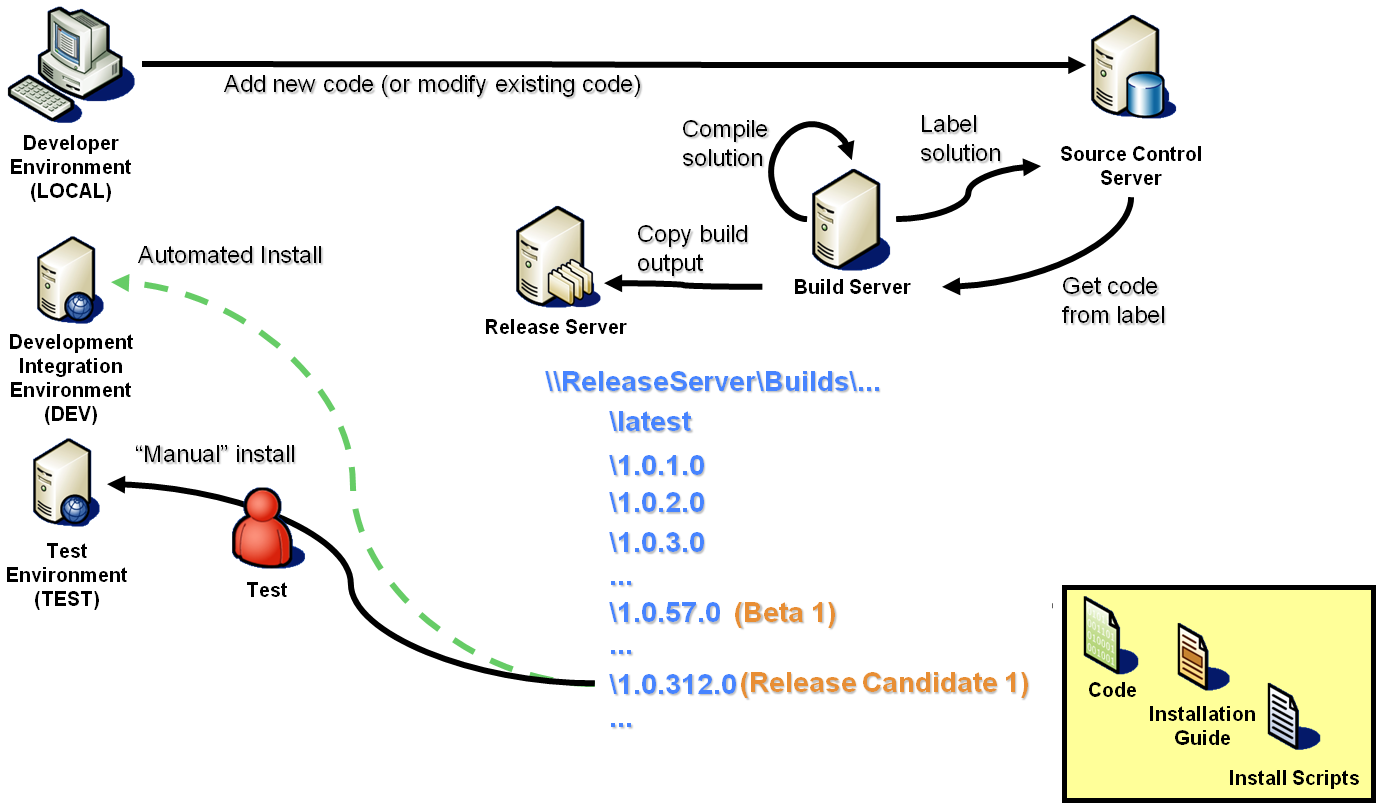
Figure 5: Installing the RC1 version to TEST
Note that if issues are discovered with the RC1 build, it may be necessary to promote yet another build to the TEST environment, as illustrated in Figure 6.
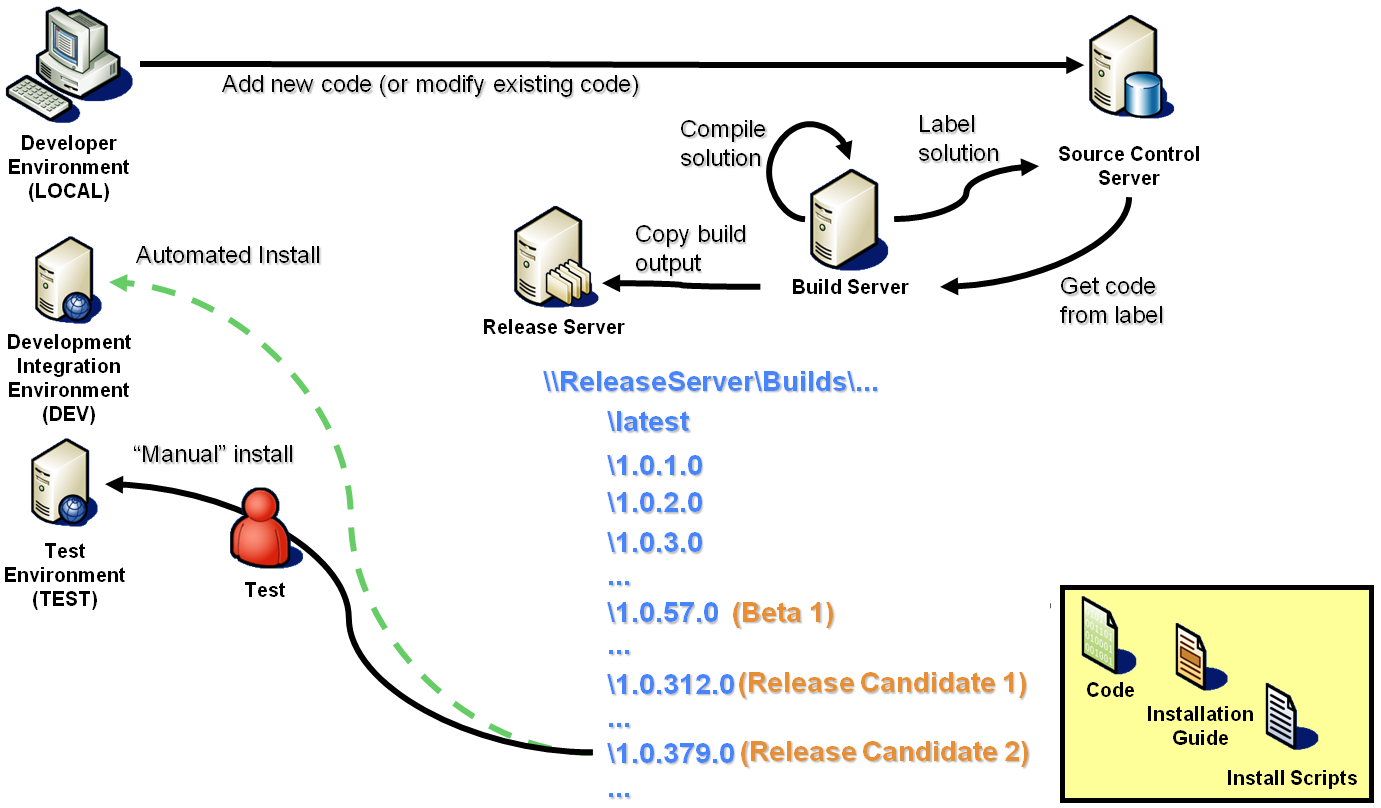
Figure 6: Installing the RC2 version to TEST
Assume that the second release candidate (version 1.0.379.0 in Figure 6) passes all of the test cases. The final step is to install the solution into the production environment, as illustrated in Figure 7.
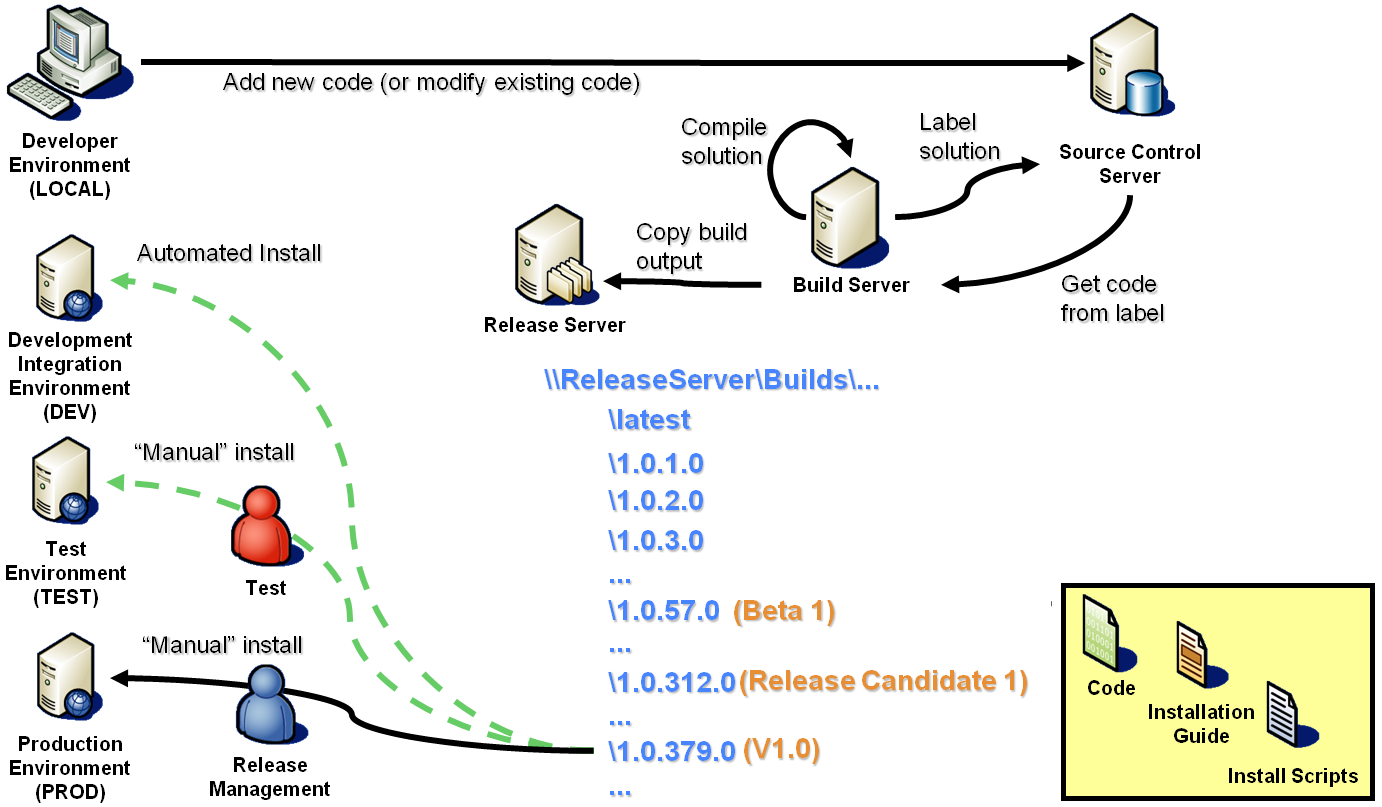
Figure 7: Installing the V1.0 release to PROD
Note the following key concepts illustrated in the previous figure:
- Release Management – not the Test team – is responsible for installing the solution into the PROD environment.
- The build installed into PROD was previously installed and evaluated in the DEV and TEST environments.
- Before installing the selected build to the PROD environment, the corresponding label in the source control system is annotated – as indicated by (V1.0) in Figure 7. The Development team also creates a branch in the source control system from this version in order to support “hotfixes” (patches) and minor releases (e.g. V1.1).
- Release Management installs the solution in the PROD environment by following the installation guide (which details the install scripts and configuration steps to be used) just as the Test team did when installing the solution into the TEST environment.