How to capture memory dumps when a specific event log occurs using new Event Log feature.
I came across a new feature (well new to me) in the Event Viewer in Windows 7 (also in Vista and Windows Server 2008) recently that can be useful in troubleshooting various issues. The new Event Viewer now allows you to attach a task to a particular event which will be launched automatically when a matching event is logged. As you are probably already thinking, there are a multitude of ways in which this could be used to aid in troubleshooting problems and monitoring server health. For this article I will cover one real–world scenario where this feature could be used.
Something I have run into on several occasions while working in IIS/ASP.NET support is the desire to capture memory dumps of the IIS process(s) when a particular Event occurs on the system. Before discovering this feature there wasn’t a really robust and easy way of doing this. We used to have a tool called EventMon which was an exe that would run in the system tray and monitor for specific events and more recently we have used a custom vbscript to monitor the event log using WMI (see https://blogs.technet.com/netmon/archive/2007/02/22/eventmon-stopping-a-capture-based-on-an-eventlog-event.aspx). With the new Event Log feature, these tools are no longer necessary. If you are like me, you prefer installing as few extraneous tools as possible on your machines. We also have the added benefit of this running as a service so we don’t have to keep a user logged into the system to monitor the event log.
For our example I will show you how to use the Event Log to trigger a memory dump capture of the IIS processes when a specific event occurs. To get started, you will need to download and install the Debugging Tools for Windows. I always install to the C:\debuggers folder for convenience. Make sure you download the correct bitness (x64, x86) for your system. Open up the Event Viewer and find the specific event you are interested in. For my example, I have used an ASP.NET Application Event 1309 which is for an Unhandled Exception. Obviously in this case the Event already has all the info for fixing our problem and a memory dump would be overkill since it is a simple DivideByZeroException but I am just using this to demonstrate the concept.

Now in the Actions pane click on the “Attach Task To This Event…” option. This will open up the “Create Basic Task Wizard. The task name is pre-populated for you but you can edit it if you wish. You can also enter a description for the task here.

Clicking the next button will bring up the Event Log information. This will be filled in and you can simply click next to get to the “Action” step.

On the “Action” step, “Start a program” will be selected by default. Since this is what we want, no change is needed here. You can probably start to see the possibilities here. Since we can start a program, this gives us lots of options for things we could do in response to this Event. In this case we will be launching the debugger to capture a memory dump. In addition to launching a program we could have chosen to send an email or display a message.

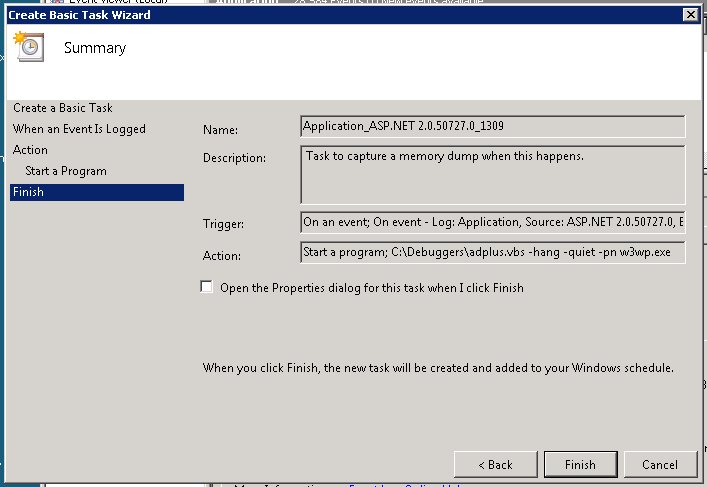
This will bring up the “Start a program” step. Here you will enter the command line and arguments. In this case, I am using the adplus script to capture the dump. You can find more information about adplus here https://support.microsoft.com/kb/286350.

By default this task will only run when the user account is logged on. To change this, click the checkbox to open the task properties before clicking the Finish button. Click Next and Finish to activate the task. On the Properties dialog, select the option “Run whether user is logged on or not”. You can also select the task to run under a different account if you wish. There are lots of advanced options you can set from this dialog such as setting up additional Triggers, executing multiple actions, and setting up Conditions.
That’s all there is to it. A memory dump of the worker process(s) will be triggered each time this event occurs. Once you have captured the dumps don't forget to go into the Task Scheduler to disable or delete the task to prevent filling up your hard disk with dump files. As you can see, we have demonstrated one of many possibilities here using this new functionality. I hope this has been a helpful tutiorial and increased awareness around just one of the many features available in current versions of Windows.