Couchbase on Azure: Creating a Virtual Network
This is the second post of a walkthrough to set up a mixed-mode platform- and infrastructure-as-a-service application on Windows Azure using Couchbase and ASP.NET. For more context on the application, please review this introductory post.
Why Do I Need a Virtual Network?
In Windows Azure, applications are deployed as Cloud Services (formerly called Hosted Services). A cloud service can contain multiple Web and Worker roles (the Platform-as-a-Service model that was part of Windows Azure from day one) or it can contain multiple Virtual Machines using the new Infrastructure-as-a-Service capability. The roles or VMs comprising a cloud service are all part of the same network sandbox and are able to communicate with each other with no additional infrastructure - in Web and Worker Roles, you configure internal endpoints and in virtual machines you can open up the desired ports on the firewall.
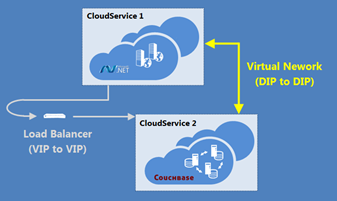 That all works well within the context of the same cloud service; however, at this time you cannot mix the Web/Worker role model with virtual machines in the same service, and if you recall the architecture diagram, the two primary components of my application indeed reside in different cloud services.
One option is to simply host the Couchbase service with a publically addressable endpoint (the ASP.NET application would already be publically accessible, of course). In this context, communication occurs via the roles’ virtual IPs (VIPs), but doing so has two primary drawbacks:
- Every request from the ASP.NET application will be routed through the Windows Azure load balancer to get back to the Couchbase cluster, increasing latency roughly threefold (to 0.88 ms as quoted in one source)
- The Couchbase cluster has to expose a publically facing endpoint. That unnecessarily increases the attack surface, since the only client application accessing it is located in the same Windows Azure data center.
The second option is a Virtual Network, which allows you to set up a private network space (with subnets) that connects service deployments in the cloud directly via IP addresses (DIPs). In fact, Windows Azure Virtual Networks can span cloud and on-premises environments by connecting Windows Azure services to your own VPN devices.
I’ll be leveraging a virtual network that spans cloud services within Windows Azure to build out the sample application. There is no on-premises component to my scenario, but if you’re interested in pursuing the use of Virtual Networks for hybrid implementations, check out Create a Virtual Network for Cross-Premises Connectivity on the Windows Azure site.
Planning the Network
When creating a network - either physical or virtual – one of the first steps is to plot out the topology. A Windows Azure Virtual Network can fall within three predefined address ranges (in CIDR format):
- 10.0.0.0/8
- 172.16.0.0/12
- 192.168.0.0/16
In this particular case, I want two subnets, one to support the Couchbase cluster (say up to 6 machines) and the second to support the TapNet web application, where each instance of the ASP.NET Web Role consumes one IP address in that subnet. It’s a sample application, so not likely to garner much traffic, but I do want to leave room in the subnet to scale up the instances to meet demand. Let’s presume I might need 20 instances some day. So basically, I need a scheme that will support two subnets with 6 and 20 machines, respectively. Actually, for growth, I should also reserve some address space for additional subnets to which new applications that make use of the same Couchbase cluster might be deployed.
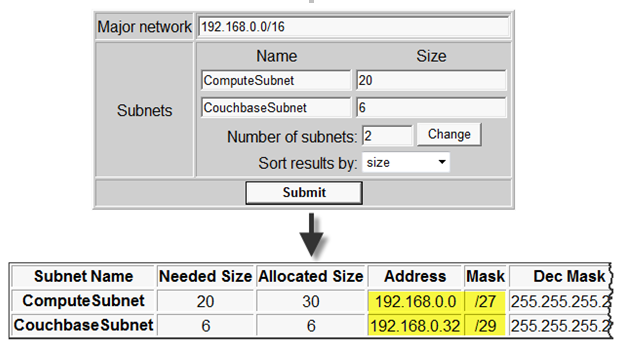
Trying to figure out what address schemes to use was a bit of a challenge for me, until I ran across this subnet calculator. You can plug in the parameters for a network and its sub-networks, and you’ll get a suggested subnet configuration along with the percentage of address space utilized (useful for balancing need for future growth with intra-network IP address conservation). Certainly you’d want to vet the resulting configuration with your network folks, but for this walkthrough it works well.
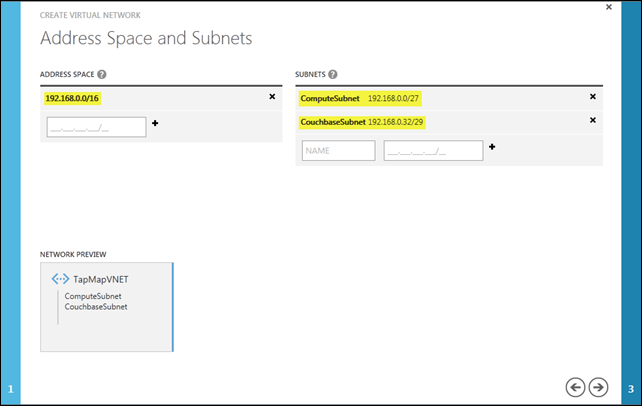
Note specifically the highlighted subnet addresses below; those are exactly what are needed for the next step of the Virtual Network setup.
Defining the Virtual Network in Windows Azure
To set up the Virtual Network. I’m going to use the new portal experience (HTML5 and all that!), but you should be aware that everything you do in the portal leverages an underlying REST Service Management API, and that same API is and can be exposed in a number of ways. There are PowerShell cmdlets for a more script-driven experience, and Systems Center 2012 – Operations Manager provides a lot of capability for managing your cloud services in addition to on-premises assets.
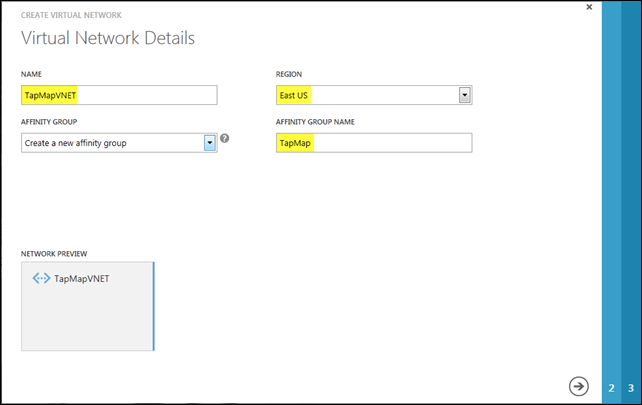
The first step is to give the Virtual Network a name; TapMapVNET seems appropriate here. As with other cloud services and assets, I need to indicate in which Windows Azure data center to set this network up. I’m in New England so the East US region is more or less my default.
I also create an affinity group here, which you can think of as a logical subset of, in this case, the East US region. When I include other cloud assets in that same affinity group, the Windows Azure fabric will collocate those resources as closely as possible within that data center to maximize application efficiency and performance.
The next step is to define the address space for the network and subnets. Below is the configuration suggested by the VLSM (CIDR) Subnet Calculator discussed earlier in this post.
Step 3 of the process allows me both to point my own separately-deployed DNS in the cloud to support a virtual network and/or to connect the virtual network to an on-premises network. In this particular case, I need neither capability, so it’s a simple matter of clicking the checkmark to complete the setup.
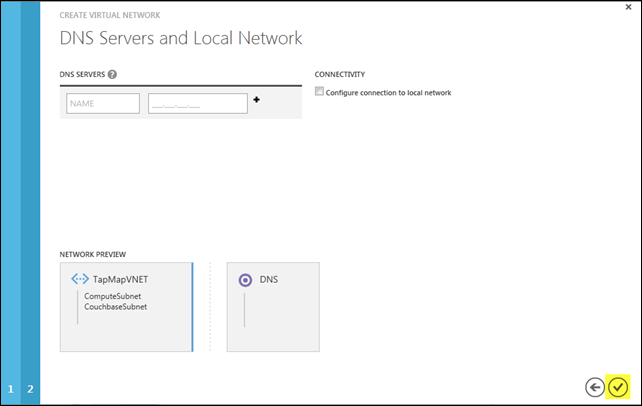
Why don’t I need a DNS? Couchbase servers use their IP addresses as unique identifiers, and those identifiers also appear in client connection URLs, so machine names aren’t significant here. What is important is that the IP addresses don’t change when VMs reboot (either due to failure or for maintenance reasons); such IP persistence is indeed guaranteed when using a Virtual Network.
By the way, you get domain name resolution within the same cloud service ‘free’ via Windows Azure provided DNS. That would mean in this case that each of the Couchbase services in a cluster could refer to each other by name versus IP address with no additional configuration requirements. Windows Azure provided DNS is not supported across cloud services though, so my ASP.NET application hosted in a PaaS Cloud Service (as a Web Role) cannot address the machines in the Couchbase cluster by name – unless I also deploy my own DNS to that cloud. That’s a bit beyond the scope of what I wanted to cover, but you can read more about how to do so on the Windows Azure site.
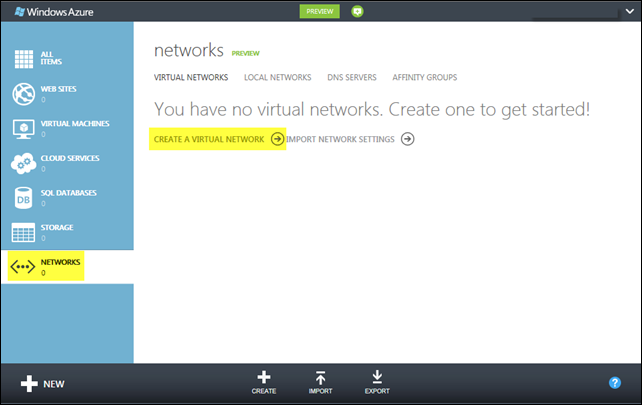
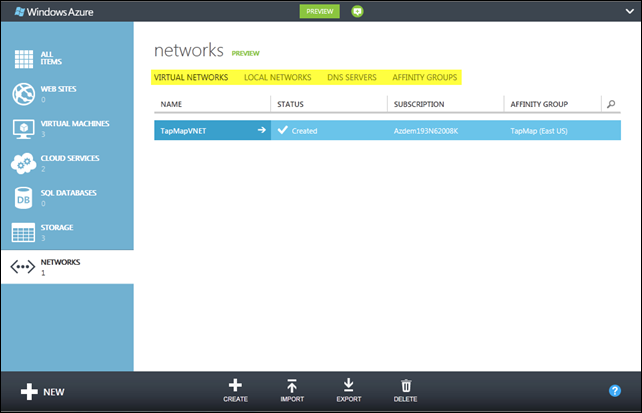
After the network has been created, you’ll notice there are a number of a subsections on the networks landing page (shown below):
- Virtual Networks lists the networks that have been created; here you can see the one I just set up.
- Local Networks reflects the hybrid networks that have been established by connecting virtual networks to on-premises VPN devices.
- DNS Servers lists whatever DNS servers have been deployed to manage the various virtual networks (I didn’t need one for this example).
- Affinity Groups define a logical grouping of Windows Azure assets that will be collocated in the same internal cluster within an Azure data center. Every virtual network must belong to an affinity group (and I’ll soon associate other assets with that same affinity group).
Now that the network is set up, I can start building my Couchbase cluster in the cloud; that’s what I’ll cover in the next post.
