Photo Mosaics Part 7: Service Bus
Ok, it’s been a really, really long time since my last substantive Windows Azure post, but we’re back! Back where, you say? Well I’ve got one or two posts left to round out my Azure Photo Mosaics series. The six previous posts actually covered the guts of the implementation, from the point of submitting an image for ‘mosaification’ to the final product – including the coverage of Windows Azure Storage (tables, blobs, and queues) and the use of Web and Worker Roles for the processing.
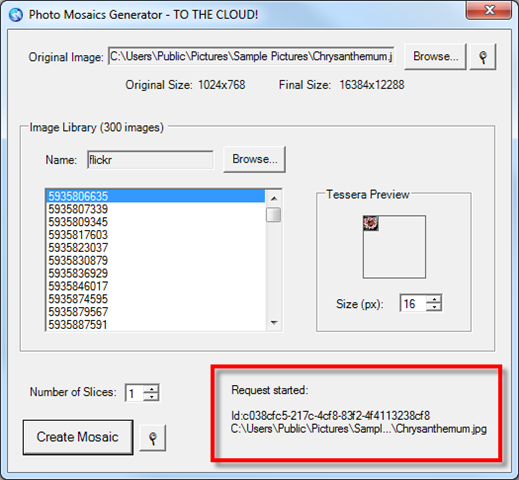
As you might recall, the entire process is asynchronous, so one non-essential feature I had added was the use of the Windows Azure Service Bus to provide some feedback to the client application regarding the status of a given request. That feedback is in the form of notification text that appears in the Windows Forms client application when some interesting action in the cloud happens on behalf of that client (e.g., a new job is started or one completes):
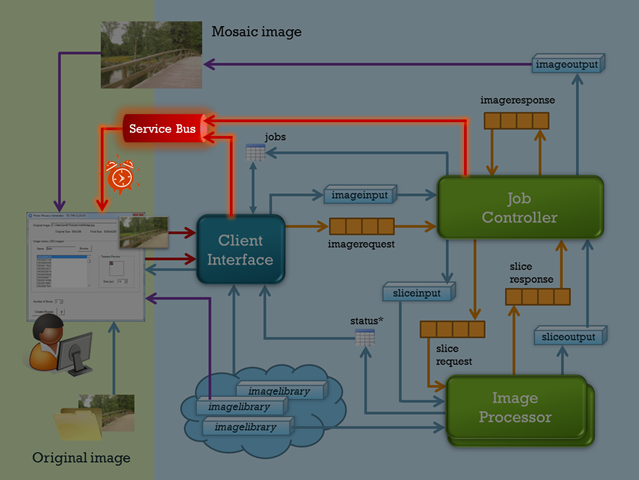
Let’s take a look at how the Windows Azure Service Bus makes that happen, and I’ll lead off (as I have most posts in this series) with the architectural diagram highlighting the portion of the application we’ll be discussing.
Service Bus Primer
The Service Bus is one of the features lumped into the umbrella of the Windows Azure AppFabric (along with Access Control and Caching) and is startling simple in concept. Its raison d’être is to provide reliable, secure communication between two independent endpoints that may otherwise be unable to communicate due to firewalls, network address translation boundaries, or dynamically assigned IP addresses. The Service Bus works in tandem with Access Control to authenticate services that establish listeners as well as clients that wish to communicate with services exposed on the Service Bus. In its most recent release, the Service Bus provides two messaging capabilities: relayed and brokered.
Relayed messaging has been part of the Service Bus since day 1 and allows one-way, request/response, and peer-to-peer messaging. In the relay scenario (which is what the Photo Mosaics application leverages), a service is typically hosted somewhere on-premises. That service is a standard WCF service with one exception, it exposes an endpoint on the Service Bus using analogs to the WCF bindings you’re already familiar with. For instance, if you set up a BasicHttpRelayBinding for your service, you’re exposing a publically reachable endpoint on the Service Bus – in the Windows Azure cloud – that conforms to the same WS-I Basic Profile 1.1 (i.e., ASMX-based services) that WCF services using BasicHttpBinding would implement. Clients to that service connect to the endpoint hosted in the cloud and communicate via the conduit set up via the Service Bus. In certain cases – where the negotiation succeeds and hybrid connections are allowed – the client and service may graduate to a peer-to-peer connection completely bypassing the Service Bus.
Brokered messaging expands the capabilities of the Service Bus to provide durable, asynchronous messaging. Specifically, queues provide the capability to store messages if the receiving party is not on line when the message is sent (in the relayed messaging scenario, such communications would be lost). Queues have an added benefit (as we’ve discussed in the context of Windows Azure Storage) of decoupling the consumer and producer so they can be scaled independently as load dictates. While queues provide a one-to-one form of communication, topics and subscriptions allow one-to-many or publish/subscribe scenarios: messages are sent to a topic and optionally filtered into subscriptions, which you can think of as virtual queues. Message consumers access the subscriptions, each of which may include some (filtered) subset of of the messages, thus enabling selective processing based on the original message properties. For instance, messages with an AccountStatus property value of “arrears” might get routed to a subscription named “IssueLateNotice” and processed by a worker role specifically focused on handling overdue accounts, whereas messages with an AccountStatus of “new” get routed to a subscription name “WelcomeCustomer” and processed by a worker role that sends out an introductory e-mail.
Supporting the Service Bus mechanics is a namespace and registry capability. Whenever you register a service endpoint on the Service Bus, you do so via a URL of the form
[scheme]://[namespace].servicebus.windows.net
- scheme is one of three values, http, https, or sb. The protocol for the first two should be obvious, and sb represents a TCP endpoint.
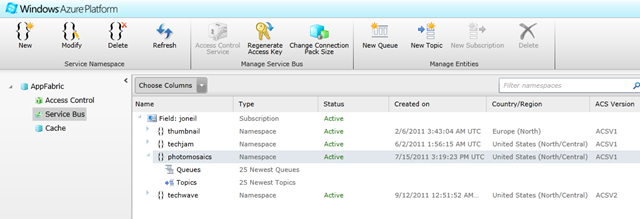
- The namespace is what you register via the Windows Azure Portal and must be unique across the whole of Windows Azure. Below you can see several namespaces declared including one called photomosaics:
You can make your endpoints discoverable (but not your queues, topics, or subscriptions), by setting the DiscoveryMode to Public in the ServiceRegistrySettings behavior for the endpoint registered by the WCF host application.
A Word on Access Control
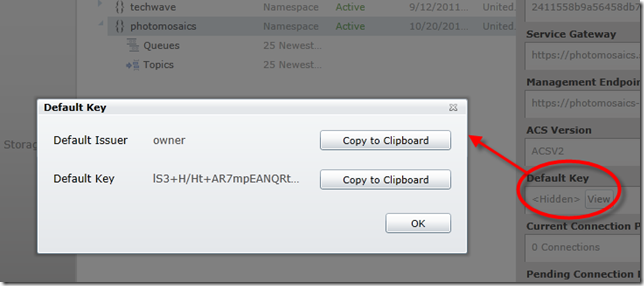
When you create a Service Bus namespace, an Access Control namespace is automatically created (with a suffix of –sb, for instance, photomosaics-sb.accesscontrol.windows.net). All requests for the Service Bus flow through a claims-based authentication and authorization process defined by properties on that Access Control endpoint. By default, there is pre-provisioned identity called “owner” with a generated shared secret key that can be sent with each Service Bus request as the credential. That’s what the Photo Mosaics example does, but it’s a rather simplistic solution that belies the power of the technology!
Other implementation options include the use of Simple Web Tokens (SWT) or SAML tokens via WS-Trust and WS-Federation protocols, which enable scenarios like single sign-on and interoperability with third party identity providers like Facebook, OpenID, and Active Directory Federation Services (ADFS 2.0). That’s a scenario I don’t broach in this sample, but it’s important to note that there are a lot of control mechanisms in place to secure access to the Service Bus (authentication) and well as to indicate which operations a given identity is authorized to carry out on that Service Bus endpoint.
To reiterate, the Photo Mosaics application uses an out-of-the-box approach:
- The identity used is “owner”, with the token mechanism being the shared secret that’s automatically generated when you create the Service Bus endpoint.
- “owner” has three claims – or operations it’s allowed to perform – listen, send, and manage. Those are the only three claims that the Service Bus recognizes, by the way. In our Photo Mosaics scenario using this single identity across the board is actually a rather lax policy. The client application, which hosts the WCF service that listens on the Service Bus, really needs only the listen privilege, while the ClientInterface and JobController roles (see architecture diagram above) need only the send privilege. Manage privileges would be retained by the owner of the service itself, such as the application administrator or perhaps the vendor that’s providing this application via SaaS. For Photo Mosaics, I could have set up three different identities corresponding to these roles and supplied the appropriate tokens via code in each case, but that’s a bit beyond the scope of what I wanted to get across in this post.
Setting up the Service Bus Endpoint
Although the plumbing behind the Service Bus and Access Control is quite intricate, setting up the namespace is pretty simple.
You start by accessing the Service Bus definitions section of the Windows Azure portal:
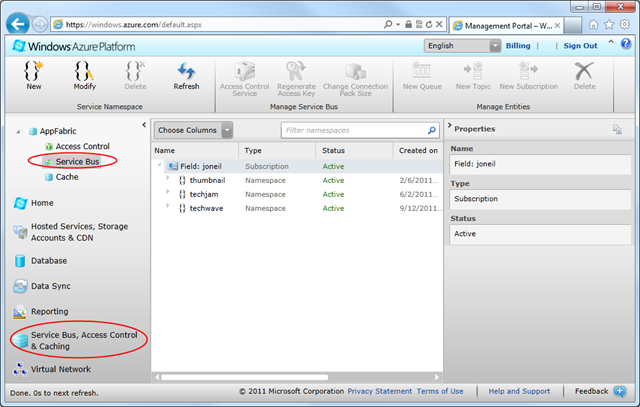
Select the New option from the menu ribbon, and specify the requested information:
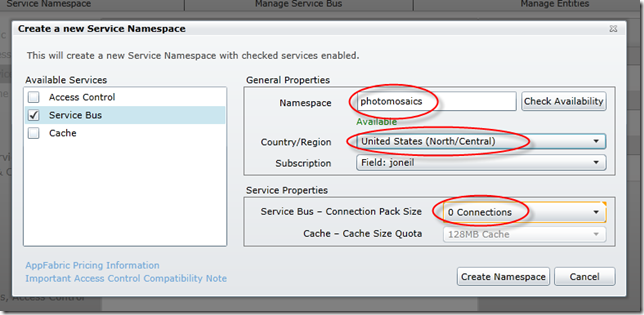
Namespace indicates the endpoint for this Service Bus instance, e.g.,
sb://photomosaics.servicebus.windows.netThe Country/Region is the Windows Azure data center hosting your Service Bus endpoint.
The Connection Pack Size refers to how billing for the endpoint will be handled. Each application that opens a service bus endpoint essentially amounts to one connection, and you are charged a pro-rated amount daily based on the maximum number of connections to that namespace for that day. You can open up as many connections as you like at a pay-as-you-go price of $3.99 per connection, per month.
If, however, you know that your Service Bus utilization rate will be higher, then you can save money by specifying a connection pack size of 5, 25, 100, or 500. Each of these packs has a set price whether you use all the connections or not, but the price is less than if you use the pay-as-you go model. For instance, as of this writing, a pay-as-you-go connection is $3.99, and a pack of 25 connection is $49.75, so if you plan on using 13 or more connections consistently, that connection pack is a better deal financially. You can always open additional connections (at the pay-as-you-go price) if you underestimated the ideal connection pack size for your application.
And that’s it, the Service Bus namespace is created, along with the complementary Access Control namespace, details of which can be found in the Properties pane for the newly created endpoint. Of particular interest is the default key (shown below):
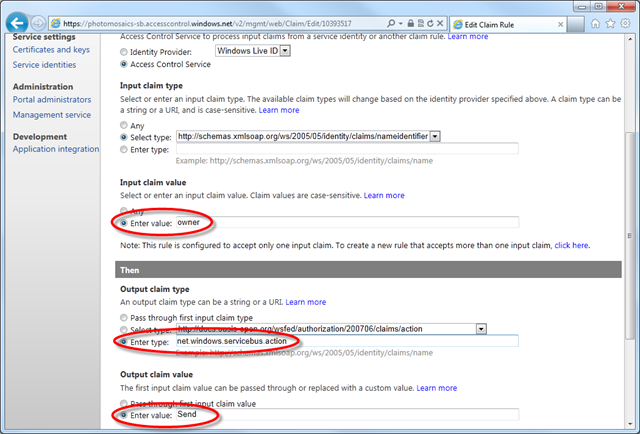
If you want to explore the Access Control endpoint associated with your Service Bus in more depth, you can select the Access Control icon on the Windows Azure Portal’s menu ribbon and examine the details. For instance, in the screen shot below, I’ve navigated to the Rule Groups section (left sidebar menu) and selected one of the claims associated with the default rule group. The rule shown grants a input claim that has a ‘namedidentifier’ property with the value of “owner,” the output clam of “Send” – thus granting the presenter of this claim the privilege to send a message via the Service Bus. When we look at the source code a bit later in this post, you’ll see how the application presents this claim for the Access Control to grant the capability.
Setting up the Service
If you’re using the Service Bus, you’re likely doing so to provide access to a hosted service that is not publically reachable (otherwise, you’d just host it as a Web Role in Windows Azure!). In our case, the service that we are exposing is hosted in our client Windows Forms application. That service is a simple notification service with the following contract:
  1: <ServiceContract(Name:="NotificationContract")>
  2: Interface INotificationService
  3:
  4:     <OperationContract(IsOneWay:=True)>
  5:     Sub NotifyRequestCompleted(requestId As Guid, fullUri As Uri)
  6:
  7:     <OperationContract(IsOneWay:=True)>
  8:     Sub NotifyRequestStarted(requestId As Guid, requestPath As String,
  9:                              requestUri As Uri, tileSize As Byte,                                    submissionTime As DateTime)
  10: End Interface
If you refer to the architecture diagram at the top of this article, the ClientInterface role invokes the NotifyRequestStarted method when a new request to generate a photo mosaic is received, and the JobController role invokes the NotifyRequestCompleted method when a photo mosaic generation is complete. Note, that this is one-way operation, and uses BasicHttpRelayBinding (though other options are also viable). If the hosted service is not running at the point a message is sent from within the cloud, then the message is lost; recall, if you want more durable messaging, or say you’d like all notifications delivered when the client again comes on-line, you’d need to incorporate the newer Service Bus queueing feature.
The implementation of these interfaces is fairly simplistic: each fires an event on all the open forms (of type AbstractNotificationForm) in the client application, and then each form can take whatever action make sense. In this case, MainForm.vb simply displays a message, similar to toast, in the lower portion of the main window (as seen in the first images of this blog post).
  1: Public Class NotificationService
  2:     Implements INotificationService
  3:
  4:     Public Sub NotifyRequestCompleted(ByVal requestId As Guid, fullUri As Uri) _
  5:         Implements INotificationService.NotifyRequestCompleted
  6:
  7:         For Each form In Application.OpenForms.OfType(Of AbstractNotificationForm)()
  8:             form.Invoke(Sub(f As AbstractNotificationForm)
  9:                             Dim e As New RequestCompletedEventArgs(requestId, fullUri)
  10:                             f.OnRequestCompleted(Me, e)
  11:                         End Sub, form)
  12:         Next
  13:     End Sub
  14:
  15:     Public Sub NotifyRequestStarted(requestId As Guid, requestPath As String,                                requestUri As Uri, tileSize As Byte, startTime As DateTime) _
  16:         Implements INotificationService.NotifyRequestStarted
  17:
  18:         For Each form In Application.OpenForms.OfType(Of AbstractNotificationForm)()
  19:             form.Invoke(Sub(f As AbstractNotificationForm)
  20:                             Dim e As New RequestStartedEventArgs(requestId,                                         requestPath, requestUri, tileSize, startTime)
  21:                             f.OnRequestStarted(Me, e)
  22:                         End Sub, form)
  23:         Next
  24:     End Sub
  25: End Class
The code to start the service looks like the following. It’s not much different from hosting any WCF service; the magic is in the binding type used, which is part of the app.config (further below). There are two sections to particularly note below:
- Lines 13-14 create the endpoint URI that the on-premises service exposes on the Service Bus. The format will be something like:
https://photomosaics.servicebus.windows.net/S-1-5-21-124525095-708259637-1543119021-795011
where the terminal portion of the URI is the clientId that’s passed into the Register method. That value is implemented here as SID obtained from the following code:
System.Security.Principal.WindowsIdentity.GetCurrent().User.Value
but the key is that it’s just something that uniquely identifies the given client in the domain of interest. Each client running this application on his or her machine will have a different SID and expose a different endpoint on the Service Bus. That SID is then used to re-construct the endpoint name as roles in the cloud send messages back through the Service Bus to communicate the status of a given Photo Mosaics job. In a production implementation, you might substitute a username or some other token that uniquely defines a given user (or instance) of the application.
- It’s in Lines 18 and 19 that we add the credentials for the Service Bus, which in turn will involve the Access Control Service to verify the identity and provide the relevant output claims. sbConfig.Issuer gets the value “owner” and sbConfig.Secret gets the shared secret key via a service call in Line 10, so that information isn’t retained explicitly by the client application.
Note too that the API changed recently, so the active code you see here reflects the use of the newer TokenProvider factory. The previous code (which is still part of the project download) is retained in the comments from Lines 21-24.
  1: Private Shared Host As ServiceHost = Nothing
  2:
  3: Shared Sub Register(clientId As String)
  4:
  5:     ' do nothing if host has already been registered
  6:     If Host IsNot Nothing Then Return
  7:
  8:     Try
  9:         ' get service bus configuration
  10:         Dim sbConfig = New AzureStorageBroker.StorageBrokerClient()                                           .GetServiceBusConfiguration(clientId)
  11:
  12:         ' create service host
  13:         Dim address = ServiceBusEnvironment.CreateServiceUri("https", sbConfig.Namespace,
  14:                                     String.Format("NotificationService/{0}", clientId))
  15:         Host = New ServiceHost(GetType(NotificationService), address)
  16:
  17:         ' set credentials on each endpoint
  18:         Dim sbCredential = New TransportClientEndpointBehavior()
  20:
  21:         ' obsolete code - pre 1.5
  22:         'sbCredential.CredentialType = TransportClientCredentialType.SharedSecret
  23:         'sbCredential.Credentials.SharedSecret.IssuerName = sbConfig.Issuer
  24:         'sbCredential.Credentials.SharedSecret.IssuerSecret = sbConfig.Secret
  25:
  26:
  27:         For Each endpoint In Host.Description.Endpoints
  28:             endpoint.Behaviors.Add(sbCredential)
  29:         Next
  30:
  31:         ' start the notification service
  32:         Host.Open()
  33:
  34:         ' start the n
  35:     Catch aade As AddressAccessDeniedException
  36:         Throw New System.Exception("Process does not have access to setup the ServiceBus namespace. For testing, consider running under an Adminstrator account or run netsh from an elevated prompt to grant access to the current user account (cf. https://go.microsoft.com/fwlink/?LinkId=70353)")
  37:
  38:     Catch ex As Exception
  39:         Throw
  40:     End Try
  41: End Sub
Finally, to round it out, here’s the app.config service information showing the binding type.
 <services>
  <service name="PhotoMosaic.NotificationService">
    <endpoint name="RelayEndpoint"
              contract="PhotoMosaic.INotificationService"
              binding="basicHttpRelayBinding"
              />
  </service>
</services>
So what we have now is one part of the puzzle, a Windows Forms application that hosts a WCF service exposing an endpoint on the Service Bus. We now need some clients to talk to the service!
Sending Messages to the Service Bus
The contract implemented by the hosted service has two notification methods, which have pretty much identical processing; only the method names, parameters, and source of invocation (the JobController versus the ClientInterface roles) differ. In both cases, the goal is to let the client application know that something interesting has happened in the hosted service on the Windows Azure cloud. Here we’ll just look at the ClientInterface role’s invocation of NotifyRequestStarted,; the same concepts apply for the analogous call to NotifyRequestCompleted that’s made by the JobController role.
The code that sends the message on the Service Bus is part of the workflow that occurs when the JobBroker service (in ClientInterface) is invoked. It starts when a user selects a photo and other parameters from the Windows Forms client application; and then presses the Create Mosaic button on the main form of that interface. That action invokes a web service call to JobBroker.SubmitImageForProcessing. The web service call is fulfilled by the Windows Azure web role named (Azure)ClientInterface, which initiates a new photo mosaics rendering job by storing the desired image in blob storage, adding a new job entry to table storage, and queuing up a new work item (all of which we have covered in previous blog posts). After it’s completed that, it does one last thing:
 try
{
    Notifier.SendRequestStartedNotification(
        clientId,
        requestId,
        originalLocation,
        imageUri,
        tileSize,
        job.StartTime);
}
catch (Exception e)
{
    Trace.TraceWarning("Request: {0}{4}Exception: {1}{4}Message: {2}{4}Trace: {3}",
        requestId,
        e.GetType(),
        e.Message,
        e.StackTrace,
        Environment.NewLine);
}
The Notifier class is a static helper class (in NotificationClient.cs) with methods (such as SendRequestStartedNotification) that ultimately just make WCF client calls through the Service Bus back to the service that’s hosted by the Windows Forms client application. Here are some key points as you view the code below:
- Lines 3-19 define a private method to abstract the standard details to create a channel factory for a Service Bus URI.
- Lines 9-12 should look familiar; it’s the same code used in the client application to set up the listener.
- Lines 14-15 establish the channel factory with an explicit binding type (BasicHttpRelayBinding), so here no configuration file is needed
The code to invoke the method (Lines 33-38) is identical to an on-premises WCF scenario. There is a bit of crude exception handling there (Lines 40-48) in case the endpoint is not available, in which case we log an error message and move on. Had we wanted to make sure the client got every message sent out by this service, we would need to leverage the newer Service Bus features of topics and subscriptions that I mentioned earlier in the post.
  1: public static class Notifier
  2: {
  3:     private static ChannelFactory<INotificationChannel> GetChannelFactory(String clientId)
  4:     {
  5:         var sbConfig = InternalStorageBrokerServices.StorageBroker                                                    .GetServiceBusConfiguration(clientId);
  6:
  7:         ServiceBusEnvironment.SystemConnectivity.Mode = ConnectivityMode.AutoDetect;
  8:
  9:         Uri serviceUri = ServiceBusEnvironment.CreateServiceUri("https",                      sbConfig.Namespace, String.Format("NotificationService/{0}", clientId));
  10:
  11:         TransportClientEndpointBehavior sbCredential =                                                new TransportClientEndpointBehavior();
  12:         sbCredential.TokenProvider = TokenProvider.CreateSharedSecretTokenProvider(                                                          sbConfig.Issuer, sbConfig.Secret);
  13:
  14:         ChannelFactory<INotificationChannel> channelFactory =
  15:             new ChannelFactory<INotificationChannel>                     (new BasicHttpRelayBinding(), new EndpointAddress(serviceUri));
  16:         channelFactory.Endpoint.Behaviors.Add(sbCredential);
  17:
  18:         return channelFactory;
  19:     }
  20:
  21:     public static void SendRequestCompletedNotification(String clientId,                                                               Guid requestId, Uri fullUri)
  22:     {
  23:        // elided
  24:     }
  25:
  26:     public static void SendRequestStartedNotification(String clientId, Guid requestId,                  String requestPath, Uri requestUri, Byte tileSize, DateTime submissionTime)
  27:     {
  28:         ChannelFactory<INotificationChannel> channelFactory = null;
  29:         INotificationChannel channel = null;
  30:
  31:         try
  32:         {
  33:             channelFactory = GetChannelFactory(clientId);
  34:             channel = channelFactory.CreateChannel();
  35:
  36:             channel.Open();
  37:
  38:             channel.NotifyRequestStarted(requestId, requestPath, requestUri,                                                                 tileSize, submissionTime);
  39:         }
  40:         catch (Exception e)
  41:         {
  42:             Trace.TraceError("Client: {0}{4}Exception: {1}{4}Message: {2}{4}Trace: {3}",
  43:                 clientId,
  44:                 e.GetType(),
  45:                 e.Message,
  46:                 e.StackTrace,
  47:                 Environment.NewLine);
  48:         }
  49:         finally
  50:         {
  51:             if ((channel != null) && (channel.State == CommunicationState.Opened))                      channel.Close();
  52:             if ((channelFactory != null) &&                       (channelFactory.State == CommunicationState.Opened))                      channelFactory.Close();
  53:         }
  54:     }
Wrap Up
And that’s it: the full trip back to the client from the cloud in an asynchronous manner. Although the Service Bus sometimes seems a bit obtuse and difficult to approach, it’s provides some important capabilities, especially when building hybrid scenarios involving on-premises and cloud assets. The Photo Mosaics application has a bit of additional overhead and application layers, so can be difficult to approach if you’re just trying out the Service Bus for the first time, so I recommend checking out the Windows Azure App Fabric SDK which includes additional samples and tutorials to get you going.
