Azure@home Part 4: WebRole Implementation (redux)
This post is part of a series diving into the implementation of the @home With Windows Azure project, which formed the basis of a webcast series by Developer Evangelists Brian Hitney and Jim O’Neil. Be sure to read the introductory post for the context of this and subsequent articles in the series.
Here’s a quick recap as to what I’ve covered in this series so far (and what you might want to review if you’re just joining me now):
- Introductory post – overview of Folding@home and project files and prerequsities
- Part 1 – application architecture and flow
- Part 2 – WebRole implementation (OnStart method and diagnostics)
- Part 3 – Azure storage overview and explanation of entities used in Azure@home
By the way, I’d encourage you to play along as you walk through my blog series: deploy Azure@home yourself and experiment with some of the other features of Windows Azure by leveraging a free Windows Azure One Month Pass.
The focus of this post is to pick up where Part 2 left off and complete the walkthrough of the code in the WebRole implementation, this time focusing on the processing performed by the two ASP.NET pages, default.aspx and status.aspx..
|
|
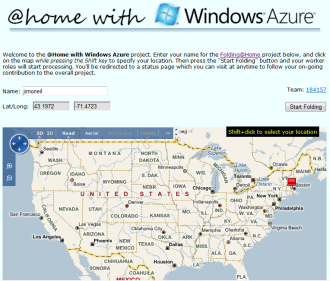
default.aspx entry page to the application via which user enters name and location to initiate the “real work,’ which is carried out by worker roles already revved up in the cloud |
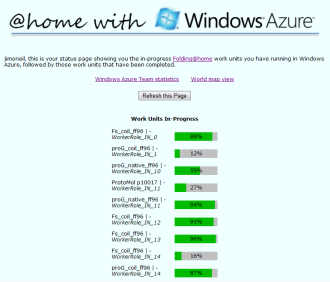
status.aspx read-only status page with a display of progress of the Folding@home work units processed by the cloud application |
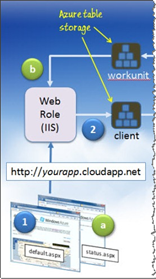 Recall too the application flow; the portion relevant to this post is shown to the right:
- The user browses to the home page (default.aspx) and enters a name and location which get posted to the ASP.NET application,
- The ASP.NET application
- writes the information to a table in Azure storage (client) that is being monitored by the worker roles, and
- redirects to the status.aspx page.
Subsequent visits to the site (a) bypass the default.aspx page and go directly to the status page to view the progress of the Folding@home work units, which is extracted (b) from a second Azure table (workunit).
In the last post, I covered the structure of the two Azure tables as well as the abstraction layer in AzureTableEntities.cs. Now, we’ll take a look at how to use that abstraction layer and the StorageClient API to carry out the application flow described above.
Default.aspx and the client table
This page is where the input for the Folding@home process is provided and as such is strongly coupled to the client table in Azure storage. The page itself has the following controls
- txtName – an ASP.NET text box via which you provide your username for Folding@home. The value entered here is eventually passed as a command-line parameter to the Folding@home console client application.
- litTeam – an ASP.NET hyperlink control with the static text “184157”, which is the Windows Azure team number for Folding@home. This value is passed as a parameter by the worker roles to the console client application. For those users who may already be part of another folding team, the value can be overridden via the TEAM_NUMBER constant in the code behind. Veteran folders may also have a passkey, which can likewise be supplied via the code behind.
- txtLatitude and txtLongitude – two read-only ASP.NET text boxes that display the latitude and longitude selected by the user via the Bing Map control on the page
- txtLatitudeValue and txtLongitudeValue – two hidden fields used to post the latitude and longitude to the page upon a submit
- cbStart – submit button
- myMap – the DIV element providing the placeholder for the JavaScript Bing Maps control. The implementation of the Bing Map functionality is completely within JavaScript on the default.aspx page, the code for which is fairly straightforward (and primarily
stolen fromresearched at the Interactive SDK)
The majority of the code present in this page uses the StorageClient API to access the client table.That table contains a number of columns (or more correctly, properties) as you can see below. The first three properties are required for any Azure table (as detailed in my last post), and the other fields are populated for the most part from the input controls listed above.
| Attribute | Type | Purpose |
| PartitionKey | String | Azure table partition key |
| RowKey | String | Azure table row key |
| Timestamp | DateTime | read-only timestamp of last modification of the entity (or ‘row’) |
| Latitude | double | value from txtLatitude |
| Longitude | double | value from txtLongitude |
| PassKey | String | optional passkey (only assignable via hard-coding) |
| ServerName | String | server name (used to distinguish results reported to distributed.cloudapp.net) |
| Team | String | Folding@home team id (default: 184157 taken from litTeam, but overridable in code) |
| UserName | String | Folding@home user name taken from txtName |
The presence of an entity (row) of data in this table (and there will be at most one row in it) is a cue as to whether or not the default.aspx page has been previously submitted. If it has been, then we know that there are worker roles busy processing Folding@home work units, and the only thing the web application does then is report progress, which is the job of status.aspx. The processing within the two coded events in default.aspx.cs can be summarized as:
Page_Load
create an Azure table called client (if it doesn’t already exist) if there’s a Azure table called client and there’s a row of data in it, show the status page; otherwise, `` show the default page
- cbStart_Click
add a record to the Azure client with the information gathered on the page unconditionally redirect to the status page
Page_Load
To be methodical about this, let’s pore over this implementation line-by-line:
1: protected void Page_Load(object sender, EventArgs e)
2: {
3: // set team and Navigate URL
4: litTeam.Text = TEAM_NUMBER;
    5:      litTeam.NavigateUrl =
               "https://fah-web.stanford.edu/cgi-bin/main.py?qtype=teampage&teamnum="
               + TEAM_NUMBER;
6:
7: // access client table in Azure storage
8: cloudStorageAccount =
9: CloudStorageAccount.FromConfigurationSetting("DataConnectionString");
10: var cloudClient = new CloudTableClient(
11: cloudStorageAccount.TableEndpoint.ToString(),
12: cloudStorageAccount.Credentials);
13: cloudClient.CreateTableIfNotExist("client");
14:
15: if (cloudClient.DoesTableExist("client"))
16: {
17: var ctx = new ClientDataContext(
18: cloudStorageAccount.TableEndpoint.ToString(),
19: cloudStorageAccount.Credentials);
20:
21: // if there's a client row, this user is already up and running
22: // so redirect to the status page
23: if (ctx.Clients.FirstOrDefault<ClientInformation>() != null)
24: Response.Redirect("/Status.aspx");
25: }
26: else
27: {
   28:          System.Diagnostics.Trace.TraceError(
                   "Unable to create 'client' table in Azure storage");
29: }
30: }
There are also three class variables/constants that figure into the processing here:
// Other folding teams can modify team number and passkey below
private const String TEAM_NUMBER = "184157";
private const String PASSKEY = "";
private CloudStorageAccount cloudStorageAccount;
Lines 4-5: Set the Windows Azure folding team number
4: litTeam.Text = TEAM_NUMBER;
    5:      litTeam.NavigateUrl =
               "https://fah-web.stanford.edu/cgi-bin/main.py?qtype=teampage&teamnum="
               + TEAM_NUMBER;
The code here is straightforward and sets the value of the HyperLink control on the page. On the Folding@home site at Stanford, the “Windows Azure” team is identified by the ID 184157, so that’s the default value set in code. We wanted to accommodate others that are new to Azure but perhaps already have folding accounts on the Stanford site, so they can easily override the default TEAM_NUMBER constant (as well as the PASSKEY which is a second identifier used by Folding@home).
Lines 8-9: Initialize a CloudStorageAccount
8: cloudStorageAccount =
9: CloudStorageAccount.FromConfigurationSetting("DataConnectionString");
A CloudStorageAccount manages information about an Azure storage account, including credentials and the individual endpoints for the blob, queue, and table services. In this case, we’re leveraging the FromConfigurationSetting method to access the storage information from the service configuration file (namely, ServiceConfiguration.cscfg), the relevant portion of which is shown below:
   <Role name="WebRole">
    <Instances count="1" />
    <ConfigurationSettings>
      <Setting name="DiagnosticsConnectionString"
               value="DefaultEndpointsProtocol=https;AccountName=snowball;AccountKey= {REDACTED} " />
      <Setting name="DataConnectionString"
               value="DefaultEndpointsProtocol=https;AccountName=snowball;AccountKey= {REDACTED} " />
    </ConfigurationSettings>
  </Role>
This portion of the configuration applies to the Role with the name “WebRole”, and shows that one instance of that role (one VM) will be spun up in the cloud once the application is deployed and executed there. (The WorkerRole has a similar section in the configuration file which we’ll look at in a subsequent post.) The ConfigurationSettings section includes application-specific settings, much as you’d put in a web.config file, with one significant difference: configuration settings can be modified while the service is running without redeploying your application. In the cloud, modifying the web.config file requires a redeployment and hence downtime.
In the configuration above, two strings are defined: a DiagnosticsConnectionString and a DataConnectionString; these are the only configurable settings for the WebRole, by virtue of the fact that the analogous section of the ServiceDefinition.cscfg defines only those two configuration settings:
 <?xml version="1.0" encoding="utf-8"?>
<ServiceDefinition name="AzureAtHome" upgradeDomainCount="2"
          xmlns="https://schemas.microsoft.com/ServiceHosting/2008/10/ServiceDefinition">
  <WebRole name="WebRole">
    <InputEndpoints>
      <InputEndpoint name="HttpIn" protocol="http" port="80" />
    </InputEndpoints>
    <ConfigurationSettings>
      <Setting name="DiagnosticsConnectionString" />
      <Setting name="DataConnectionString" />
    </ConfigurationSettings>
  </WebRole>
...
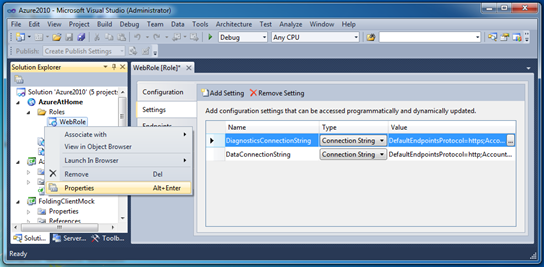
If you’re not too keen on modifying the XML file directly, there is a UI available in Visual Studio to manage the ServiceDefinition and ServiceConfiguration entries for each role defined in your project. To do so, access the Properties view of the desired role underneath your cloud service project:
Even with this UI, the syntax for a connection string is a tad arcane, so there’s a helper for you there as well, accessible via the ellipses button to the right of the connection string entry. Via the resulting dialog you can specify the cloud storage account credentials (or opt to use Development Storage, with its handy shortcut connection string value of
UseDevelopmentStorage=true).
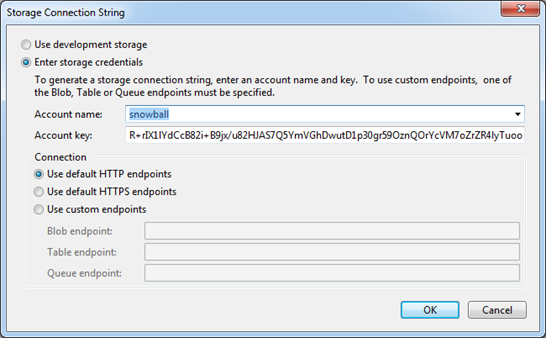
There is one additional prerequisite for the FromConfigurationSetting code to work though, and that’s setting up the configuration setting publisher, a topic I covered in my post when discussing the OnStart method of the WebRole. The settings publisher enables some additional flexibility to modify the source of configuration parameters so that your code can work on-premises and in the cloud with minimal modifications. An alternative to this approach is using the Parse method to which you can supply a connection string directly.
Lines 10-12: Access the storage account
10: var cloudClient = new CloudTableClient(
11: cloudStorageAccount.TableEndpoint.ToString(),
12: cloudStorageAccount.Credentials);
CloudTableClient provides access to the Azure table storage, much like a DbConnection instance provides access to an RDBMS in ADO.NET. Via CloudTableClient you can enumerate the tables in table storage, test for a table’s existence, and create and drop tables. In the StorageClient API there are analogous APIs for blob storage (CloudBlobClient) and queue storage (CloudQueueClient).
Line 13: Check for existence of client table
13: cloudClient.CreateTableIfNotExist("client");
CloudTableClient gets put to use right away to detect whether the client table has yet been created, and if not, it creates the table.
Lines 15 – 25: Check for existence of a row in client table and redirect to status page
15: if (cloudClient.DoesTableExist("client"))
16: {
17: var ctx = new ClientDataContext(
18: cloudStorageAccount.TableEndpoint.ToString(),
19: cloudStorageAccount.Credentials);
20:
21: // if there's a client row, this user is already up and running
22: // so redirect to the status page
23: if (ctx.Clients.FirstOrDefault<ClientInformation>() != null)
24: Response.Redirect("/Status.aspx");
25: }
At first blush, the test in Line 15 of DoesTableExist may seem a bit redundant given the immediately preceding CreateTableIfNotExist call; why not just check if line 13 failed or succeeded and use that as the condition – CreateTableIfNotExist returns a boolean after all? Well, the subtlety here is that the CreateTableIfNotExist returns true if and only if the table was created, and so specifically returns false if the table was already there.
In Line 17, we’re gearing up to query the table and to do so initializing a data context, which is the class on a “client” that wraps an object graph and manages change tracking of the data retrieved from a “server” (as the DataContext does in LINQ to SQL and the ObjectContext does in the ADO.NET Entity Framework). The ClientDataContext class here extends the base TableServiceContext class in AzureAtHomeEntities.cs (which was the topic of my last post).
Second-thoughts: Revisiting this code, I’m still bothered by the fact that I’ve provided the table endpoint and credentials here as well as for the CloudTableClient instantiation a few lines prior. The client and the data context classes are distinct, so it makes sense, but it still looks redundant to me. I’m thinking now that if I were to do this again, I’d add a new constructor to my ClientDataContext class that accepts a CloudTableClient instance and then access the endpoint and credentials from there; something like this:
         public ClientDataContext(CloudTableClient cloudClient) :
            base(cloudClient.BaseUri.AbsoluteUri, cloudClient.Credentials)
        {
        }
Line 23 next leverages the Clients property of the context (again defined in AzureAtHomeEntities.cs) , which returns all of the entities in the client table (remember it’s either one or none, so there no real overhead to doing so). On to the base Clients property is added a second filter to grab the first item in the collection (or the default value for such an item). This is essentially a test to determine how many entities are actually in the collection and hence the table.
Hmm, that seems a bit circuitous – why not something like
ctx.Clients.Count<ClientInformation>()? Here’s why:
Count seems simple enough, but it’s not one of the handful of LINQ expression/extension methods supported by the Table service. In retrospect, the following would have worked though:
            if (ctx.Clients.AsEnumerable<ClientInformation>().Count() == 1)
               Response.Redirect("/Status.aspx");
since theIQueryable reference ctx.Clients is converted to an in-memory collection, and then the Count method is applied, versus the code creating a query for the entire expression and executing that against the Azure table service, which again is unsupported.
When writing the code, though, I opted for one of the supported LINQ extensions, FirstOrDefault, which will return null if the specified collection (of reference types) is empty. If it’s not null, then we know that the user has previously entered information via the default.aspx page, and the code does an immediate redirect to the status.aspx page to display progress on the Folding@home work units being carried out by the worker roles.
Line 28: Error diagnostics
   28: System.Diagnostics.Trace.TraceError(
           "Unable to create 'client' table in Azure storage");
There’s not much error recovery code in this simple example, but Line 28 does detect the failure to create the client table from Line 13-15 and further illustrates the use of diagnostics in Azure as I covered in the second post of this series. The existence of a listener in the web.config file and the DiagnosticMonitorConfiguration setup in the webrole.cs file cooperate to redirect the familiar Trace output to Azure table storage, specifically in a table named WADLogsTable.
Tip: As you're developing your applications against Azure storage, you might be wondering how to keep track of what’s in your Azure tables, blobs, and queues, whether you’re working with the local development fabric or a cloud storage account. On the local machine, Azure storage is backed by a SQL Server local database but in a somewhat modified fashion, so using SQL Server Management Studio is feasible but not very practical.
Ah, but there’s a Development Storage UI that’s accessible from the system tray:
Unfortunately as you can see, the UI here only lets you know what the service endpoints are and if the service is running - not all that helpful. But don’t fret! With the latest Windows Azure tools for Visual Studio, you have read-only access to Azure storage right within the Server Explorer pane in Visual Studio.
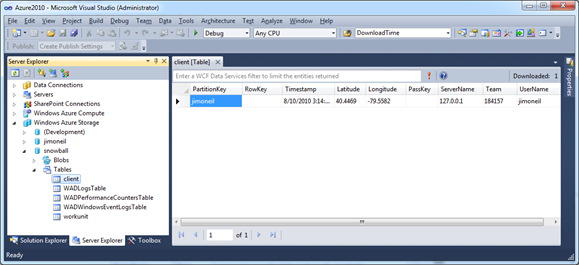
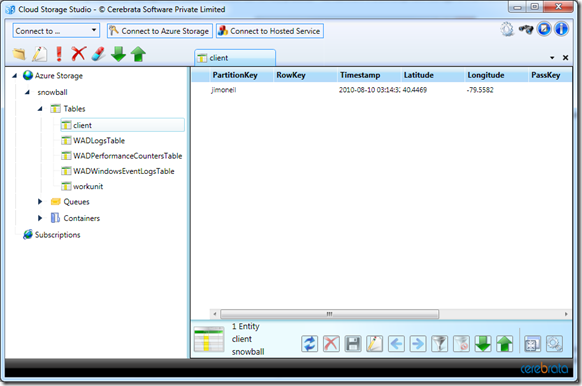
That’s much better, but it’s still read-only. If you’re looking for more of a SQL Server Management Studio experience, you’ll have to move to open source or 3rd party tools. On CodePlex you’ll find several options with varying degrees of functionality, including Azure Storage Explorer and the Windows Azure Management Tool (MMC). Additionally, Cerebrata offers a tool called Cloud Storage Studio (with a free trial and Developer Version) that’s quickly become my favorite option for doing CRUD operations on my Azure table storage accounts.
cbStart_Click
Now that we’ve covered the page loading logic, let’s take a look at the the code behind the submit button on default.aspx. Its role is to insert a new entity (row) into the client table, which signals the worker roles to launch instances of the Folding@home client console application. The code is shown below:
1: // add client information record to the client table in Azure storage
2: var ctx = new ClientDataContext(
3: cloudStorageAccount.TableEndpoint.ToString(),
4: cloudStorageAccount.Credentials);
5: ctx.AddObject("client",
6: new ClientInformation(
7: txtName.Text,
8: PASSKEY,
9: litTeam.Text,
10: Double.Parse(txtLatitudeValue.Value),
11: Double.Parse(txtLongitudeValue.Value),
12: Request.ServerVariables["SERVER_NAME"]));
13: ctx.SaveChanges();
14:
15: // the worker roles are polling this table, when they see the record
16: // each will kick off its own Folding@home process
17:
18: // so just transfer to the status page
19: Response.Redirect("/Status.aspx");
Lines 2 - 4: Create a new data context
This is exactly the same thing we did earlier, namely establish a data service context for the Azure table service by passing it the HTTP endpoint and storage credentials. This time though instead of issuing a query, we’ll be inserting a new entity (row) into the table.
Lines 5 - 12: Add a new entity to the local context
The AddObject call inserts a new object into the object graph maintained by the client data context. In line 6ff, we’re initializing a new ClientInformation object (remember,ClientInformation is defined as a TableServiceEntity in the AzureAtHomeEntities.cs file) with information gathered from the user on the default.aspx page as well as from the ASP.NET Request object. After this code executes, the data service context tracks this new object so that it can reflect it back to the data source – namely the Azure table service -- when instructed.
Line 13: Update the table with the new entity
The single line
ctx.SaveChanges();packs a lot of punch! When this executes, the web page is flushing all of the changes made ‘locally’ to the source of that data: in our case, the client table in Azure. Here the change is the addition of a single entity, but in general it could consist of modifications to data in multiple entities or the deletion of entities already present in the Azure table. Now recall that under the covers the Azure storage API is REST-based, so that new entity is actually being added to the table via an HTTP POST request that is completely generated and executed on your behalf by the data service context.Woefully missing here is any sort of error checking or recovery. For instance, severing my network connection right before SaveChanges yields a System.Net.WebException indicating a timeout, and a DataServiceRequestException will occur if there happens to be an object with the same PartitionKey and RowKey already in the table. That latter exception should never happen in this specific case; however, it remains that the failure of the storage operations is not something addressed in this code, and a more robust implementation would do exception handling as well process the DataServiceResponse returned by SaveChanges. Those topics are important and great fodder for a future blog post but a bit out of scope for my goals on this blog series.
Line 19: Redirect to the status page
The optimal outcome of the submission of default.aspx is that the client table is updated successfully, setting in motion the worker roles which are responsible for managing the actual Folding@home activities. So at this point, the user is redirected to the status page (status.aspx), which at this early stage will indicate no real progress. Subsequent visits to the site will always redirect to the status.aspx page as well.
Status.aspx and the workunit table
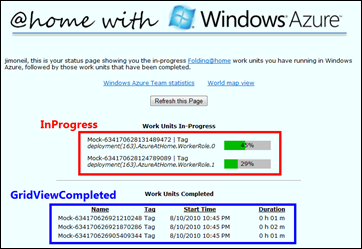 Let’s move on to a discussion of the status.aspx page, which given the groundwork we’ve laid above is actually quite easy to explain. A sample version of the status.aspx page appears to the right, with the primary ASP.NET control components labeled:
- InProgress is an ASP.NET Repeater control that lists out the in-progress Folding@home work units along with a pretty nifty pure HTML/CSS representation of a progress bar
- GridViewCompleted is an ASP.NET GridView that includes all of the completed work units, including statistics on when they started and how long they took to finish.
There’s also a couple of ASP.NET Literal controls to spiff up the user-experience, like including the name in the welcome message.
The data for the work unit status is stored in the Azure table named workunit, which is updated by the worker roles deployed with Azure@home. Here’s the table structure repeated from my last blog post:
| Attribute | Type | Purpose |
| PartitionKey | String | Azure table partition key |
| RowKey | String | Azure table row key |
| Timestamp | DateTime | read-only timestamp of last modification of the entity (row) |
| CompleteTime | DateTime | time (UTC) that the assigned WorkerRole finished processing the work unit (a value of null indicates the work unit is still in progress) |
| DownloadTime | String | download time value for work unit (assigned by Stanford) |
| InstanceId | String | ID of WorkerRole instance processing the given work unit(RoleEnvironment.CurrentRoleInstance.Id) |
| Name | String | Folding@home work unit name (assigned by Stanford) |
| Progress | Int32 | work unit percent complete (0 to 100) |
| StartTime | DateTime | time (UTC) that the assigned WorkerRole started processing the work unit |
| Tag | String | Folding@home tag string (assigned by Stanford) |
On to the code – which is all part of the Page_Load method:
1: protected void Page_Load(object sender, EventArgs e)
2: {
3: var cloudStorageAccount =
4: CloudStorageAccount.FromConfigurationSetting("DataConnectionString");
5: var cloudClient = new CloudTableClient(
6: cloudStorageAccount.TableEndpoint.ToString(),
7: cloudStorageAccount.Credentials);
8:
9: // get client info
10: var ctx = new ClientDataContext(
11: cloudStorageAccount.TableEndpoint.ToString(),
12: cloudStorageAccount.Credentials);
13:
14: var clientInfo = ctx.Clients.FirstOrDefault();
   15:      litName.Text = clientInfo != null ?
                          clientInfo.UserName : "Hello, unidentifiable user";
16:
17: // ensure workunit table exists
18: cloudClient.CreateTableIfNotExist("workunit");
19: if (cloudClient.DoesTableExist("workunit"))
20: {
21:
22: var workUnitList = ctx.WorkUnits.ToList<WorkUnit>();
23:
24: InProgress.DataSource =
25: (from w in workUnitList
26: where w.CompleteTime == null
27: let duration = (DateTime.UtcNow - w.StartTime.ToUniversalTime())
28: orderby w.InstanceId ascending
29: select new
30: {
31: w.Name,
32: w.Tag,
33: w.InstanceId,
34: w.Progress,
35: Duration = String.Format("{0:#0} h {1:00} m",
36: duration.TotalHours, duration.Minutes)
37: });
38: InProgress.DataBind();
39:
40: GridViewCompleted.DataSource =
41: (from w in workUnitList
42: where w.CompleteTime != null
   43:                  let duration = (w.CompleteTime.Value.ToUniversalTime() -
                                       w.StartTime.ToUniversalTime())
44: orderby w.StartTime descending
45: select new
46: {
47: w.Name,
48: w.Tag,
49: w.StartTime,
50: Duration = String.Format("{0:#0} h {1:00} m",
51: duration.TotalHours, duration.Minutes)
52: });
53: GridViewCompleted.DataBind();
54: }
55: else
56: {
   57:          System.Diagnostics.Trace.TraceError(
                    "Unable to create 'workunit' table in Azure storage");
58: }
59:
60: litNoProgress.Visible = InProgress.Items.Count == 0;
61: litCompletedTitle.Visible = GridViewCompleted.Rows.Count > 0;
62: }
The code in the first twenty lines should be pretty familiar given what I covered earlier in this post on the default.aspx page. litName, in Line 15, is a just a nicety to add the user’s name (taken from the client table) to the intro message displayed on the page. Likewise, the other two literals (Lines 60 and 61) are there so the main headings can be hidden when there are no results yet to display. The interesting part of this implementation is really only five lines:
Line 22: Retrieve work unit statistics
22: var workUnitList = ctx.WorkUnits.ToList<WorkUnit>();
Here we’re leveraging the data service context again and pulling all of the work units from the Azure table into memory (via the ToList method). That may or may not be the best approach, depending on the amount of data that might be stored in the table. With the code above, the entire contents of the table will be returned, whether that’s one row or one million rows. In a more robust implementation, you might want to implement a paging scheme – particularly with the historical results of completed work units.
Recommendation: For more information on how to handle paging in the context of Azure table storage, check out Scott Densmore’s blog post (including sample code) as well as the MSDN documentation. Note also that there are several other articles on this topic in the blogosphere that are now outdated.
Lines 24 - 38: Retrieve work unit statistics
LINQ to Objects makes a major appearance in this code. Here, the collection of work units materialized in Line 22 is filtered to include only in-progress work units (i.e., CompleteTime is null) and then projected into a new collection of entities, the properties of which map one-to-one with the data source for the repeater control, InProgress. Properties of the projection are used directly within the ItemTemplate (not shown here) defined in the markup for the Repeater control. With the DataSource property assigned, it’s a simple DataBind call to complete the process.
24: InProgress.DataSource =
25: (from w in workUnitList
26: where w.CompleteTime == null
27: let duration = (DateTime.UtcNow - w.StartTime.ToUniversalTime())
28: orderby w.InstanceId ascending
29: select new
30: {
31: w.Name,
32: w.Tag,
33: w.InstanceId,
34: w.Progress,
35: Duration = String.Format("{0:#0} h {1:00} m",
36: duration.TotalHours, duration.Minutes)
37: });
38: InProgress.DataBind();
Lines 40 - 53: Retrieve work unit statistics
This code is nearly identical to the previous block but instead selects the completed work units (where CompleteTime is not null) and creates a slightly different projection. That resulting collection is then bound to the GridView, the markup for which includes a number of BoundFields.
40: GridViewCompleted.DataSource =
41: (from w in workUnitList
42: where w.CompleteTime != null
   43:                  let duration = (w.CompleteTime.Value.ToUniversalTime() -
                                       w.StartTime.ToUniversalTime())
44: orderby w.StartTime descending
45: select new
46: {
47: w.Name,
48: w.Tag,
49: w.StartTime,
50: Duration = String.Format("{0:#0} h {1:00} m",
51: duration.TotalHours, duration.Minutes)
52: });
53: GridViewCompleted.DataBind();
Next up….
 Whew! That post went WAY longer that I thought it would, so if you’ve made it this far you’ve earned a virtual medal!
In the next post, I want to go a level deeper with the Azure table data access, which I hope will accomplish a few things: help you further understand the REST API for Azure storage, provide some insight into diagnosing and debugging unexpected behaviors, and above all gain an appreciation for all the code you aren’t writing when leveraging the StorageClient API!
