Azure@home Part 2: WebRole Implementation
This post is part of a series diving into the implementation of the @home With Windows Azure project, which formed the basis of a webcast series by Developer Evangelists Brian Hitney and Jim O’Neil. Be sure to read the introductory post for the context of this and subsequent articles in the series.
In my last post, I gave an overview of the @home With Windows Azure architecture, so at this point we’re ready to dive in to the details. I’m going to start with the internet-facing WebRole, the user interface for this application, and cover it in two blog posts, primarily because we’ll broach the subject of Azure storage, which really deserves a blog post (or more) in and of itself.
Getting to Where You Already Are
 By now, you should have downloaded the relatively complete Azure@home application in either Visual Studio 2008 or 2010 format and magically had a bunch of code dropped in your lap – a cloud project, a web role, a worker role and a few other projects thrown in the mix. Before we tackle the WebRole code in this article, I wanted to quickly walk through how the solution was built-up from scratch. If you’ve built Azure applications before, even “Hello World”, feel free to skip this section (not that I’d really know if you did or didn’t!)
You start off just as you would to create any other type of project in Visual Studio: File->New->Project (or Ctrl+Shift+N for the keyboard junkies out there). Presuming you have the Azure Tools for Visual Studio installed, you should see a Cloud option under the Visual C# and Visual Basic categories. (It doesn’t show under Visual F# even though you can build worker roles with F#).

In the New Project dialog (above), there’s not much to choose from; however, this is where you’ll need to commit to running either .NET Framework 3.5 or .NET Framework 4 inside of Windows Azure. At the point when we started this project, there wasn’t any .NET 4 support in the cloud, so the project we’ll be working with is still built on the 3.5 framework. I generally elect to build a new solution as well when working with Cloud Service projects, but that’s not a requirement.
 The next step is selecting the combination of web and worker roles that you want to encapsulate within the cloud service. There’s a few flavors of the roles depending on your needs:
- ASP.NET Web Role – a default ASP.NET application, such as you’d use for Web Forms development
- ASP.NET MVC 2 Web Role – an ASP.NET project set up with the MVC (model-view-controller) paradigm, including the Models, Views, and Controllers folders and complementary IDE support
- WCF Service Web Role – a WCF project set up with a default service and service contract
- Worker Role – a basic worker role implementation (essentially a class library with a Run method in which you’ll put your code)
- CGI Web Role – a web role that runs in IIS under the Fast CGI module. Fast CGI enables the execution of native code interpreters, like PHP, to execute within IIS. If you’re looking for more information on this topic, check out Colinizer’s blog post.
 For Azure@home we need only an ASP.NET web role and a worker role, which you can see I added above. Selecting OK in this dialog results in the creation of three projects: one for each of the roles and one for the Cloud Service itself. There are a few interesting things to note here.
- WebRole and WorkerRole each come with role-specific class files, providing access points to lifecycle events within the cloud. In the WebRole, you might not need to touch this file, but it’s a good place to put initialization and diagnostic code prior to the ASP.NET application’s start event firing. Beyond that though, the WebRole files look identical to what you’d get if you were building an on-premises application, and indeed a vast majority of constructs you’d use in on-premises applications translate well to Azure.
- There is a one-to-one correspondence between the role projects and an entry beneath the Roles folder within the Cloud Service project. Those entries correspond to the configuration options for each of the roles. All of the configuration is actually contained in the ServiceConfiguration.cscfg and ServiceDefinition.csdef files, but these Role nodes provide a convenient way to set properties via a property sheet versus poring over the XML.
By the way, if you already have, say, a web application built and want to incorporate it (or even a new one) within an existing Cloud Services project you can do that via the context menu on the Roles folder – just create a new project or add the existing project to the solution and then select the Web Role Project in solution… or Worker Role Project in solution… option from the context menu. In the image below, those options are disabled since there are no unassociated web or worker role projects currently in this particular solution.
.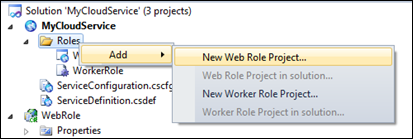
And that’s how the project was started. The remaining two projects, AzureAtHomeEntities and FoldingClientMock are simply a class library and console application that we’ll talk about in context at some point in future posts.
Inside the WebRole
The WebRole project in Azure@home is a simple one with only two ASPX pages – default.aspx and status.aspx. These two pages form the user-interface of the application:
 |
|
default.aspx entry page to the application via which user enters name and location to initiate the “real work,’ which is carried out by worker processes already revved up in the cloud |
status.aspx read-only status page with a display of progress of the Folding@home work units being processed by the cloud application |

As noted above, there’s also a ‘new’ file here, webrole.cs, and there’s quite a bit of ‘free code’ in there that warrants explaining before we even get to the web pages that this application serves up.
webrole.cs
The webrole.cs file is automatically generated when you create a Cloud Service Project and add in one of the Web Role variants; however, if you associate an existing ASP.NET application as a web role the additional file isn’t generated for you, so you’d need to supply whatever implementation is required for your application.
So what’s the code in this file do? Note first that the class it contains, WebRole, extends the RoleEntryPoint class (Line 1 below), a part of the Azure service runtime used to start, run, and stop your roles in the cloud. An implementation of RoleEntryPoint is required for worker roles, but it’s optional for web roles, since there’s an explicit lifecycle that ASP.NET applications already exercise. In this case of a web role, the Azure fabric invokes the OnStart method of each role instance, and presuming that method returns TRUE, the Application_Start method of the ASP.NET application is invoked. Conversely, the Application_End method of the ASP.NET application is called immediately before OnStop.
1: public class WebRole : RoleEntryPoint
2: {
3: public override bool OnStart()
4: {
5: DiagnosticMonitor.Start("DiagnosticsConnectionString");
6:
7: // use Azure configuration as setting publisher
8: CloudStorageAccount.SetConfigurationSettingPublisher(
9: (configName, configSetter) =>
10: {
11: configSetter(
12: RoleEnvironment.GetConfigurationSettingValue(configName)
13: );
14: }
15: );
16:
17: // For information on handling configuration changes
18: // see the MSDN topic at https://go.microsoft.com/fwlink/?LinkId=166357.
19: RoleEnvironment.Changing += RoleEnvironmentChanging;
20:
21: return base.OnStart();
22: }
23:
24: private void RoleEnvironmentChanging(object sender,
25: RoleEnvironmentChangingEventArgs e)
26: {
27: // If a configuration setting is changing
28: if (e.Changes.Any(change =>
29: change is RoleEnvironmentConfigurationSettingChange))
30: {
31: // Set e.Cancel to true to restart this role instance
32: e.Cancel = true;
33: }
34: }
35: }
This particular implementation of OnStart does three things (prior to invoking the method on its base class):
- Starts the DiagnosticMonitor (line 5),
- Sets a configuration setting publisher (line 8), and
- Assigns an event handler for RoleEnvironment.Changing (line 19).
Let’s take a deeper look at each of those next.
DiagnosticMonitor
DiagnosticMonitor is a class in the Microsoft.WindowsAzure.Diagnostics namespace that provides an avenue for recording diagnostic information from a role directly to Azure storage (the string parameter in Line 5 refers to a role configuration setting that provides the connection string for the Azure storage account to be used). There are multiple different diagnostics that can be collected (some automatically, some requiring configuration) including:
- Windows Azure logs (via the familiar Trace methods)
- IIS 7.0 logs
- Windows Diagnostic infrastructure logs
- Failed Request logs
- Windows Event logs
- Performance counters
- Crash dumps
- Custom error logs
Writing to the Windows Azure logs, which is the only diagnostics implemented in Azure@home at this point, occurs via a TraceListener configured in the web.config (or app.config for a worker role):
 <system.diagnostics>
    <trace>
        <listeners>
            <add type="Microsoft.WindowsAzure.Diagnostics.DiagnosticMonitorTraceListener,
                       Microsoft.WindowsAzure.Diagnostics,
                       Version=1.0.0.0, Culture=neutral, PublicKeyToken=31bf3856ad364e35"
                name="AzureDiagnostics">
                <filter type="" />
            </add>
        </listeners>
    </trace>
</system.diagnostics>
The good news here is that this markup is all added for you if you use the Visual Studio project templates to create a new role, and the better news is that to leverage the diagnostic capability, you need only make calls to the System.Diagnostics.Trace class: TraceInformation, TraceError, TraceWarning, etc. You’ll note there are calls to TraceError in both of the pages in the web role to indicate there was a problem creating a table in Azure storage (a topic I’ll address in a future post).
If you set this up exactly as I did for the web role, you’ll notice your trace output in the Development Fabric UI console windows for the respective roles, but in the ‘real’ cloud, you don’t have this visibility, so you must rely on the transfer of logs to Azure storage. Each of the diagnostics in the bulleted list above can be transferred on a regular basis, say every 15 minutes by setting up additional DiagnosticMonitorConfiguration options and supplying them to the DiagnosticMonitor.Start call. You can also transfer the diagnostics to Azure storage on demand and even remotely. If you were to set up any of those options, the Azure log file output would be persisted to a table called WADLogsTable; other diagnostics are written to additional tables or blob storage.
Recommendation: There is an incredibly rich set of capabilities for instrumenting your code via the Windows Azure APIs. The worker role, which I’ll cover in an upcoming post, uses an only slightly more sophisticated approach than the web role here. For a very thorough treatment of the subject, I highly recommend Neil Mackensie’s blog and the June 2010 MSDN Magazine article, “Take Control of Logging and Tracing in Windows Azure,” by Mike Kelly.
CloudStorageAccount Configuration Setting Publisher
The next thing OnStart does (lines 7– 15, repeated below) is assign a lambda function (an anonymous delegate) as a setting publisher for the associated cloud storage account . The CloudStorageAccount class is part of what’s referred to as the Azure StorageClient API, which provides convenient .NET classes and methods to wrap the core REST APIs for accessing Azure storage, and this code is essentially telling that API where to get the configuration parameters (account name, key) for the cloud storage account that we’ll be using in the web role.
7: // use Azure configuration as setting publisher
8: CloudStorageAccount.SetConfigurationSettingPublisher(
9: (configName, configSetter) =>
10: {
11: configSetter(
12: RoleEnvironment.GetConfigurationSettingValue(configName)
13: );
14: }
15: );
This setup is ultimately a prerequisite for calls to access the configuration settings that you’ll find in both default.aspx and status.asxpx, namely,
cloudStorageAccount = CloudStorageAccount.FromConfigurationSetting ("DataConnectionString");
That code seems pretty straightforward, so why the need for all that SetConfigurationSettingPublisher fanfare (well beyond the fact that calling FromConfigurationSetting without it causes an exception)?
You might, for instance, want your application that accesses Azure storage to work either in the cloud or on premises; in the cloud, you’d want to use the ServiceConfiguration.cscfg file, but on-premises, you’d want to use the web.config file. The configuration setting publisher functionality helps abstract the source of that configuration to limit the impact on the rest of your code. In line 11, for instance, the source of the configuration value is the Azure role environment. If you were to move this code to run on-premises as a standalone ASP.NET application, you’d call something like
configSetter(ConfigurationManager.AppSettings[configName]);
and then subsequent calls to FromConfigurationSetting would pull the values from the local web.config instead of ServiceConfiguration.cscfg.
In retrospect, for Azure@home, which will always run in Azure, it’s overkill, and to initialize the storage account, we could have used the simpler
CloudStorageAccount cloudStorageAccount = CloudStorageAccount.Parse( RoleEnvironment.GetConfigurationSettingValue ("DataConnectionString"));
and obviated the need for the SetConfigurationSettingPublisher in the OnStart method.
Recommendation: For a deeper dive into the mechanics of SetConfigurationSettingPublisher check out Neil Mackensie’s blog as well as Steven Nagy’s.
RoleEnvironment.Changing
RoleEnvironment.Changing is one of four events that can fire on the context of a particular role instance. As you might expect the event occurs when a change to the environment is requested, but before it’s actually carried out. There is also a RoleEnvironment.Changed event that will execute after a change in the role environment.
So what constitutes a change in the environment? There are two types of changes that can trigger these events: a modification to a configuration parameter (in ServiceConfiguration.cscfg), or a change to the topology – namely the number of role instances.
Although Azure@home really doesn’t exploit the Changing event, let’s take a closer look at how the mechanism works. As mentioned there’s a couple of triggers for the event, and the combination of those modifications are contained in the Changes collection of the RoleEnvironmentChangingEventArgs, with each ‘change’ being one of the concrete types extending the abstract class RoleEnvironmentChange – so a change of type RoleEnvironmentTopologyChange indicates a modification to the number of instances of a role, and a change of type RoleEnvironmentConfigurationSettingChange indicates a modification to one of the configuration properties (as named in the ConfigurationSettingName property).
24: private void RoleEnvironmentChanging(object sender,
25: RoleEnvironmentChangingEventArgs e)
26: {
27: // If a configuration setting is changing
28: if (e.Changes.Any(change =>
29: change is RoleEnvironmentConfigurationSettingChange))
30: {
31: // Set e.Cancel to true to restart this role instance
32: e.Cancel = true;
33: }
34: }
So now that last bit of code (reproduced above) starts making a bit more sense. The code detects if any of the changes are due to configuration settings (versus topology) and by setting Cancel to true instructs the role to shutdown and restart, at which point the change is applied. This brings up several points to be aware of in this particular implementation:
- Only configuration setting changes are trapped (line 29), so changing the number of instances of a role (topology) won’t result is shutting down existing instances (other than to stop a subset of them to reflect a request to reduce the number of instances). Empirically, it appears that the instances are stopped in increasing order of longevity, that is, the last instance started would be the first instance stopped, but that’s not a documented behavior.
- Any configuration setting change will cause a restart of each existing role instance to which that setting applies. That may be too drastic for certain circumstances – for instance, perhaps you want to set a trace flag dynamically for an active but misbehaving role instance. The code above would set that flag only after restarting the instance, which may eliminate the behavior you were trying to diagnose in the first place.
- The role is allowed 30 seconds to shutdown, if that doesn’t occur ‘cleanly’ in that timeframe, then the process is immediately terminated.
Tip: If you want to experiment with modifying configuration changes ‘on-the-fly’ in the development fabric, you’ll need to employ the CSrun utility that’s part of the Azure SDK. Here’s what I generally do:

Launch the Windows Azure SDK Command Prompt; you can find this in the Windows Azure SDK Program Group on the Start menu.
Change the directory to the one housing your build output, specifically the ServiceConfiguration.cscfg file, for example:
solutionname/cloudprojectname/bin/debugRun the command
csrun /update:deploymentID;ServiceConfiguration.cscfgwhere deploymentID is assigned to the current deployment by the development fabric and specified in parentheses in the deployment node within the Development Fabric UI (see image in callout).
In the next post, we'll look at the implementation of default.aspx and status.aspx, including their use of Azure table storage.