Try Azure, Win a Laptop (Thru Wednesday)
This past week, Chris and I finished up our Northeast Roadshow series in Farmington, CT, where we focused on the primary components of Windows Azure. If you were at that venue or attended New England Code Camp 13 yesterday in Waltham, you might have picked up a sheet of paper with a token for trying out Windows Azure free-of-charge for the next few days or so.
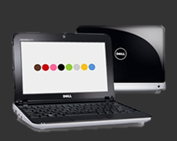 Well, I’ve got an awesome (and potentially rewarding!) opportunity to give Azure a spin. CodeProject is sponsoring a contest through the end of March (that’s only 3 days away folks). By downloading and deploying a simple application to Windows Azure, you’ll automatically be entered in a contest to win one of three Dell Inspiron Mini 10 netbooks (similar to the one at the right).
Visit CodeProject for the full details
Don’t have a free token? You can still participate!
- If you have an MSDN Premium account, you’re allotted 750 hours of compute time per month for a period of 8 months, and
- Via the Introductory Special, you can get an account with up to 25 hours of compute time per month (more than enough for this contest).
Both of these plans require signing up for an Azure account using a Windows Live ID. Here are the steps you can follow, it takes about 15 minutes, tops.
Select the Windows Azure Platform Introductory Special option from the Offers section on the Windows Azure site.

You’ll be prompted for your Live ID at this point. Or, if you have an MSDN Premium account, go to the Account tab of your subscription page, and select the Windows Azure Platform option.

In either case you’ll be redirected to your shopping cart at the Microsoft Online Customer Services Portal, as you can see below:
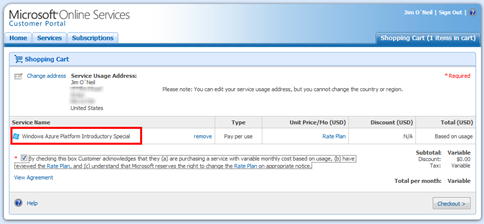
Select the checkbox acknowledging you’ve read the Rate Plan - you did read it didn’t you :). Then click the Checkout button.
Next, you’ll be prompted for a credit card… do not panic! step away from the cancel button!

The credit card number is there to handle any overages to your account – think of this like providing a credit card at the hotel for ‘incidentals’, when you’ve already pre-paid via a service like Expedia or Priceline.You do need to be cognizant of your account usage so you don’t go over the complimentary compute time allotments, but I’ll show you how to ensure you don’t a bit later.
You know the drill for the next part, and no, that’s not my actual credit card information (or anyone’s for that matter, but nice try!).

Once your information is validated, you’ll be presented the agreement screen below, on which you’ll need to sign off.

Next is the confirmation of your order.

Select the Confirm button at the bottom right of the screen (not shown on the screenshot above), and…
You’ll get the confirmation screen as shown below (well, with your information, not mine)

When you proceed to activation, you’ll be prompted to enter a name for your subscription, which appears on your bill and is also used to name your first Windows Azure project.

Next, you provide the information for your Service Administrator; this is the person with access to the Developer Portal and who makes the decisions on what and when to deploy to Azure. The information you provided previously (in Step 4) was for the Account Owner, who would typically be someone in a purchasing department or other administrative group within your company.
For a simple trial account though you’re going to wear both hats, so you can leave it at the default, which copies in the account owner information you already entered.

YASS (yet another summary screen)

and you’re done!

Note, the verbiage above indicates you’ll get a confirmation message sent to your Live ID e-mail within 24 hours, but the response is really more like 20 minutes, so you won’t have to wait that long to put your app in the cloud for a chance to win that netbook!
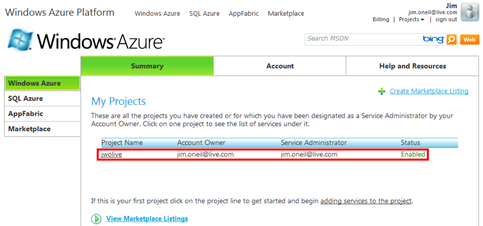
Although it took only about 15 minutes for my e-mail to arrive, I got itchy and discovered my account was ready within just a few minutes. You can always check if you’re good to go by logging into the Windows Azure portal with your account’s Live ID. Here’s my new Azure project at the ready!
On to the Contest
 Ok, now you’ve got your Azure account all set up, and it’s time to play! The Azure site has plenty of resources to get you going, but since you’re all here to win a laptop, follow the steps on The Code Project site.
When you download the sample code (Step 2 of their instructions) you’ll get a PDF file to lead you through modifying the application, deploying it, and officially registering for the contest – which you do by running your application once it’s in the cloud.
Depending on how much time you spend delving into the implementation and trying to understand the Azure development and deployment process, I’d say plan on 15 to 45 minutes to get it all done (which includes time for everything to spin up on Azure).
I’m in! What Next?
(or: how do I avoid charges on my credit card)
 If you’re using one of the complimentary tokens that has a fixed expiration date, you don’t really have to do anything more; the application will be decommissioned automatically when the account expires.
If, however, you’ve applied for either the introductory or MSDN account offers, the clock is ticking, and you’re being charged for usage in Azure against the allotment of your plan. If you exceed those allotments, the overage will appear on the credit card you used to set up the account.
Keep in mind that an application deployed to Azure costs you whether or not your application is doing anything ($0.12 per hour for one small-instance role, slightly less with an MSDN account). You’re paying for the provisioning, not for the CPU; it’s kind of like a hotel room, you get charged for it whether or not you’re in the room.
So, for this contest, it’s important to suspend and completely remove your application after you’ve entered the contest, and your submission has been confirmed (that takes just a few minutes).
At the development portal, make sure you go from this:
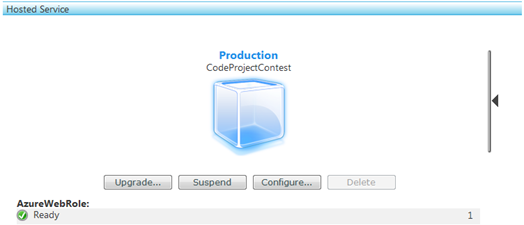
to this (via Suspend button):
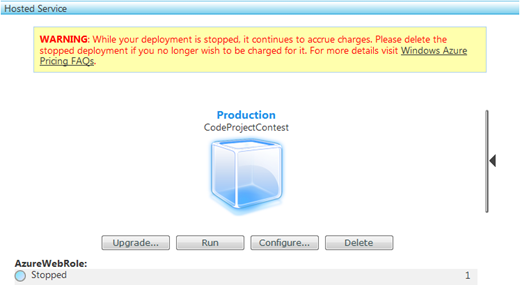
and then to this (via the Delete button):
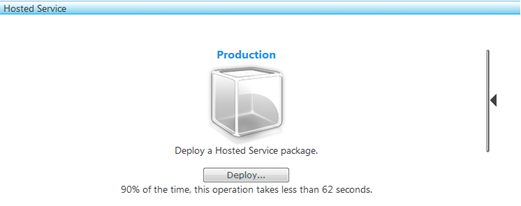

Oh, and by the way, you’re charged for staging in just the same way as you are for production, so don’t just move your application to staging thinking that will avoid charges.
Good luck with the contest, and please let me know if you get stuck somewhere along the line; I’m happy to help you out!