Azure PaaS 快速实践 2 - 设计实现第一个集成应用(托管服务/预启动任务)
本节中,我们会设计并实现第一个基于Azure的云服务,该实现中会使用到Azure公有云中的存储服务(Azure Storage),关于 Azure Storage详情,请了解:https://www.windowsazure.cn/zh-cn/manage/services/storage/what-is-a-storage-account/
Windows Azure Storage(WAS)存储提供持久的、可持续的、易扩展的存储空间,并且提供基于Internet的多种访问方式。包含3种类型的存储服务:
- „ 二进制大对象(Binary Large Object(Blob)Storage)服务,主要用于存储文件或二进制数据,用于文件存储分发、流媒体库存储、数据备份等。存储的文件提供对外的HTTP(s)访问地址。
- „ 队列(Queue Storage)服务,用于存储实时消息数据,确保应用程序之间可靠的、持久的消息传递。
- „ 表(Table Storage)服务,用于可被查询的动态结构化数据存储。与SQL Server等传统数据库中数据表不同的是,同一个Table Storage表中的数据实体可以拥有不同的数据结构,如学生成绩信息和客户联系信息,而SQL Server中同一个数据表内不可能同时含有学生成绩信息和客户联系信息。
在本节实践中,你需要使用你的Azure Storage存储来实现数据交互和存储,因此在本实践之前,请参考以下步骤创建一个属于你的Azure Storage帐号,并查看到帐号名和密码。
如何创建你的Azure Storage存储:https://www.windowsazure.cn/zh-cn/manage/services/storage/how-to-create-a-storage-account/
如何查看你的存储帐号及密码:https://www.windowsazure.cn/zh-cn/manage/services/storage/how-to-manage-a-storage-account/#regeneratestoragekeys
进一步单独了解WAS提供的编程接口和访问方式,请参考:
如何编程访问Blob存储:https://www.windowsazure.cn/zh-cn/develop/net/how-to-guides/blob-storage-v17/
如何编程访问Table存储:https://www.windowsazure.cn/zh-cn/develop/net/how-to-guides/table-services/
如何编程访问队列存储:https://www.windowsazure.cn/zh-cn/develop/net/how-to-guides/queue-service/
提示: 开发者可以使用Global Windows Azure中的WAS帐号或者China Azure中的WAS帐号来完成本实践,具体WAS连接字符串稍有不同,如下:
如开发者使用China Azure时,WAS连接字符串类似以下样例:
CloudStorageAccount storageAccount = CloudStorageAccount.Parse("BlobEndpoint=https://portalvhds88zyhq6kndn2p.blob.core.chinacloudapi.cn/;AccountName=portalvhds88zyhq6kndn2p;AccountKey=tbLt4dmW0vJFFYobuBvpN2RB6On63XjwKDkoxD/v7Hg1vkeS3y3FJ+BK0MT6Q1MYXCWbKOJSM8+9mUrHUzrLDg==");
如开发者使用Global Windows Azure,WAS连接字符串类似以下样例:
CloudStorageAccount storageAccount = CloudStorageAccount.Parse.("DefaultEndpointsProtocol=https;AccountName=mytest3939393;AccountKey=sZjfJiETVsXC****&&$$$m4yfjdajf*****%%U3fvxVHqGmJhIcaVaX3g==");
除此之外,开发者若单独进行WAS实践,可以使用本地模拟器中的WAS帐号进行测试,连接方式为:CloudStorageAccount storageAccount = CloudStorageAccount.DevelopmentStorageAccount;
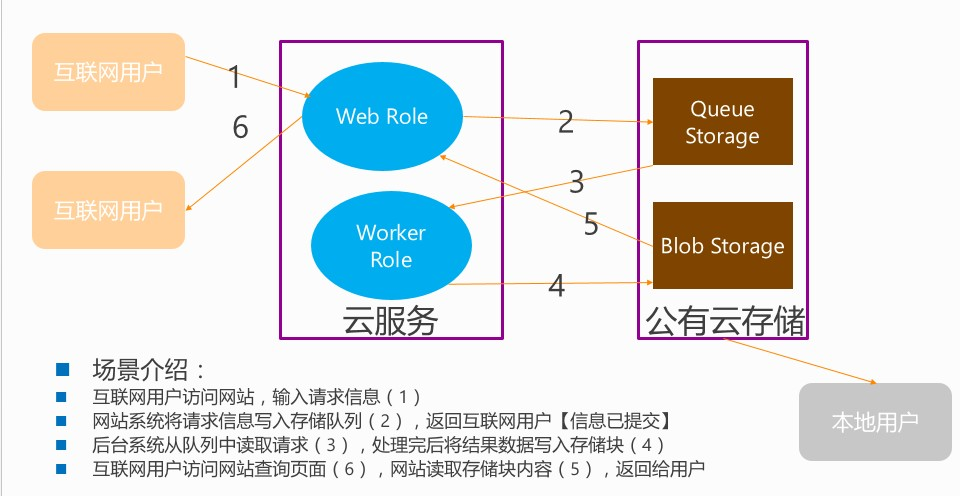
步骤六:深入集成应用
这一步,我们将尝试一个较综合的集成应用,架构图如下:
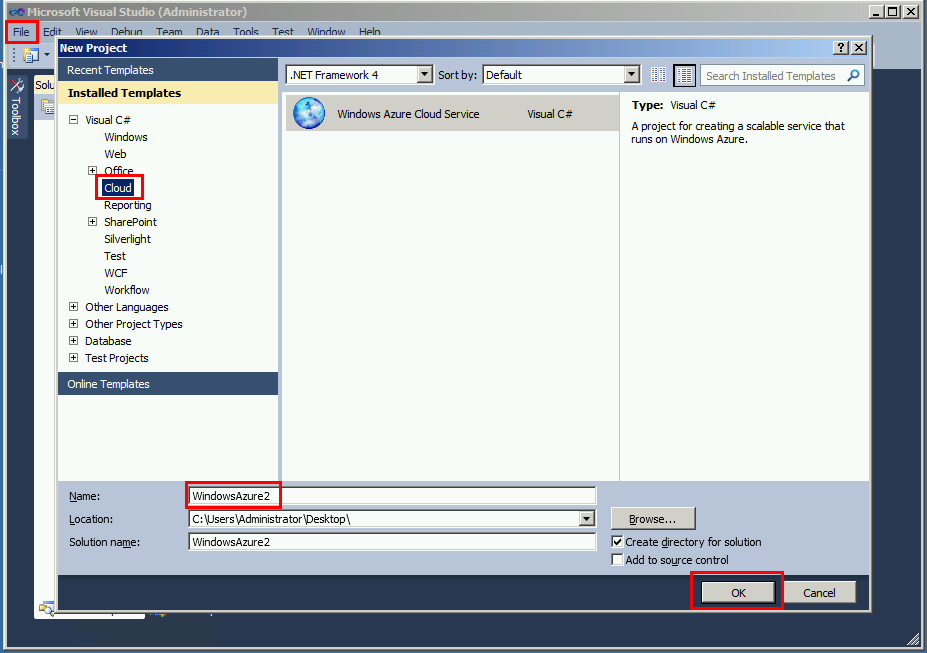
选择File --> Close Solution, 然后点击File,选择New,点击Project按钮,新建项目
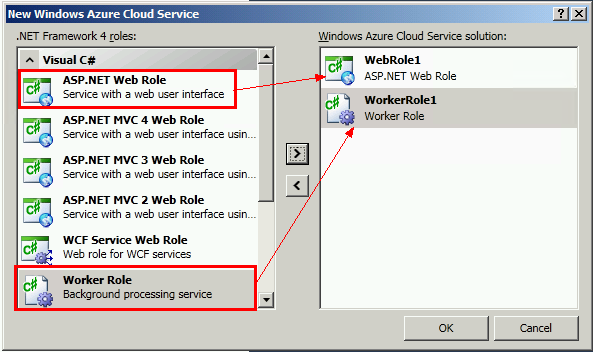
新项目中,如下图添加两个Role,点击OK完成新项目创建。
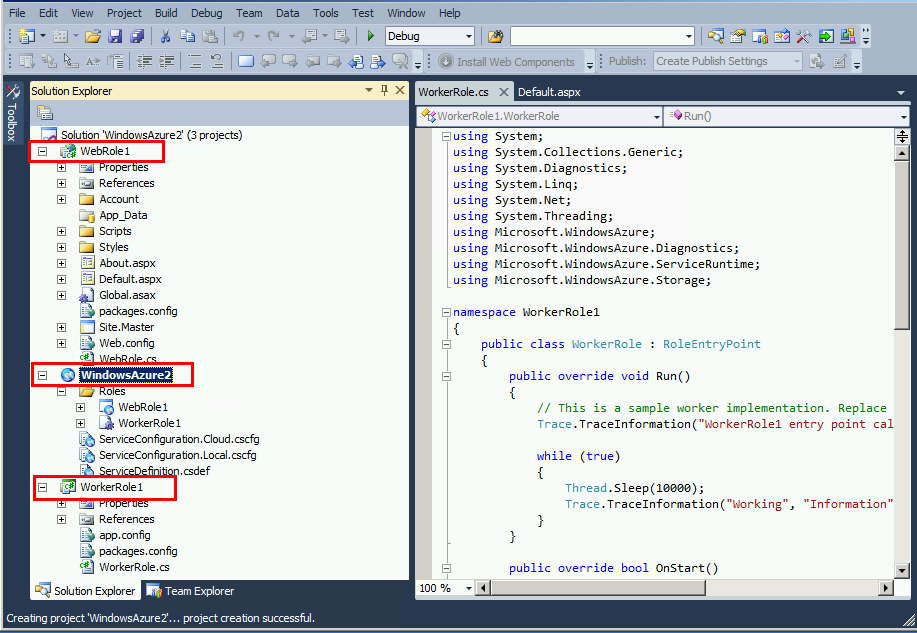
创建完的项目如图:
在WebRole1的Default.aspx设计页面中,类似步骤四中拖入两个textbox和两个button,
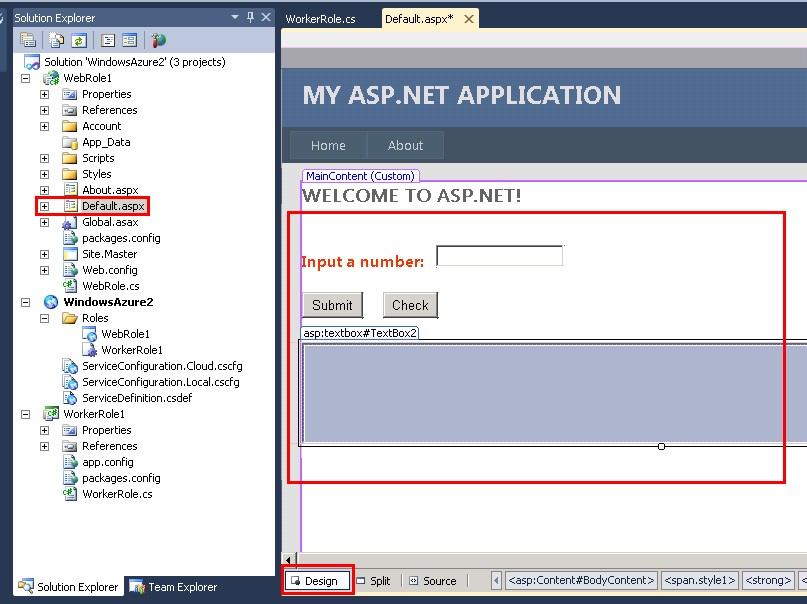
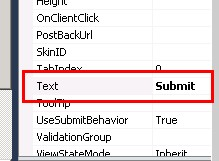
其中,Button上文字以及第二个TextBox的多行可以通过(选中Button,右键 --> property)设置,如图:

双击Default.aspx设计页面中的Submit按钮,进入到代码页,添加如下引用和代码:
(注:下列代码中的Storage连接信息可以更换成练习者已有的Storage连接串)
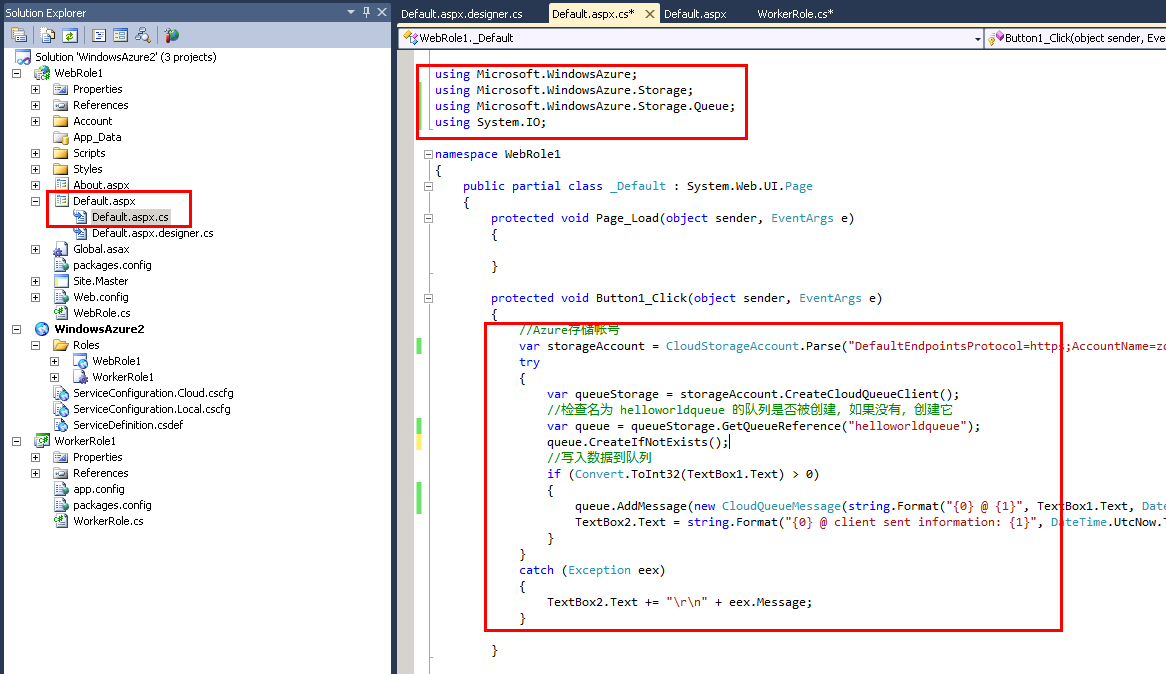
protected void Button1_Click(object sender, EventArgs e)
{
//Azure存储帐号
var storageAccount = CloudStorageAccount.Parse("DefaultEndpointsProtocol=https;AccountName=portalvhds303zv6wrv9j9q;AccountKey=WNydsi2FU6GRg/KfPV7aF0P86NdXt2AS6twm+qo6zhepr580EP2T7V7PGXsXYOxK/SlKHuq5smnHVsR/1R4klQ==");
try
{
var queueStorage = storageAccount.CreateCloudQueueClient();
//检查名为 helloworldqueue 的队列是否被创建,如果没有,创建它
var queue = queueStorage.GetQueueReference("helloworldqueue");
queue.CreateIfNotExists();
//写入数据到队列
if (Convert.ToInt32(TextBox1.Text) > 0)
{
queue.AddMessage(new CloudQueueMessage(string.Format("{0} @ {1}", TextBox1.Text, DateTime.Now.ToString())));
TextBox2.Text = string.Format("{0} @ client sent information: {1}", DateTime.Now.ToString(), TextBox1.Text);
}
}
catch (Exception eex)
{
TextBox2.Text += "\r\n" + eex.Message;
}
}
双击Default.aspx设计页面中的Check按钮,进入到代码页,添加如下代码:
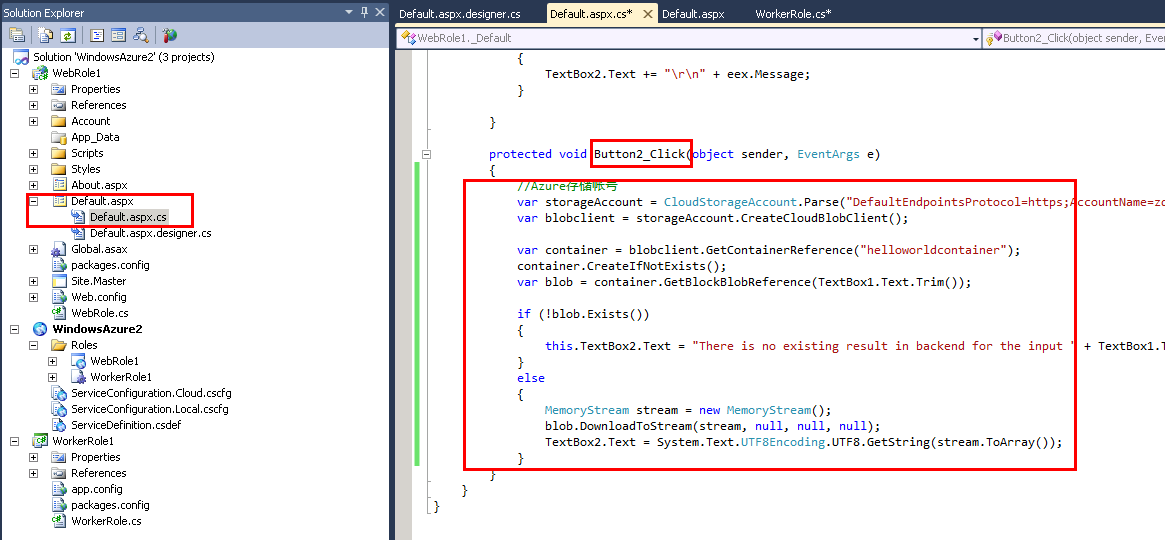
//Azure存储帐号
var storageAccount = CloudStorageAccount.Parse("DefaultEndpointsProtocol=https;AccountName=portalvhds303zv6wrv9j9q;AccountKey=WNydsi2FU6GRg/KfPV7aF0P86NdXt2AS6twm+qo6zhepr580EP2T7V7PGXsXYOxK/SlKHuq5smnHVsR/1R4klQ==");
var blobclient = storageAccount.CreateCloudBlobClient();
var container = blobclient.GetContainerReference("helloworldcontainer");
container.CreateIfNotExists();
var blob = container.GetBlockBlobReference(TextBox1.Text.Trim());
if (!blob.Exists())
{
this.TextBox2.Text = "There is no existing result in backend for the input " + TextBox1.Text + blob.Uri.ToString();
}
else
{
MemoryStream stream = new MemoryStream();
blob.DownloadToStream(stream, null, null, null);
TextBox2.Text = System.Text.UTF8Encoding.UTF8.GetString(stream.ToArray());
}
双击WorkerRole1中的WorkerRole.cs,添加如下代码和引用。
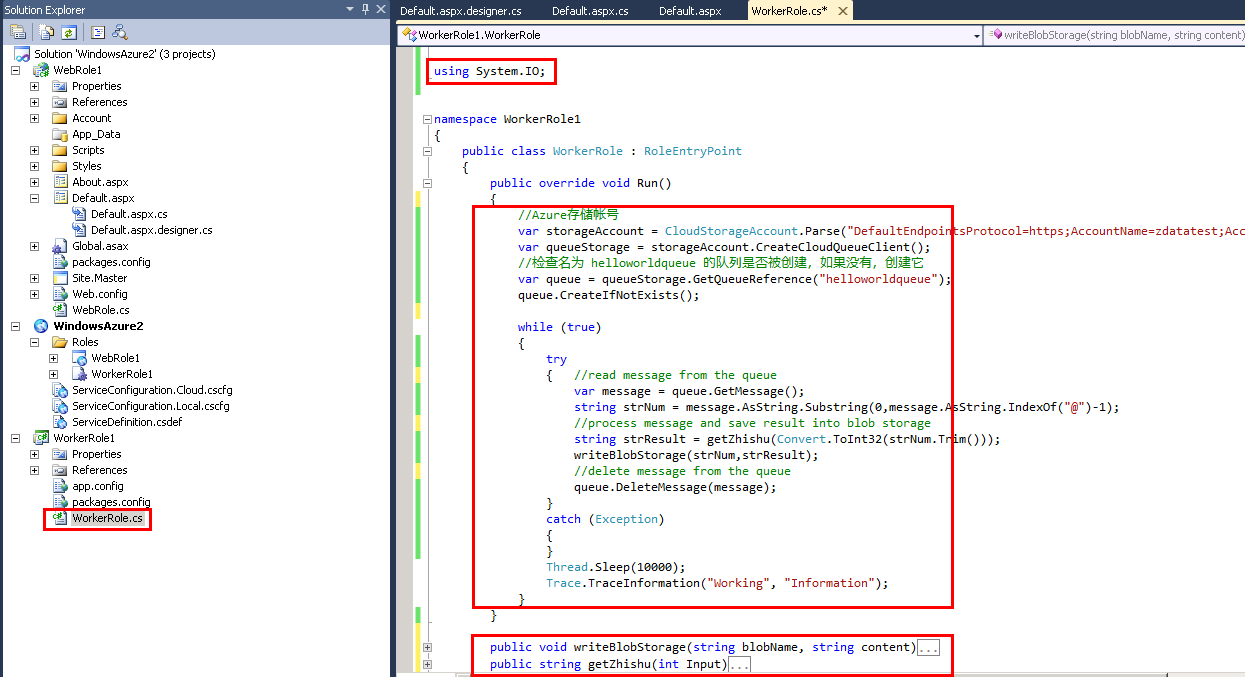
其中添加的两个函数分别实现blob storage的写操作和求质数,所有代码如下:
Run()函数:
//Azure存储帐号
var storageAccount = CloudStorageAccount.Parse("DefaultEndpointsProtocol=https;AccountName=portalvhds303zv6wrv9j9q;AccountKey=WNydsi2FU6GRg/KfPV7aF0P86NdXt2AS6twm+qo6zhepr580EP2T7V7PGXsXYOxK/SlKHuq5smnHVsR/1R4klQ==");
var queueStorage = storageAccount.CreateCloudQueueClient();
//检查名为 helloworldqueue 的队列是否被创建,如果没有,创建它
var queue = queueStorage.GetQueueReference("helloworldqueue");
queue.CreateIfNotExists();
while (true)
{
try
{ //read message from the queue
var message = queue.GetMessage();
string strNum = message.AsString.Substring(0,message.AsString.IndexOf("@")-1);
//process message and save result into blob storage
string strResult = getZhishu(Convert.ToInt32(strNum.Trim()));
writeBlobStorage(strNum,strResult);
//delete message from the queue
queue.DeleteMessage(message);
}
catch (Exception)
{
}
Thread.Sleep(10000);
Trace.TraceInformation("Working", "Information");
}
添加的两个函数:
public void writeBlobStorage(string blobName, string content)
{
//Azure存储帐号
var storageAccount = CloudStorageAccount.Parse("DefaultEndpointsProtocol=https;AccountName=portalvhds303zv6wrv9j9q;AccountKey=WNydsi2FU6GRg/KfPV7aF0P86NdXt2AS6twm+qo6zhepr580EP2T7V7PGXsXYOxK/SlKHuq5smnHVsR/1R4klQ==");
var blobclient = storageAccount.CreateCloudBlobClient();
var container = blobclient.GetContainerReference("helloworldcontainer");
container.CreateIfNotExists();
var blob = container.GetBlockBlobReference(blobName);
byte[] buffer = System.Text.Encoding.Default.GetBytes(content);
blob.PutBlock(Convert.ToBase64String(System.BitConverter.GetBytes(100)), new MemoryStream(buffer, true), null);
List<string> blocklist = new List<string>();
blocklist.Add(Convert.ToBase64String(System.BitConverter.GetBytes(100)));
blob.PutBlockList(blocklist);
}
public string getZhishu(int Input)
{
if (Input < 2)
{
return "invalid input or there is no prime number less than the input number.";
}
int i = 2, j, n = 0;
string output = " ";
while (i <= Input)
{
j = 2;
while (j <= i / 2)
{
if (i % j == 0)
break;
j++;
}
if (j > i / 2)
{
n += 1;
output += i.ToString() + ";";
//Console.Write("{0}\t", i);
}
i++;
}
output = "There are " + n.ToString() + " prime numbers no greater than " + Input.ToString() + " : " + output;
return output;
}
所有步骤集成完毕,接下来可以本地验证。
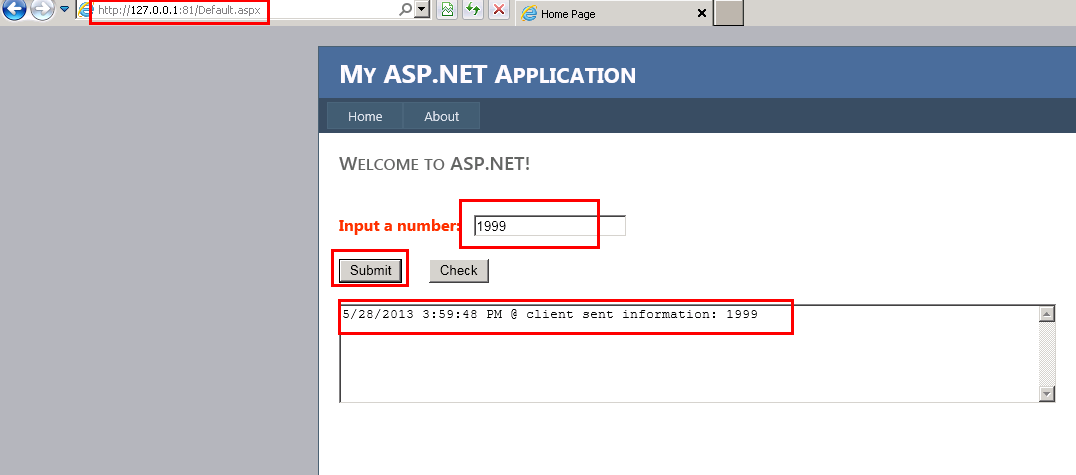
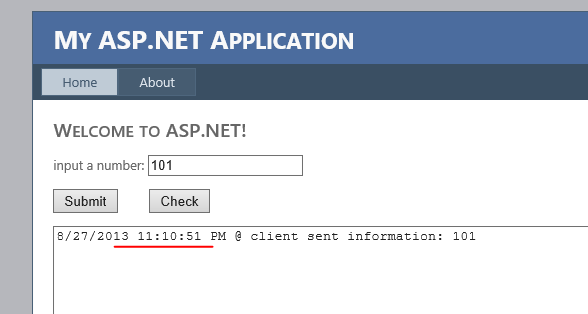
按F5进入本地运行模式,在弹出的网页中输入数字如1999后点击Submit按钮,得到以下结果:

如上依次测试数字999,600,确认数字都提交成功。
稍等片刻,如1分钟,后输入1999,点击Check按钮,得到以下结果:

至此,充分体现了Azure计算资源中的Web Role,Worker Role和存储资源中的Queue,Blob完整的协作,整个方案运转成功。
同步骤五,可以将此服务发布到云端,供所有用户同时测试。
如https://test0604.cloudapp.net
步骤七:预启动任务和更新
在上面步骤的测试中,可以发现:
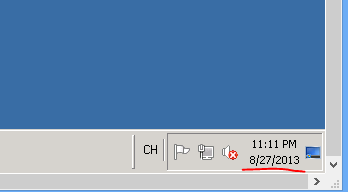
Web role页面返回的时间信息与本地当前时间不符,存在8小时的时差。这是因为Azure所有的PaaS虚机都被初始化成UTC标准时间。
因此,此步实践中,采用startup task更改web role虚机中的时区设定。
为了调用系统时区修改工具,本步实践中需要指定web role虚机中的OS版本为Windows Server 2008 R2。
在本地开发机上新建一个txt文本文件,手动输入以下文本:
tzutil /s "Singapore Standard Time"
选择File --> Save As将文本文件另存为一个新文件,命名为startup.cmd,编码方式为ANSI

在VS解决方案中,添加刚刚新建的startup.cmd文件至web role项目(右键web role项目,add --> existing item -->)。并设置startup.cmd文件的属性为copy always。

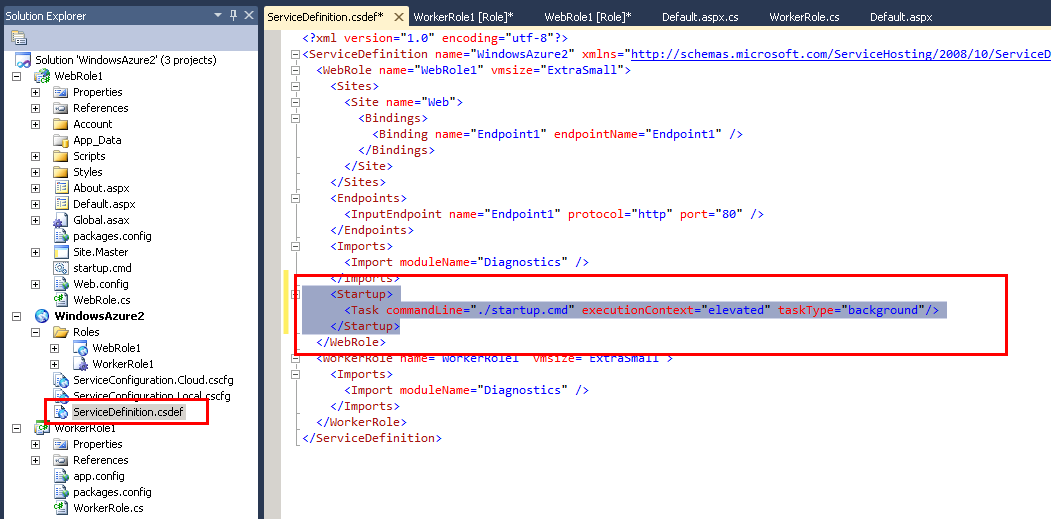
选择并双击Azure项目中的servicedefinition.csdef文件,在web role配置节中添加以下配置:
<Startup>
<Task commandLine="./startup.cmd" executionContext="elevated" taskType="background"/>
</Startup>
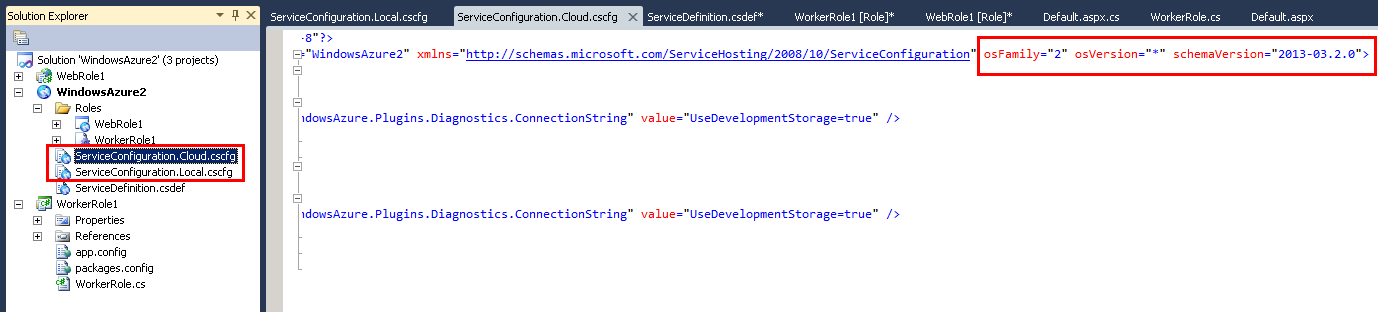
逐一查看两个serviceconfiguration文件,确认其中的OSfamily=2,Osversion=”*”.如有不同,请修改到如下:osFamily="2" osVersion="*" schemaVersion="2013-03.2.0"
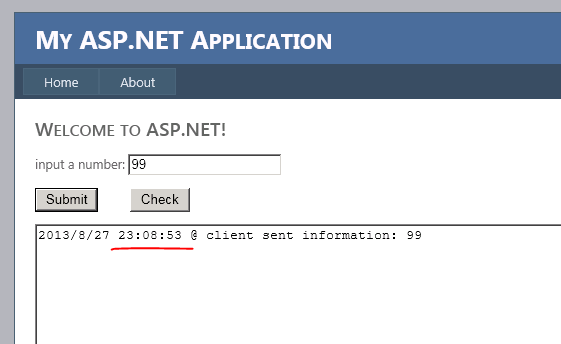
按F5进入本地运行模式,在弹出的网页中输入数字如99后点击Submit按钮,得到以下结果,时间为北京时间
同步骤五,将此服务发布到云端。
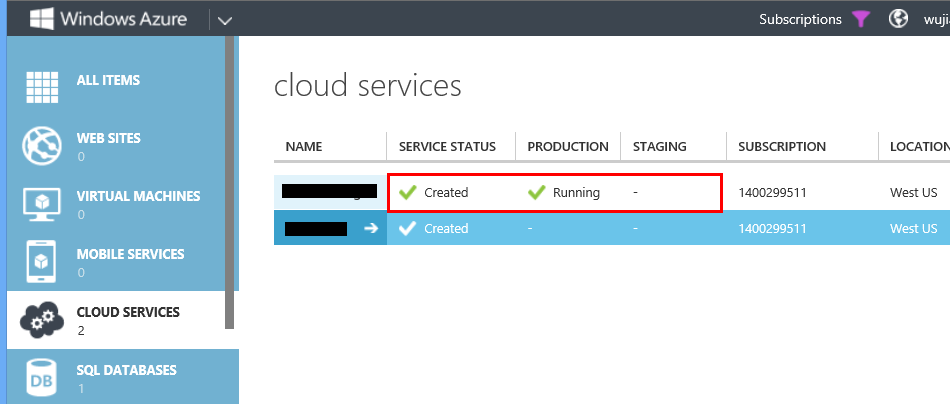
发布完成后,点击刚刚发布的云服务,如图
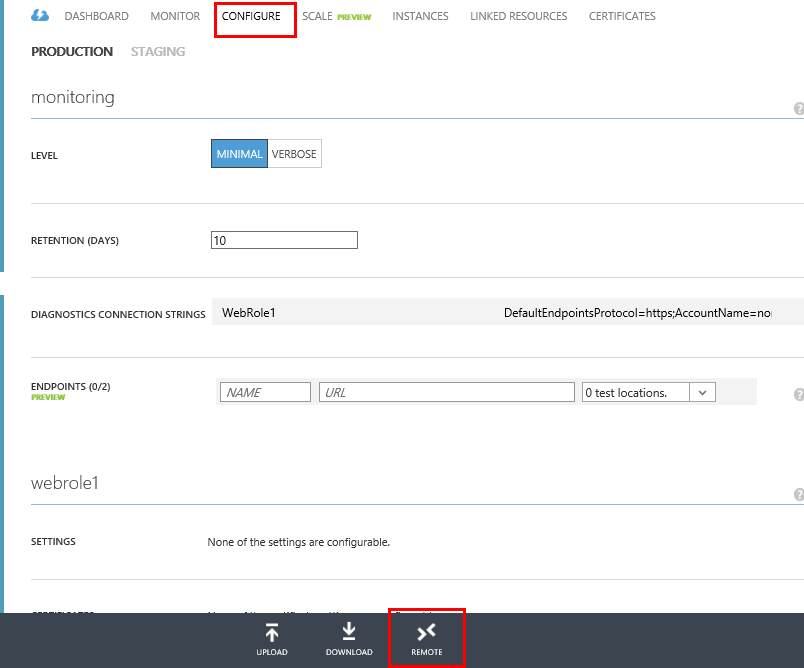
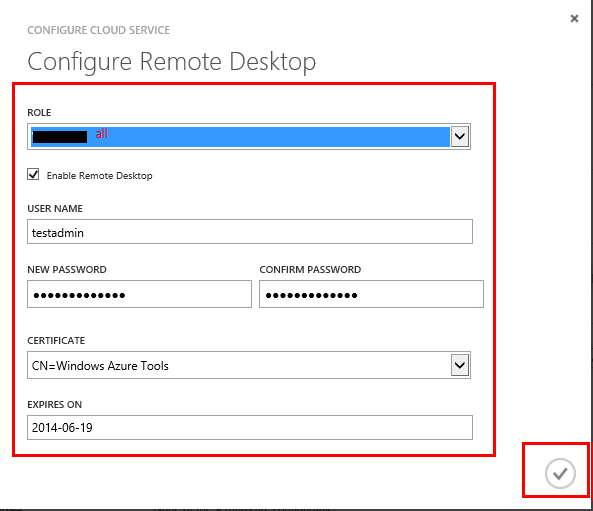
进入到该云服务的管理界面,选择Configure页面,点击下方的Remote按钮,根据向导页设定Remote的用户名密码。
然后通过两种方法可以查看web role虚机所在的时区:
- 访问云服务对应的**.cloudapp.net,输入数字,然后低级submit按钮
- Remote连接到虚机中,查看timezone信息。
以下是测试结果,均显示为北京时间,达到预期。
关于Azure Storage的更多开发基础,请参考:https://www.windowsazure.cn/zh-cn/develop/net/how-to-guides/blob-storage-v17/