Visual Studio 2010: How to extend the architecture tools
During Visual Studio 2010 planning, the Visual Studio team suffered the same thing that every development team suffers during planning: they had a ton of features they wanted to add and only so much time. When it became obvious that they had to cut features, they decided to invest in an extensible infrastructure so they could deliver more features out of band. This extensibility also allows end users to tweak the product. To implement this, they utilized the Managed Extensibility Framework (MEF) throughout their architecture.
Now, Microsoft has a significant service agreement; we service products for 10 years after their release. The only way that we can do this is if the bits are well-controlled. Therefore, a developer can’t throw zip files on their blog to change existing code...it would become unmanageable. So when new features are added out of band (like power tools and feature packs…more on that below), they have to be purely additive releases where they can’t change existing bits.
There are two main things that I want to cover regarding extensibility: how to extend the architecture tools and an upcoming feature pack release that is possible due to the extensible infrastructure.
Create a New Extension for the Architecture Tools
To build Visual Studio extensions and extend the architecture functionality, you will need to download the Visual Studio 2010 SDK and the Visual Studio 2010 Visualization and Modeling SDK (this is the rename of the DSL Toolkit).
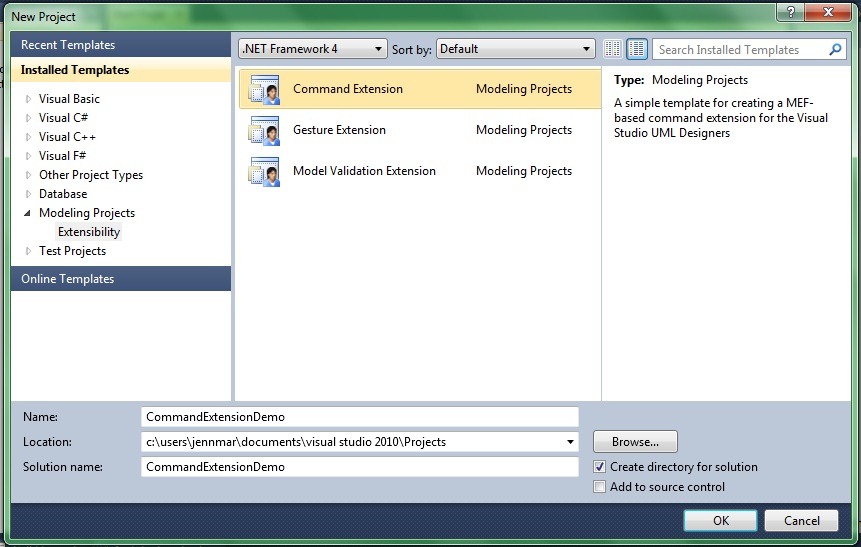
In Visual Studio 2010, go to the “File” menu item, then select “New” and “Project”. In the left-hand sidebar of templates, expand “Modeling Projects” and click “Extensibility”. You should see three extensions available:
- Command Extension
- Gesture Extension
- Model Validation Extension
These are templates for creating MEF-based extensions for the Visual Studio UML Designers. NOTE: these options will only be available after you’ve downloaded the two SDKs above.
I’m going to create a new Command Extension called “CommandExtensionDemo”. After the project is created, open the CommandExtension.cs file. It contains sample code (with some TODOs) to get you started:
 using System;
using System.Collections.Generic;
using System.Linq;
using System.ComponentModel.Composition;
using Microsoft.VisualStudio.ArchitectureTools.Extensibility.Presentation;
using Microsoft.VisualStudio.ArchitectureTools.Extensibility.Uml;
using Microsoft.VisualStudio.Modeling.ExtensionEnablement;
using Microsoft.VisualStudio.Uml.Classes;

namespace CommandExtensionDemo
{
    // Custom context menu command extension
    // See https://msdn.microsoft.com/en-us/library/ee329481(VS.100).aspx
    [Export(typeof(ICommandExtension))]
    [ClassDesignerExtension] // TODO: Add other diagram types if needed
    class CommandExtension : ICommandExtension
    {
        [Import]
        IDiagramContext context { get; set; }


        public void Execute(IMenuCommand command)
        {
            // TODO: Add the logic for your command extension here

            // The following example creates a new class in the model store
            // and displays it on the current diagram.
            IClassDiagram diagram = context.CurrentDiagram as IClassDiagram;
            IModelStore store = diagram.ModelStore;
            IPackage rootPackage = store.Root;
            IClass newClass = rootPackage.CreateClass();
            newClass.Name = "CommandExtensionDemo";
            diagram.Display(newClass);
        }

        public void QueryStatus(IMenuCommand command)
        {
            // TODO: Add logic to control the display of your menu item

            // The following example will disable the command extension unless the user selected
            // a class shape.
            //
            //   IShape selshape = context.CurrentDiagram.SelectedShapes.FirstOrDefault();
            //   command.Enabled = selshape.Element is IClass;
            //
            // Note: Setting command.Visible=false can have unintended interactions with other extensions.
        }

        public string Text
        {
            get { return "CommandExtensionDemo"; }
        }
    }
}
Notice the “ClassDesignerExtension” attribute on the CommandExtension class. That means that this extension is only viewable on the UML Class Diagram. You can also add other attributes to make it apply to additional UML diagrams (or replace the “ClassDesignerExtension” attribute if you don’t want it to apply to a UML Class Diagram). For example, adding the “UseCaseDesignerExtension” attribute will make the extension appear in a UML Use Case Diagram too.
Now, you must implement three things – Execute, QueryStatus, and Text. “Text” is the text of the menu item that will appear in Visual Studio. When the user clicks that menu item, the “Execute” method will be invoked. Currently, the sample code in the Execute method will create a new class in the model store and display it on the current diagram.
I’m going to hit F5 to run the code just as it is. This will launch an experimental instance of Visual Studio with your extensions. (The reasoning is pretty straightforward: if you are adding extensions to VS and you mess something up, you can hose your own copy of VS while developing. The experimental instance of Visual Studio is sandboxed and won’t affect your original installation.)
In the experimental instance of Visual Studio, create a new modeling project. (Under the “File” menu item, select “New” and “Project”. In the left-hand sidebar of templates, click “Modeling Projects” and then click the “Modeling Project” template in the middle. Click “OK”.)
Now, create a new Class Diagram. (Under the “Architecture” menu item, click “New Diagram”. In the dialog box, select “UML Class Diagram” and click “OK”.) Remember that we want to create a class diagram because of that “ClassDesignerExtension” attribute in our code; our extension is currently applied only to class diagrams.
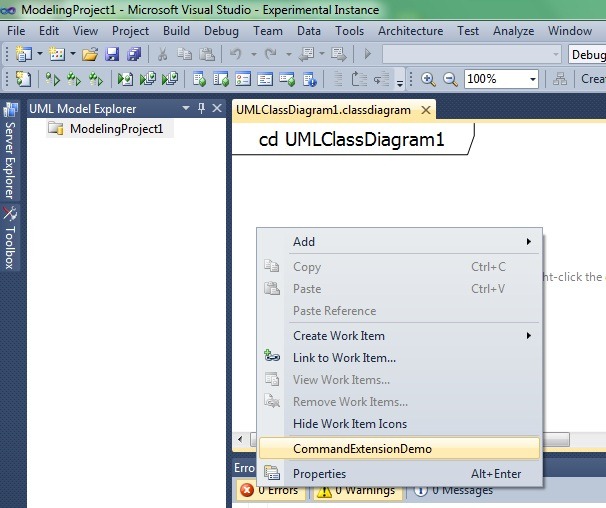
Now, right-click on the design surface. In the right-click menu, we see our “CommandExtensionDemo” extension. The menu is displaying the value of the Text property from our code above.
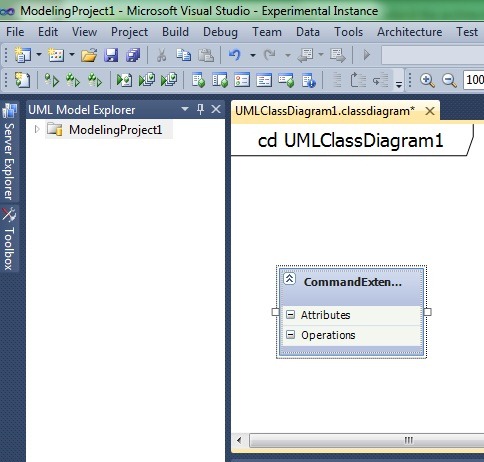
Click on “CommandExtensionDemo” and a new class is created on the diagram, just as we specified in the “Execute” method in our code above.
Remember, this simple example code is available to get you started, but you can modify it to perform more complex behaviors.
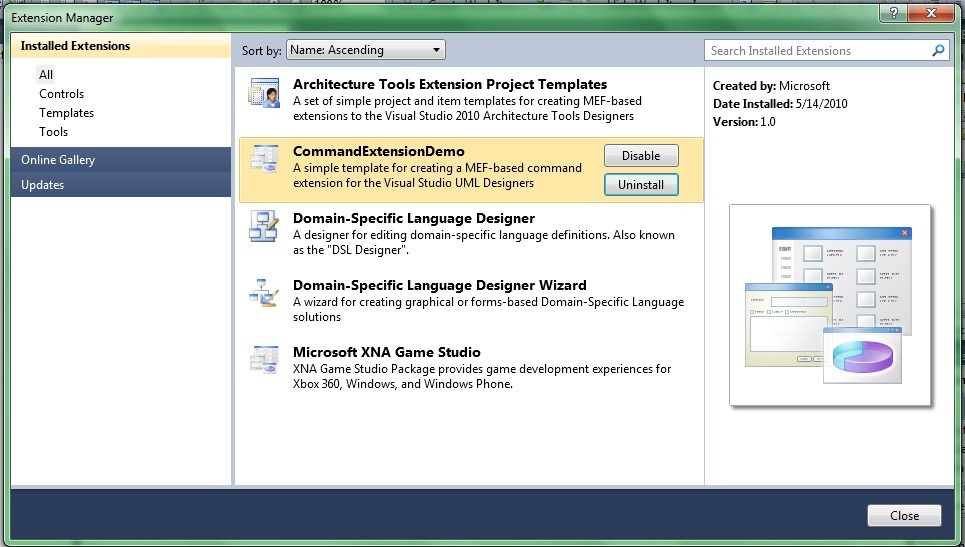
You can remove the extension from the experimental instance of Visual Studio by navigating to the “Tools” menu item and selecting “Extension Manager”. From there, you can find the “CommandExtensionDemo” extension and either disable or uninstall it.
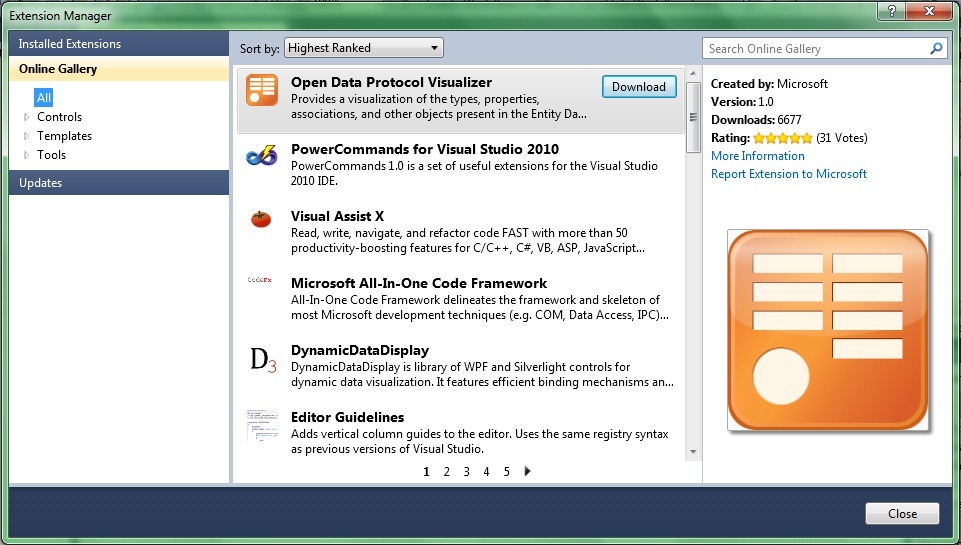
Also note the “Online Gallery” in the left-hand sidebar. This is a large collection of various extensions that you can download. It contains controls, templates, and tools. For each extension, it tells you who created it, the number of downloads, and a rating.
Finally, you might be wondering how to share an extension with your team. The extension is contained in a VSIX package. (VSIX is pronounced “vee-6” in case you’re wondering.) If I navigate to the bin\Debug directory of my CommandExtensionDemo project, there are two files: CommandExtensionDemo.vsix and extension.vsixmanifest. You can give those to a teammate; simply double-clicking on the VSIX file will install the Visual Studio extension.
Feature Pack for VS2010 Visualization and Modeling Tools
One of the reasons that the team invested in the extensibility infrastructure was to be able to provide out-of-band releases. The first “Feature Pack” for the VS2010 Visualization and Modeling Tools is scheduled to release in about a month and a half. Watch Cameron Skinner’s blog for the release announcement.
The feature pack will be a VSIX that you can install. Cameron has written a blog post that gives a sneak peek at what’s in the first feature pack. You should definitely go read that post, but the top features that I’m excited about are:
- Dependency graphs for native code
- Web development diagrams (dependency graphs)
- Code generation from the UML Class Diagram
- XMI 2.1 import (so you can import from Visio diagrams)
Now, you are probably wondering how a “Feature Pack” is different from a Power Tool. Here is a quick comparison:
Power Tools - in general, power tools are supported in forums, but not by CSS (phone support). They are free to everyone. Most of the time, these are side projects by developers on the team.
Feature Pack – the feature packs will be fully supported by CSS and documented (maybe not to the degree of full product but will be on MSDN). They are guaranteed to make it into the next version of the product, they will be closer to product quality, and they will be localized. They are available to MSDN subscribers only. The entire PM/Dev/Test effort goes into them. The Visual Studio team also wants to establish a regular release cadence, so feature packs will be more discoverable than power tools.
One thing that they have in common is the same servicing model, in that both power tools and feature packs won't change existing bits; they are purely additive.
In summary, the extensibility in VS 2010 enables you to tune the tooling to your problem domain. I hope that you’ve enjoyed this week’s series on the architecture functionality in Visual Studio 2010.
