Biztalk POP3 Adapter and WSS Adapter Example
After some extensive research I could not find a good example of how I could receive an Email via the POP3 Adapter for Biztalk Server 2006 R2 that completely parsed out the header content (To, From, Subject, CC, etc...) and the Body (I don't parse the attachments in this example, but here is a sample that does a great job of parsing multiple attachments , thanks to Stephen W. Thomas for posting it.) .
* For this article I make a general assumption that you already have a working knowledge about the Biztalk for creating and deploying a basic Biztalk application.
Scenario:
College Admissions process requires that a prospective student submit an Essay as part of their application for admittance to the University. Here the student will be submitting their essays in the body of an email. Instead having someone in the Admissions office monitor a huge inbox, we can automate the process of by parsing out the email and submitting it to a Sharepoint List. For this first example that is as far as we'll take it, but the idea is that once anything is submitted to a Sharepoint List... Sharepoint workflows can be started, staff from the Admission Office can easily search/edit/export these essays, they can be automatically be correlated with other application artifacts (ie. Transcripts, Application Info, Financial records, etc...) based on the application ID or student email to ultimately create a single "student profile" once everything has been received for a particular student. (I'll demonstrate the rest of these other pieces in a separate example.)
Setup a custom List in Sharepoint (WSS or MOSS):
(Details about setting up and configuring Sharepoint and Biztalk are beyond the scope of this example.)
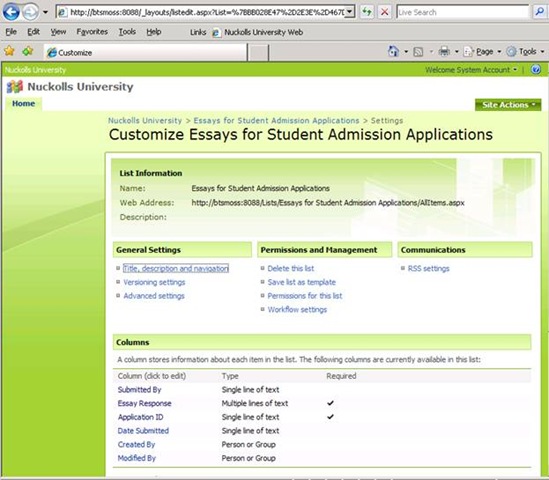
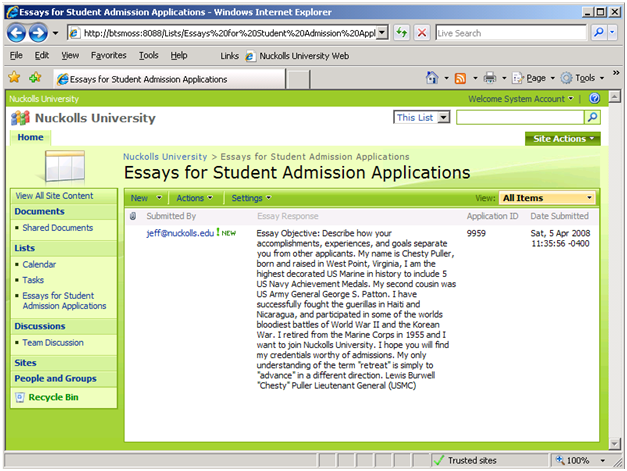
Here I have created a custom List called "Essays for Student Admission Applications" with the following Columns:
- Changed the Default "Title" Column name to Submitted By
- Essay Response (Multiple lines of text)
- Application ID (Single line of text)
- Date Submitted (Single line of text)
* I left the defaults for Created By and Modified By as is.
Create a new POP3 Mailboxes and setup the Outlook client:
* Here we are assuming that you have already installed/configured POP3 and SMTP Services or your will be leveraging an existing POP3 mail server (ie MS Exchange Server). (The installation/configuration of POP3/SMTP Services is beyond the scope of this example.)
- In this example I installed POP3/SMTP on my local machine and configured it to use my local domain (called nuckolls.edu)
- Add a new Mailbox to be used by Biztalk (you must know the password of the account associated with this mailbox)
- Added a mailbox associate with a user account (called ProcessApplication@nuckolls.edu)
- Add a new Mailbox to simulate the Student (you must know the password of the account associated with this mailbox)
- Added a mailbox associate with a user account (ie. jeff@nuckolls.edu)
- Create a new Account Profile in Outlook or Outlook Express to send and receive email as this Student. (Steps for this were omitted, assuming this was a reasonably simple step... just make sure it works, by send/receiving email or checking the C:\InetPub\mailroot\Mailbox\nuckolls.edu\YourMailbox.mbx)
Create a new blank Biztalk Application project:
- Name the Project TestPOP3
- Right-click on the TestPOP3 project in Solution Explorer and select Properties
- In the Project Properties window ensure you have done the following:
- Common Properties/Assembly:
- Assembly Key File = (assign your *.snk key file... if you haven't already created it, create one using the VStudio command prompt and sn.exe -k C:\MyKey.snk)
- Configuration Properties/Build:
- Application Name = TestPOP3
- Restart Host Instances = True
- Common Properties/Assembly:
Create the initial Biztalk application artifacts (Schemas):
In this example we will need two schemas, one for the inbound email message (we will call EmailSchema.xsd) and one for the outbound Sharepoint message (we will call AdmissionApp.xsd).
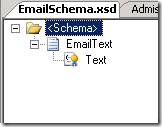
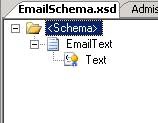
- Create a new Schema called EmailSchema.xsd
Rename the Root node to EmailText
Create one Child Field Element named Text with a Data Type = xs:string
Promote the Text element as a "Distinguished Field" property.
EmailSchema.xsd should appear as follows:
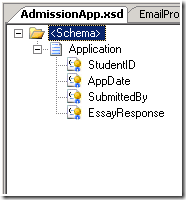
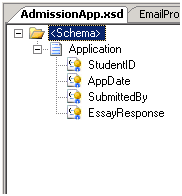
- Create another Schema called AdmissionApp.xsd
Rename the Root node to Application
Create the following Child Field Elements all with a Data Type = xs:string and promote all of them as "Distinguished Field" properties:
AdmissionApp.xsd should appear as follows:
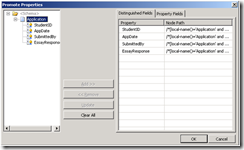
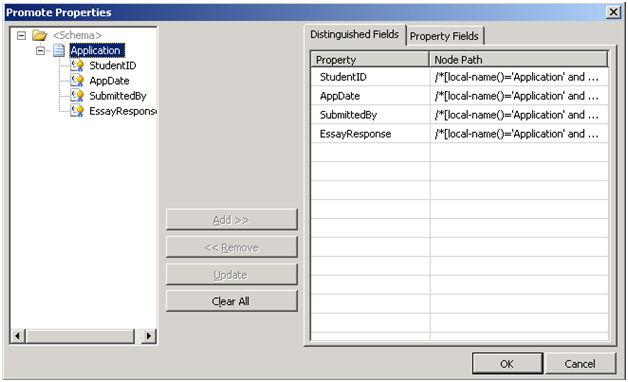
* Ensure all of the Child Field Elements in both schemas are set to "Distinguished Fields" as follows:
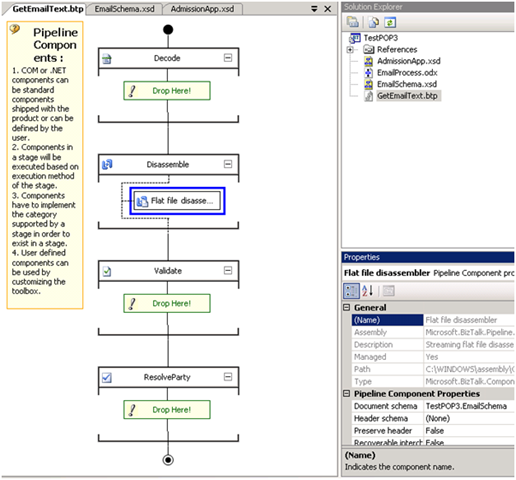
Add a (Flat file disassembler) Pipeline component:
This will be used to help parse out the header and body elements of the text-based email we will receive from the POP3 Adapter.
- Add a new Receive Pipeline component to your Biztalk project called GetEmailText.btp
- Add a Flat file disassembler to the Disassemble shape on the pipeline designer.
- Assign the Document Schema property of the Flat file disassembler = TestPOP3.EmailSchema
Create a Biztalk Orchestration:
This orchestration represents the automated Business Process of receiving an Essay as part of a larger Admissions Application process.
Add an Orchestration:
Right-click on TestPOP3 project in Solution Explorer and Add a new Biztalk Orchestration
Name it EmailProcess.odx
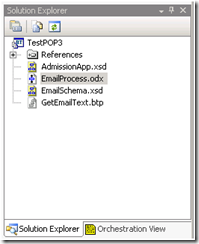
* Your Solution Explorer window should now appear as follows:
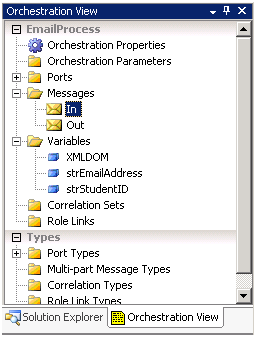
* Before we start adding/configuring shapes to the Orchestration Designer... let's first open the Orchestration View window and define some Messages and Variables that we will later use within our Orchestration:
Orchestration Messages and Variables:
- Select View-->Other Windows-->Orchestration View (otherwise it should already accessible on the tab next to the Solution Explorer window)
- Right-click Messages and create the following Messages:
- In
- Message Type = TestPOP3.EmailSchema
- Out
- Message Type = TestPOP3.AdmissionApp
- In
- Right-click Variables and create the following Variables:
- strEmailAddress
- Type = System.String
- strStudentID
- Type = System.String
- XMLDOM
- Type = System.Xml.XmlDocument
- strEmailAddress
* The Orchestration View should appear as follows:
Orchestration Workflow/Process Designer
Back to the Orchestration Designer we can now start adding some shapes and configuring some properties that will ultimately define our workflow process.
- Add a Receive shape
- Active = True
- Message = In
- Add a Construct Message shape
- Message Constructed = Out
- Drag a Message Assignment shape into the Construct Message shape we just added above
- Expression = (add the following to the Expression Editor)
XMLDOM = new System.Xml.XmlDocument();
//NOTE: The following xml can be easily generated by right-clicking on the EmailSchema.xsd file and selecting Generate Instance//IMPORTANT: The following line of XML should all be on a single line, its on several lines here just for reading purposes only!!!XMLDOM.LoadXml(@"<ns0:Application xmlns:ns0=""https://TestPOP3.AdmissionApp""><StudentID>StudentID_0</StudentID><AppDate>AppDate_0</AppDate><SubmittedBy>SubmittedBy_0</SubmittedBy><EssayResponse>EssayResponse_0</EssayResponse></ns0:Application>");
Out = XMLDOM;Out.AppDate = In(POP3.Date);
//Here we chop of the first 11 characters of the "Subject" (which is "Application")and return the rest as the StudentIDstrStudentID = In(POP3.Subject);Out.StudentID = strStudentID.Substring(11);
//Here we do some string manipulations to remove "<" and ">" from the email adddress...strEmailAddress = In(POP3.ReplyTo);strEmailAddress = strEmailAddress.Remove(0,1);strEmailAddress = strEmailAddress.Remove((System.Int32)strEmailAddress.Length -1);
Out.SubmittedBy = strEmailAddress;
Out.EssayResponse = In.Text;
Out(FILE.ReceivedFileName) = "StudentID" + In(POP3.Subject) + ".xml";XMLDOM = null;XMLDOM = Out;
//The following if for debugging purponses only...System.Diagnostics.EventLog.WriteEntry("TestPOP3 Debug Complete Msg", System.String.Format("Out Message = {0}", XMLDOM.InnerXml));
- Expression = (add the following to the Expression Editor)
- Add a Send shape
- Message = Out
Create Logical Send and Receive Ports:
- Drag a Port shape from the Toolbox to the "Port Surface" on the left side of the Orchestration Designer
- Wizard will start, click Next
- Name = Port_In, click Next
- Port Type = PortType_In, click Next
- Port Binding screen:
- Port direction of communication = I'll always be receiving messages on this port
- Port Binding = Specify Later
- Click Next, Finish
- Drag another Port shape from the Toolbox to the "Port Surface" on the right side of the Orchestration Designer
- Wizard will start, click Next
- Name = Port_Out, click Next
- Port Type = PortType_Out, click Next
- Port Binding screen:
- Port direction of communication = I'll always be sending messages on this port
- Port Binding = Specify Later
- Click Next, Finish
Assign Logical Port Operations with Send and Receive shapes:
- From the Port_In port we just created, Drag the green "Port Connector Line" to the Receive shape
- From the Port_Out port we just created, Drag the green "Port Connector Line" to the Send shape
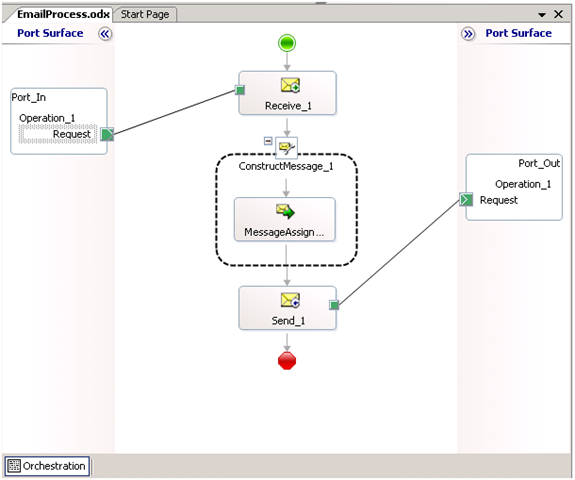
* Your Orchestration should now look as follows:
Build and Deploy your Biztalk Application:
At this point we are ready to build, deploy, and test our application...
- Right-click on TestPOP3 and select Build (resolve any errors)
- Right-click on TestPOP3 and select Deploy (resolve any errors)
Create Physical Biztalk Port and Define Orchestration Bindings:
Once you have successfully been able to Build and Deploy your Biztalk application, you will find it available in the Biztalk Server Administration console under Applications.
- Open up the Biztalk Server Administration console
- Drill down into Applications --> TestPOP3
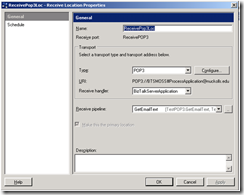
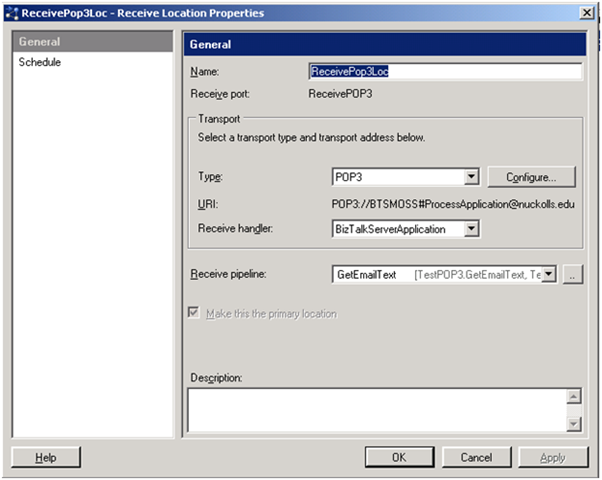
- Create a new Receive Port called ReceivePOP3 (accept default settings)
- Create a new Receive Location called ReceivePop3Loc
- Type = POP3
- Receive pipeline = GetEmailText
* Receive Location properties should appears as follows:
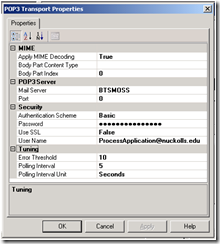
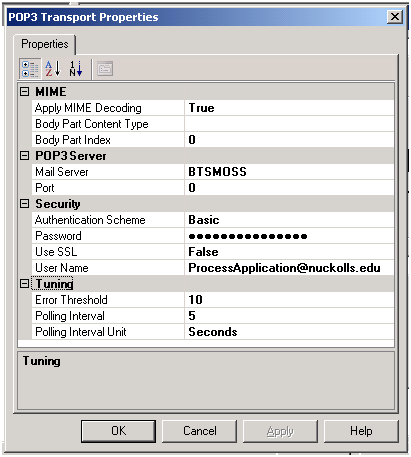
- Configure the POP3 Adapter:
- Mail Server = (The name of your mail server or local machine name if you install POP3/SMTP locally)
- Authentication Scheme = Basic
- Password = (The password of the ProcessApplication@nuckolls.edu account or account your using to be monitored by Biztalk)I
- Polling Interval = 5
- Polling Interval Unit = Seconds
* POP3 Adapter properties should appear as follows:
- Create a new Receive Location called ReceivePop3Loc
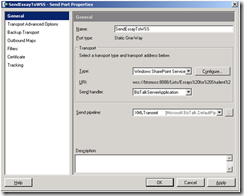
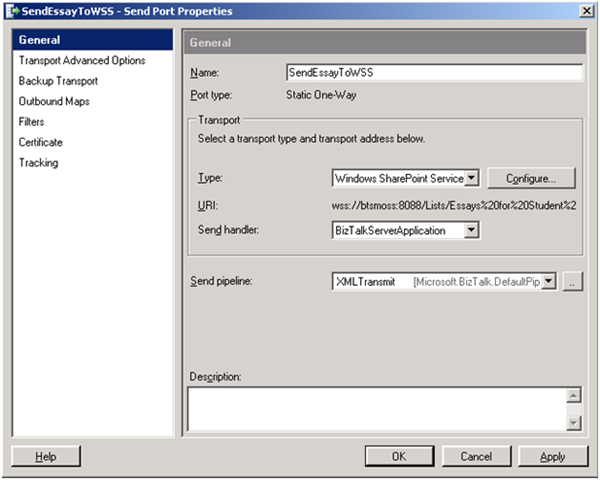
- Create a new Send Port called SendEssayToWSS
- Type = Windows Sharepoint Services
- Send pipeline = XMLTransmit
* Send Port should appear as follows:
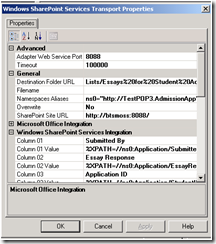
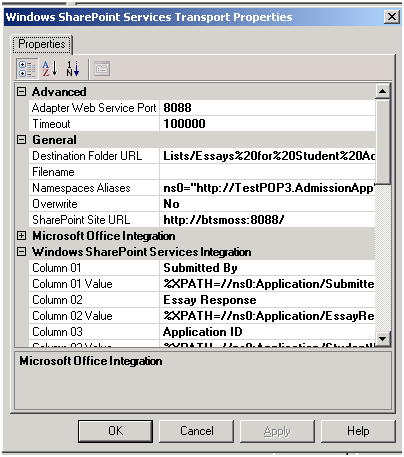
- Configure the WSS Adapter:
- Adapter Web Service Port = 8088 (This is the port that your WSS/MOSS site listens on)
- Destination Folder URL = Lists/Essays%20for%20Student%20Admission%20Applications
- Namespaces Aliases = ns0="https://TestPOP3.AdmissionApp"
- SharePoint Site URL = https://btsmoss:8088/
- Column 01 = Submitted By
- Column 01 = %XPATH=//ns0:Application/SubmittedBy%
- Column 02 = Essay Response
- Column 02 = %XPATH=//ns0:Application/EssayResponse%
- Column 03 = Application ID
- Column 03 = %XPATH=//ns0:Application/StudentID%
- Column 04 = Date Submitted
- Column 04 = %XPATH=//ns0:Application/AppDate%
* The WSS Adapter properties should appear as follows:
- Configure the Orchestration Bindings
- In the Orchestrations folder under TestPOP3 in the Biztalk Server Administration console...
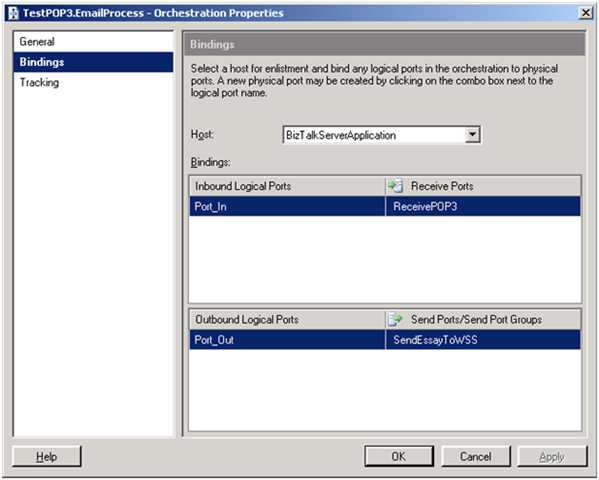
- Double-click TestPOP3.EmailProcess and select Bindings in the properties window
- Host = BiztalkServerApplication
- Port_In/Receive Ports = ReceivePOP3
- Port_Out/Send Ports = SendEssayToWSS
* The Orchestration Binding properties should appear as follows:

- Double-click TestPOP3.EmailProcess and select Bindings in the properties window
- In the Orchestrations folder under TestPOP3 in the Biztalk Server Administration console...
Run and Test your Application:
Finally we are ready to test our application...
- Right-click on TestPOP3 in the Biztalk Server Administration console and select Start
- Click Start
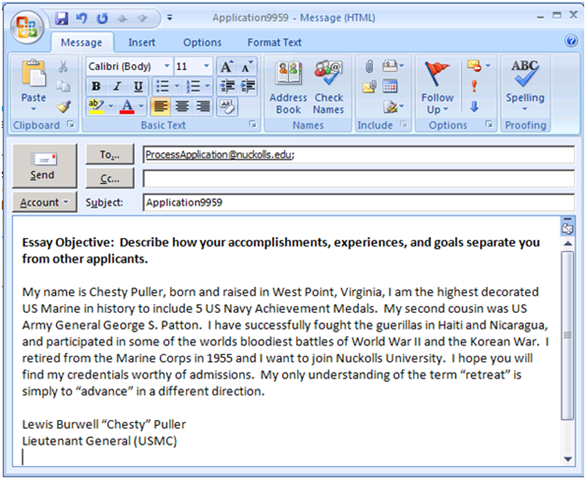
Open your email client (Outlook or Outlook Express):
- Create an email
- To = ProcessApplication@nuckolls.edu
- Subject = Application9959 (You can use any # following "Application"... ie: Application1234567890, recall our Orchestation parses out the first 11 characters of the Subject line, to return only the Application ID that follows... or StudentID as it is referred to in the schema)
- Body = (Type in some essay response text here to be submitted as part of the admissions process.)
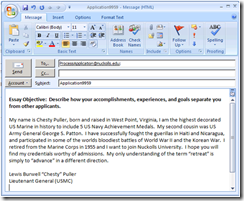
* Your email should appear as follows:
- Click Send
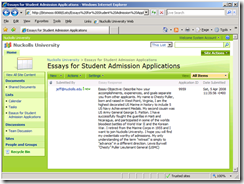
Confirm the message was sent to Sharepoint:
- Open up your Sharepoint site to the custom List we created earlier (ie. https://btsmoss:8088/Lists/Essays%20for%20Student%20Admission%20Applications)
* You should see the message appear in the "Essays for Student Admission Applications" List as follows:
Hopefully this was helpful and will save some time! :-)