My Favorite Features: Creating Storyboards with PowerPoint
In my last post on Continuous Value Delivery, I talked the importance of communication between the customer and the engineering team to arrive at a clear project definition. How many times have you built exactly what was asked for, but not what was wanted? Agile teams need the right communication tools to eliminate waste at this stage in the software lifecycle. In this post, I’d like to talk about PowerPoint Storyboarding, a new feature we built to help express and illustrate the intent of each item on the backlog. As the saying goes, “A picture is worth a thousand words”.
While working on my apps, I need a quick way to mockup UI and test different workflows before I start coding. I have PowerPoint on my machine, which I use all the time for presentations, so it’s quick and easy for me to mock things up there. In my case, these designs were primarily for my own review and brainstorming; however, this becomes even more valuable in a team environment where you can attach and link storyboards directly to items on the backlog.
Prerequisites
Here are the specific prerequisite versions that you’ll need to follow along with this post. [Added May 29, 2012]
- To create and modify storyboards by using PowerPoint Storyboarding, you must have installed either Office PowerPoint 2007 or later, and one of the following versions: Microsoft Visual Studio 11 Test Professional Beta, Visual Studio 11 Premium Beta or Visual Studio 11 Ultimate Beta.
- To view storyboards that were created using PowerPoint Storyboarding, you must have either Office PowerPoint 2007 or later installed.
Building the Storyboard
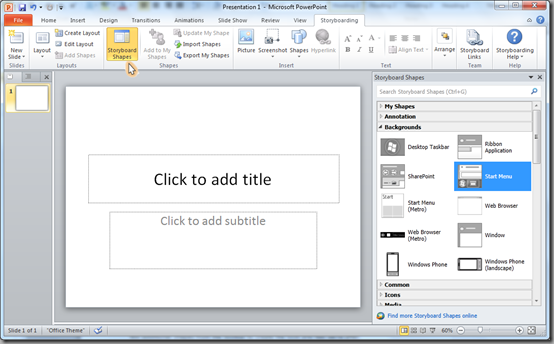
Once you have these components installed, just fire up PowerPoint and open up the Storyboarding tab. Click on the Storyboard Shapes button to open the new shapes toolbar (shown below). The shapes in the toolbar work just like traditional shapes in PowerPoint; however, we’ve added some magic to preserve aspect ratios and help make the process of building a Storyboard really easy.
Figure 1 - Storyboard Shapes
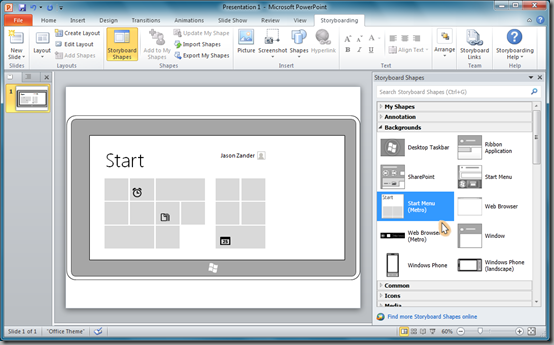
The first think you’ll often want to do is add a background. I’ll do this by double-clicking one of the backgrounds from the toolbar. In this case, we’re going to grab the Tablet (landscape) background. If you’re a more advanced PowerPoint user you can place the background on a Layout slide. Next I’ll add a few additional shapes from the toolbar to create the look and feel we’re after.
Figure 2 - Adding a Background
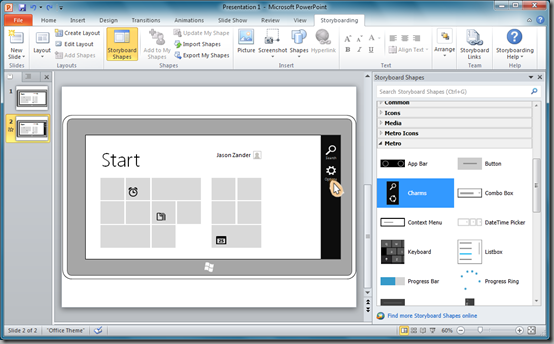
I’m not too concerned about the details on this first slide as I just want to convey intent (in fact we don’t want to make things look too perfect, or the customer might think it’s done ;). Next, I’ll add a slide that speaks more to the feature I’m designing. In this case, I’m building a feature for my app that allows the user to select from a list of options. First, I’ll add a charm bar to the page that I’ll use to access the options.
Figure 3 – Building the Flow
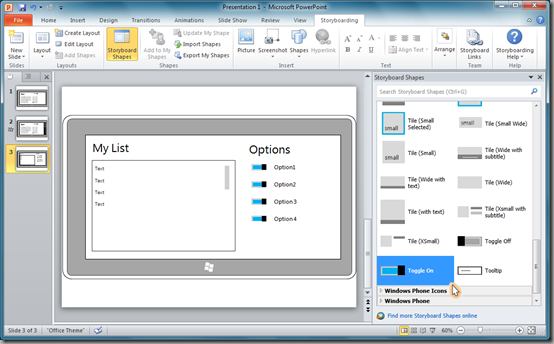
Next, I’ll build out the options page by grabbing a list object, resizing it to fit the screen, and then adding a few on/off toggle buttons, which you might recognize from tablet and phone applications.
Figure 4 – Designing the Options page
As you can see, in just a few slides, the storyboard is beginning to show my plan for the application.
Custom Shapes
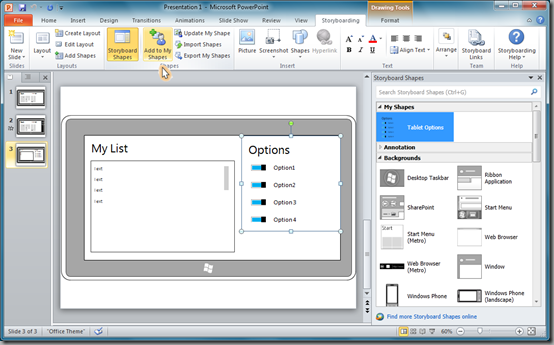
I often find that I’m re-using the same group of shapes. I’ve found the “Add to My Shapes” feature very convenient for this. I can highlight all the shapes I added to my options slide and select “Add to My Shapes” from the ribbon (as shown below). This places this new shape into my shapes toolbar so I can re-use it on additional slides. You can even export the shapes to share with other members of your team.
Figure 4 - Custom Shapes
Gathering Feedback
Before you know it, as I continue adding more slides and inserting more shapes, I end up with a PowerPoint presentation that communicates what I’m planning to build. The real beauty here is that I can get things “right” before I invest too much time coding. A storyboard like this can be used to solicit feedback from stakeholders and can even be linked or attached directly to a backlog item. Your customers all have PowerPoint, so it’s a familiar tool that they can easily pick up and use.
One of the most powerful aspects of Storyboarding is that you can convey the flow of the app you’re building interactively, not just with a set of pictures. Because PowerPoint has built in presentation features like slide transitions, you can create a click-through storyboard, which allows customers to navigate between screens and even simulate the application gestures. Add a new slide for each screen, include a bit of animation, and you’ve got something that looks and feels like the real thing.
In fact, a good portion of Visual Studio 11 and Team Foundation Server 11 was spec’d using this tool. I’ve gotten really used to communicating my ideas in this way, and am using this feature all the time now.
Conclusion
I hope you have an opportunity to give PowerPoint Storyboarding a try, and save some time by communicating with these designs in your team. For more information, please read about Storyboarding on MSDN.
Enjoy!
Follow me at twitter.com/jlzander .
