Working with Collections in Deep Zoom.
In the Deep Zoom run-time, you can load two types of compositions:
- A single image composition is when you interact with a single image at run-time. This does not mean you started with a single image, you could start with many images and compose a scene, then you export from Composer and all of the images get 'stitched' into a single composition that you can interact with at run-time. You interact (like zooming, opacity, etc.) with your image by changing the properties of your MultiScaleImage.
- A "Collection of Images" is when you compose a scene but export it as a collection of images (duh jaime do u get paid by the word? word, word?)
At run-time, you can still interact with each of the individual images in your composition.
The images are exposed via the SubImages collection of your MultiScaleImage. You can still set properties in the MultiScaleImage and these properties will affect all the images in the collection [for example if I Zoom-in to 200% in MSI, that would impact which SubImages are visible] but with collections I also get the benefit of interacting with the SubImages directly.
Collections have a lot more flexibility of course, but I also caution of two tiny concerns:
- when dealing with collections, you likely end up downloading a few more tiles as you go. Not a huge deal
- Your images load independently; this again is not a huge deal unless you have huge discrepancies in size; in that case you will see your small images load earlier than your bigger ones. [To solve this you could play with Opacity]
This post is about working with Collections, so let's assume I decided the two issues above are not in play (that is the case for most people).
To find out what we can do with a MultiScaleSubImage, all we need is to look at the class definition:
- AspectRatio - readonly property == width/height.
- Opacity = self-explains; 0== transparent. 1.0 == Opaque
- ViewportOrigin == top-left corner of the image. Stay tuned for a lot more below. This is a really interesting property and 1/3 the point of this post
- ViewportWidth == width of the area to be displayed. This value is in logical coordinates. For example:
- a value of 1 displays the entire image (no zoom),
- a value of 0.5 is 200% zoomed in and a value of 0 is completely zoomed (user cannot see the image at all).
- A value above 1 is zooming out from the image. For example, a value of 2 means that the image will take up half the size of the MultiScaleImage control area (50% zoom).
- ZIndex -- self explains; higher numbers are in front of lower ones.
A few of the less obvious options for dealing with collections are:
Tags
If you have used Deep Zoom Composer you might have noticed that composer has a property called "Tag" for each image. As of beta2 tag is not exposed via the MultiScaleSubImage. So, how can you get to this Tag?
The tags are stored in the metadata.xml file generated by Deep Zoom Composer.
You can easily get to this file using WebClient or HttpWebRequest networking APIs in SL2. It is a trivial two step process:
Make call to read XML file. I did it from ImageOpenSucceded to not compete with download traffic for image and to know for sure that when WebClient callback happened I could access the images in the collection.
void msi_ImageOpenSucceeded(objectsender, RoutedEventArgs e)
{
WebClient wc = newWebClient();
wc.DownloadStringCompleted += newDownloadStringCompletedEventHandler(wc_DownloadStringCompleted);
wc.DownloadStringAsync(newUri("GeneratedImages/Metadata.xml", UriKind.Relative));
}Then we read the results. The code is below. I used LINQ to XML -that makes it trivial :)
The only thing worth highlighting from the code is the "map" between tags and MultiScaleSubImages.
metadata.xml has a ZOrder, which is a 1-based index of the position of the image in the collection. Despite its name (ZOrder), this has nothing to do with MultiScaleImage.ZIndex .The actual collection is 0 based, so we subtract one to the value read from metadata.xml I have put red, highlighted comments on top the two most relevant lines .
void wc_DownloadStringCompleted(objectsender, DownloadStringCompletedEventArgs e)
{
if(e.Cancelled == false&& e.Error == null)
{
strings = e.Result;
XDocument doc = XDocument.Parse(s);
var images = froma indoc.Element("Metadata").Descendants("Image")
selecta;
foreach ( XElement image inimages )
{
CollectionImage ci =
newCollectionImage
{
Height = (double) image.Element("Height"),
Width = (double) image.Element("Width"),//here we read the ZOrder from metadata.xml and subtract one
ZOrder = ((int) image.Element("ZOrder")) -1 ,
Tag = (string) image.Element("Tag"),
Location = newPoint{ X = (double)image.Element("x"), Y = (double) image.Element("y")}
}
;//here we map from the SubImages collection based on the ZOrder we read ci.Image = msi.SubImages[ci.ZOrder];
_images.Add ( ci ) ;
}items.ItemsSource = _images;
}
}If you look at the code, I created a CollectionImage which aggregates the stuff from metadata.xml and the corresponding MultiScaleSubImage.
This means I could now filter, or do any thing since the data is merged. Kirupa has an example of using tags to filter (so I will stop here on that topic and move to Viewports).
ViewportOrigin:
ViewportOrigin represents the left(x), top(y) corner of your SubImage relative to the MultiScaleImage control.
The surprise (for me at least) is that:
- They are normalized relative to the viewportWidth of the subimage you are dealing with.
- Moving towards the right in the horizontal ( X) direction is actually a negative offset, so is moving towards the bottom.
Got it?? OK! you are done.
If you are like me you might want to see a sample. Here are some below:
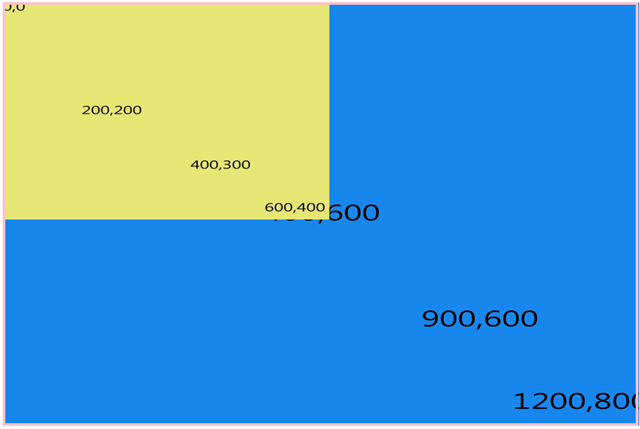 |
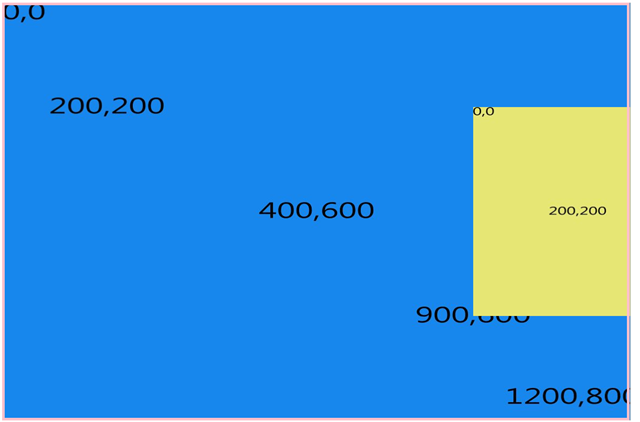
This is a DeepZoom composition w/ two images. Blue is 1200x800 ( Aspect ratio = 1.5 ) Yellow is 600x400 ( AR = 1.5 ) At this point ViewportOrigin = 0,0 for both... Looks good to me. It is worth mentioning [if you try to make sense as you go ] that the ViewportWidth for blue == 1.0 [takes the whole width available] ViewportWidth for yellow == 2.0 [takes 1/2 the width available to the control] The numbers on the images are "approximations".. if you read a coord of say 900,600 that means it is around there, but not quite exact Let's now start changing ViewportOrigin. |
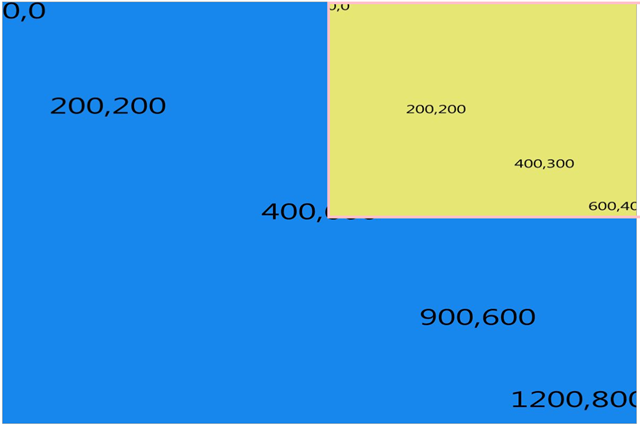 |
Here I simply changed viewportOrigin in yellow image. My first instinct looking at this one would be 1,0 ... [since it is 600 pixels left of 0,0] I was wrong!! This is actually ViewportOrigin = -1, 0.. Remember, when you move an image to right or bottom, the offsets are negative. You want to know what would happen if VO was 1,0?? The demo is at https://www.cookingwithxaml.com/recipes/DeepZoomCollection/default.html You can play with ZIndex, Opacity and ViewportOrigin for each image [their values are databound on the grid]. |
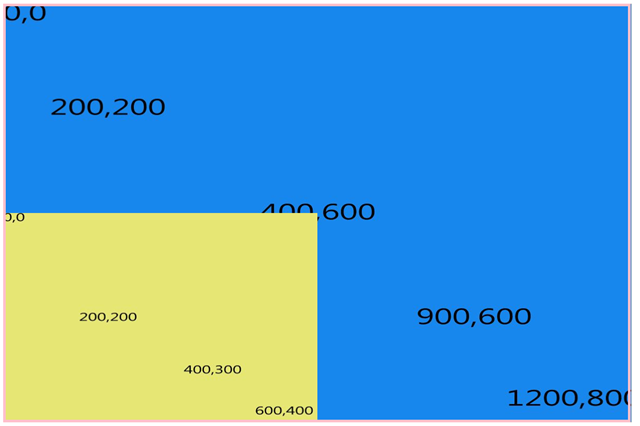 |
Having explained that the ViewportOrigins offsets (to right,bottom) are negative numbers. Can you guess what the offset is for the image to the right? My guess was ( 0, -1) but then I was wrong again! The ViewportOrigin here is ( 0, -.66666666666) Why? Because the offsets are relative to the Width and in this case it is 600. So a viewport of (0,-1) would have been lower in the y axis [instead of at 400, it would be at 600] |
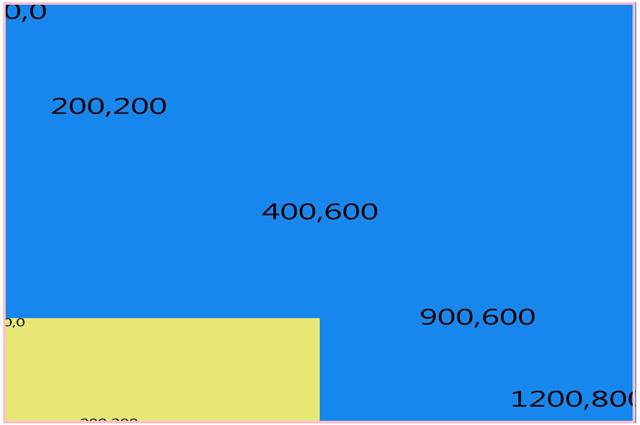 |
This is 0,-1 and exactly what we expected for this one (after reading line above). |
 |
I know you have it by now, but just for fun, this is ( -1.5, -.3333) aka ( 900,200) Notice how half of our yellow image is clipped. |
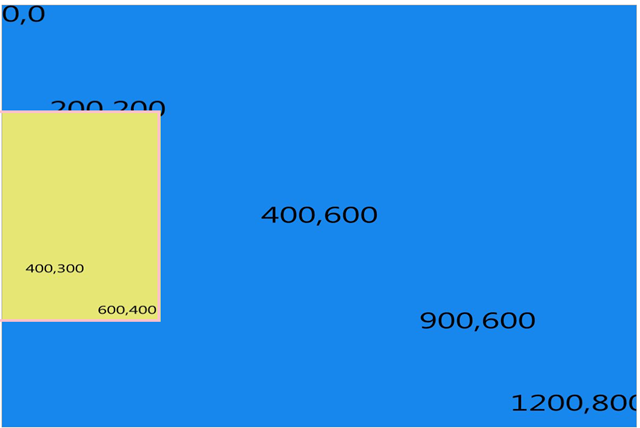 |
This is ViewportOrigin ( 0.5, -.3333 ) ... I figured I should show you some thing with a positive value for Viewport Origin... |
Again, you can play with the ugly but hopefully useful sample here..
Just change the ViewportOrigin, or any other property and see what happens.
You can use the same sample to play with Opacity, ZIndex and ViewportWidth.. this will show you the flexibility in collections.
Don't get tricky with the values as there is no validation.
Mapping SubImages to Element Coordinates
Now that we understand ViewportWidth and ViewportOrigin, we can map from logical coordinates to element coordinates so we can put overlays on our MultiScaleImage. Or do hit testing or any thing similar.
What I did is put a small pink rectangle in the page and I am going to listen to MouseMove on the MultiScaleImage and then do kind of a "hit testing" to see which Image I am over. I used ZIndex to select only the single image on the front. If you did not use ZIndex you can select multiple.
So, what does the map look like?? The whole code is below commented in detail.. I hope that makes it easiest to explain -instead of my rambles-.
 /// <summary>
/// Gets a rectangle representing the top-most image that the mouse is over
/// </summary>
/// <param name="elementPoint">Mouse Position, in Element Coordinates</param>
/// <returns> Rectangle reprsenting Element Coordinates for the image or 0,0,0,0 if not over an image</returns>
Rect SubImageHitTestUsingElement(Point elementPoint)
{
    Rect resultRect = new Rect(0, 0, 0, 0);
    int zIndex = 0;

    // We loop through all our images.
    for (int i = 0; i < _images.Count; i++)
    {
        try
        {
            // Selct our MSSI.
            MultiScaleSubImage subImage = _images[i].Image;

            // NOTICE the scale is a mutliplication of the size of our image (1 / subImage.ViewportWidth)
            // and the current Zoom level ( 1 / msi.ViewportWidth)
            double scaleBy = 1 / subImage.ViewportWidth * 1 / msi.ViewportWidth;

            // The two lines below convert our image size us from Logical to Element Coords
            // Notice that for Height, we must take into account Aspect ratio.
            double width = scaleBy * this.msi.ActualWidth;
            double height = (scaleBy * this.msi.ActualWidth * (1 / subImage.AspectRatio));

            // Now we convert our viewportorigin  (logical coords) to Element Coords
            // Reminder, this is top-left ..  Notice that we multiply by -1 since
            // we saw the negative math for Viewport Origin.
            Point p = msi.LogicalToElementPoint(
                new Point(
                     -subImage.ViewportOrigin.X * 1 / subImage.ViewportWidth,
                    - subImage.ViewportOrigin.Y * 1 / subImage.ViewportWidth));

            // Now we create a Rectangle in Element Coords.
            Rect subImageRect = new
                Rect(p.X, p.Y, width, height);

            // here we hitTest, using Contains..
            // and we keep track of the front-most element only..
            if (subImageRect.Contains(elementPoint))
            {
                if (subImage.ZIndex >= zIndex)
                {

                    zIndex = subImage.ZIndex;
                    resultRect = subImageRect;
                }
            }
        }
        catch (Exception ex)
        {
            System.Diagnostics.Debug.WriteLine(ex.Message);
        }
    }
    System.Diagnostics.Debug.WriteLine("Done");
    return resultRect;
}
I used Element Coords because that is what I was after. If you want logical coords, it should be easy from code above..
Just convert the point to Logical, do the scaling for zoom and hittest against a logical rect...
Fair enough??? The source is [you guessed it] at Skydrive.
You can see a few tiny issues I did not care much for:
1) My math is rounded so some times you see the 'Rectangle' I created be slightly off (adding some extra pixels should do fine) ...
2) I did the recalculation for rectangle only on mouse move.. and I did not do it on Pan... so if you Zoom using Wheel or you pan, it will take for you to move the mouse one more time in order for Rectangle overlay to update.
That is my part!! Now it is up to you to build some thing really cool using real images and hittesting..