What is AOBO?
Admin on behalf of (AOBO) is a fundamental concept to understand when developing applications that will interact with tenants that are associated with the Cloud Solution Provider (CSP) program. AOBO enables applications registered in the partner’s Azure AD tenant to perform administrative tasks on the customer’s tenant on behalf of the customer. This is possible because the CSP program leverages delegated administrative access provided through the reseller relationship and foreign security principals to provide administrative rights over the customer’s Azure subscriptions, Azure AD, and Office 365 subscriptions.
 |
 |
With these delegated permissions we can easily access both Azure and Office 365 specific APIs in order to perform any operation. To provide a better understanding of how the AOBO concept works let’s take a look at how it can be used to access the Azure Resource Manager API and Exchange Web Service (EWS) for a customer using an application from the partner’s Azure AD tenant. Before we look at what code is required an application in Azure AD must be created. To create and configure an application in Azure AD perform the steps below. These steps use the new Azure AD admin experience that was just moved to preview. You can find additional information regarding the new experience here.
- Login to the Azure Management portal using credentials associated with the CSP partner tenant that have global admin privileges
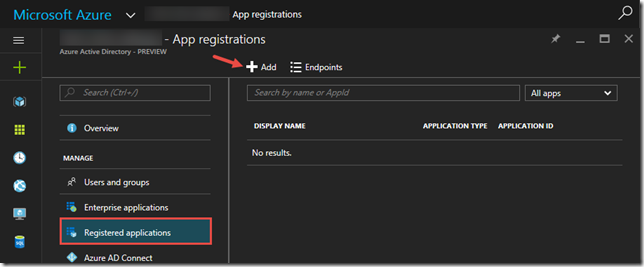
- Click on More Services –> Azure Active Directory –> Registered applications –> Add
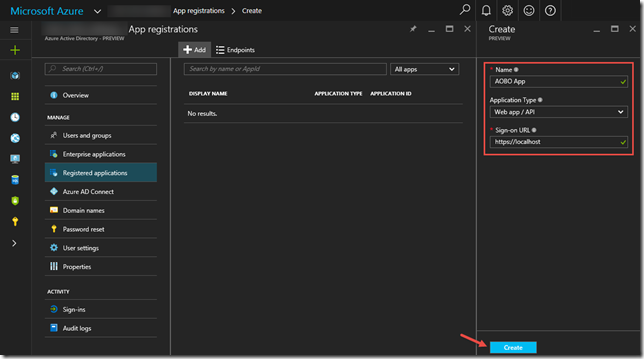
- Create a web application as shown below. (You can change the sign-on URL to any appropriate value or leave it configured to https://localhost. It can be modified at any point if necessary).
Now that the application has been created, it will need to be configured so it can be used for demonstrating AOBO with Azure Resource Manager API and EWS. This is done by performing the following
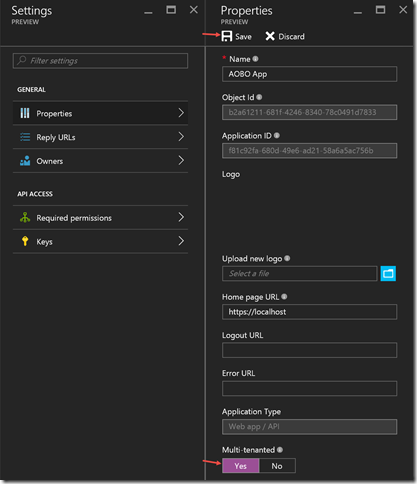
- Configure the application to be multi-tenanted
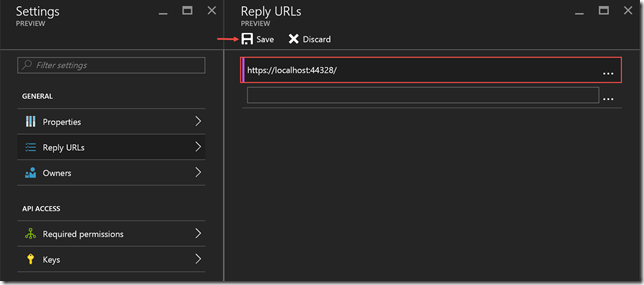
- Update the reply URL if necessary. If you are running the code sample from Visual Studio make sure that the SSL Enabled property is true and you obtain the appropriate value from the SSL URL property.
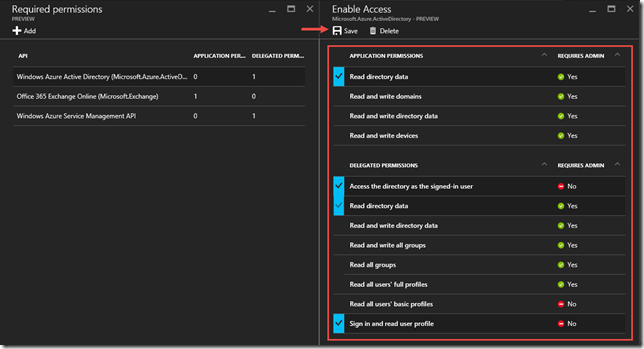
- Add the following Required permissions
[](https://msdntnarchive.blob.core.windows.net/media/2016/09/image202.png) [](https://msdntnarchive.blob.core.windows.net/media/2016/09/image1526.png) [](https://msdntnarchive.blob.core.windows.net/media/2016/09/image1527.png)API Permissions Office 365 Exchange Online (Microsoft.Exchange) Use Exchange Web Services with full access to all mailboxes Windows Azure Service Management API Access Azure Service Management as organization users (preview) - Add the Read directory data application permission, Access the directory as the signed-in user and Read directory data delegated permissions to the Windows Azure Active Directory (Microsoft.Azure.ActiveDirectory) API
- Add the Partner Center API and Access Partner Center PPE permission
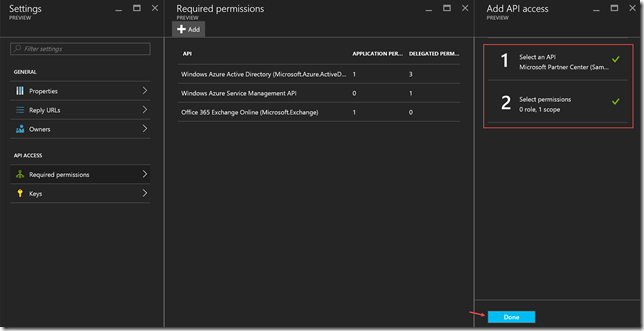
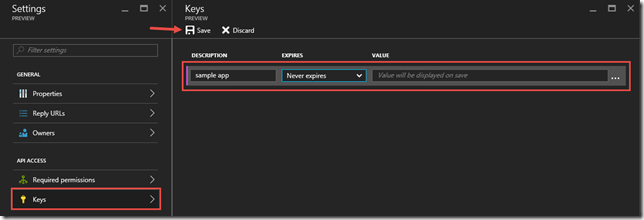
Note – In order to add the Partner Center API application you must search for Sample in order to find the API. - Add a key to the application for authentication purposes
In order to successfully obtain a token to connect to the Exchange Web Service (EWS) you must provide a X.509 certificate with a public/private key pair with the token request. This is required because of the board access that this particular API has. You can find additional information pertaining to the reasoning behind this here. If you attempt to utilize the app only, or app + user, authentication flow without a X.509 certificate then you will receive an error like the following
x-ms-diagnostics: 2000001;reason="The access token is acquired using an authentication method that is too weak to allow access for this application. Presented auth strength was 1, required is 2.";error_category="invalid_token
What this error means is that we need to utilize a more secure method to obtain the required token to access EWS. In order to do this we must specify a X.509 certificate when requesting the token. Perform the following steps in order to register the public X.509 certificate with the application definition in Azure AD.
Generate a self-signed certificate using the following command, when prompted enter a password to protect the private key
[sourcecode]makecert -r -pe -n "CN=AOBO Cert" -ss My -len 2048 AOBO.cer -sv AOBO.pvk
Open an instance of PowerShell and invoke the following cmdlets. Be sure to update the path to the CER file when importing it.
$cer = New-Object System.Security.Cryptography.X509Certificates.X509Certificate2
$cer.Import("D:\certs\AOBO.cer")
$bin = $cer.GetRawCertData()
$base64Value = [System.Convert]::ToBase64String($bin)
$bin = $cer.GetCertHash()
$base64Thumbprint = [System.Convert]::ToBase64String($bin)
$keyid = [System.Guid]::NewGuid().ToString()
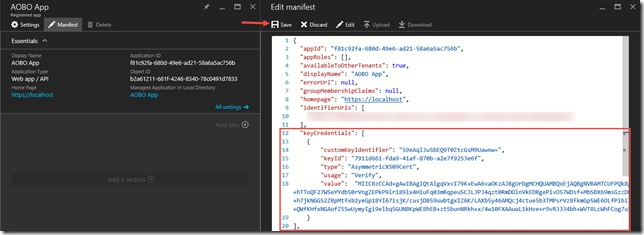
Update the application manifest

Replace the keyCredentials element with the following[sourcecode]"keyCredentials": [
{
"customKeyIdentifier": "$base64Thumbprint_value_from_PowerShell",
"keyId": "$keyid_value_from_PowerShell",
"type": "AsymmetricX509Cert",
"usage": "Verify",
"value": "$base64Value_value_from_PowerShell"
}
],Create a PFX that contains the certificate and private key by invoking the following command
[sourcecode]pvk2pfx -pvk AOBO.pvk -pi EnterYourPasswordHere -spc AOBO.cer -pfx AOBO.pfx -f
Import the AOBO.pfx into your certificate store
Obtain the thumbprint for the certificate by invoking the following PowerShell cmdlet
Get-ChildItem -Path Cert:\LocalMachine\My | Where-Object {$_.Subject -match "AOBO"}The thumbprint will be utilized by the following code in order to obtain a reference to the certificate.
private static X509Certificate2 FindCertificateByThumbprint(string value)
{
    X509Certificate2Collection collection;
    X509Store store = new X509Store(StoreName.My, StoreLocation.CurrentUser);

    try
    {
        store.Open(OpenFlags.ReadOnly);
        // Certificates are not validated with this call. If that is a requirement
        // for your solution then change false to true in the store.Certificates.Find call.
        collection = store.Certificates.Find(
            X509FindType.FindByThumbprint,
            value,
            false);

        if (collection == null || collection.Count == 0)
        {
            return null;
        }

        return collection[0];
    }
    finally
    {
        store.Close();
        collection = null;
    }
}
The reference to the certificate will be utilized by the request to acquire the token as seen in the code snippet below
public async Task<AuthenticationResult> GetAppOnlyTokenAsync(string authority, string resource, string thumbprint)
{
    AuthenticationContext authContext;
    DistributedTokenCache tokenCache;

    if (string.IsNullOrEmpty(authority))
    {
        throw new ArgumentNullException(nameof(authority));
    }
    if (string.IsNullOrEmpty(resource))
    {
        throw new ArgumentNullException(nameof(resource));
    }
    if (string.IsNullOrEmpty(thumbprint))
    {
        throw new ArgumentNullException(thumbprint);
    }

    try
    {
        // If the Redis Cache connection string is not populated then utilize the constructor
        // that only requires the authority. That constructor will utilize a in-memory caching
        // feature that is built-in into ADAL.
        if (string.IsNullOrEmpty(Settings.RedisConnection))
        {
            authContext = new AuthenticationContext(authority);
        }
        else
        {
            tokenCache = new DistributedTokenCache(resource);
            authContext = new AuthenticationContext(authority, tokenCache);
        }

        return await authContext.AcquireTokenAsync(
            resource,
            new ClientAssertionCertificate(
                Settings.ApplicationId,
                FindCertificateByThumbprint(thumbprint)));
    }
    finally
    {
        authContext = null;
        tokenCache = null;
    }
}
Now that the application in Azure AD has been created and the required permissions have been configured it is recommend that you configure it for pre-consent. Please see the Enabling Pre-Consent for an Application for more details on how to do this. Once you have enabled pre-consent for the application it can be leveraged to perform operations using Azure Resource Manager API and Exchange Web Services upon customers that are associated with the partner.
The admin of behalf of concept is implemented when you request a token for a given resource. The token request will be scoped for a particular customer by leveraging a specific authority for the request. When requesting the token you must specify an authority, and that authority is the endpoint that will issue the access token. It is scoped to a particular customer by modifying one part of the address
https://login.microsoftonline.com/abacac8e-c870-4508-a6d6-263ee515832f/
Using the authority above an access will be generated that is capable of performing operations against the Azure AD tenant with the identifier of abacac8e-c870-4508-a6d6-263ee515832f. What is important to understand here is that when the common authority is not utilized the GUID specified after https://login.microsoftonline.com/, or https://login.windows.net/, is the identifier associated to a specific Azure AD tenant, or put another way it is the identifier assigned to a customer. So when you want to request a token to perform operations using the Azure Resource Manager the request would look like
token = new TokenContext().GetAppPlusUserToken(
    "https://login.microsoftonline.com/abacac8e-c870-4508-a6d6-263ee515832f",
    "https://management.azure.com/");
Then request for a token to perform operations using EWS would look like
authResult = new TokenContext().GetAppOnlyToken(
    "https://login.microsoftonline.com/abacac8e-c870-4508-a6d6-263ee515832f",
    "https://outlook.office365.com",
    Settings.Thumbprint);
You can find sample code that implements all the information covered in this post here. Hopefully this information will help with any integration work that you are doing.
