Nip & Tuck for GUIs (3) : manipulating a hosted WPF user control from a Windows Forms app
In my last post in this series I showed how easy it is to host a WPF user control within a Windows Forms application. The control I used was completely self-contained in that it didn't require (or allow) the Windows Forms host app to set any properties or communicate with it in any way. That's not necessarily a very realistic scenario, but it's pretty easy to change things around so that the Windows Forms app can interact with the user control. Here's how.
For the purposes of this post I've dropped the use of Flickr (!) and instead I'm going to have a user control which will accept a valid URL for any image and allows our rotate/scale functionality as before. Here's my XAML:
1: <UserControl x:Class="FlickrWpfUserControl.UserControl1"
2: xmlns="http://schemas.microsoft.com/winfx/2006/xaml/presentation"
3: xmlns:x="http://schemas.microsoft.com/winfx/2006/xaml"
4: xmlns:local="clr-namespace:FlickrWpfUserControl"
5: Height="410" Width="700" Background="Gray">
6: <UserControl.Resources>
7: <local:Img x:Key="myDataSource" loc="https://msdntnarchive.blob.core.windows.net/media/TNBlogsFS/BlogFileStorage/blogs_msdn/ronang/WindowsLiveWriter/NipTuckforGUIs2WindowsFormsandaselfconta_EA34/image_2.png" original-url="http://blogs.msdn.com/blogfiles/ronang/WindowsLiveWriter/NipTuckforGUIs2WindowsFormsandaselfconta_EA34/image_2.png"/>
8: </UserControl.Resources>
9: <Grid>
10: <StackPanel Orientation="Horizontal" >
11: <StackPanel>
12: <Slider x:Name="ScaleSlider" VerticalAlignment="Top" Minimum="100" Maximum="300" Width="300" Value="300" Margin="10" />
13: <Image x:Name="imageBox" Width="{Binding ElementName=ScaleSlider, Path=Value}"
14: Height="{Binding ElementName=ScaleSlider, Path=Value}"
15: Source="{Binding Source={StaticResource myDataSource}, Path=loc, UpdateSourceTrigger=PropertyChanged}" RenderTransformOrigin="0.5,0.5" >
16: <Image.RenderTransform>
17: <RotateTransform Angle="{Binding ElementName=RotateSlider, Path=Value}" />
18: </Image.RenderTransform>
19: </Image>
20: <Slider x:Name="RotateSlider" VerticalAlignment="Top" Minimum="0" Maximum="360" Width="300" Value="0" Margin="10" />
21: </StackPanel>
22: </StackPanel>
23: </Grid>
24: </UserControl>
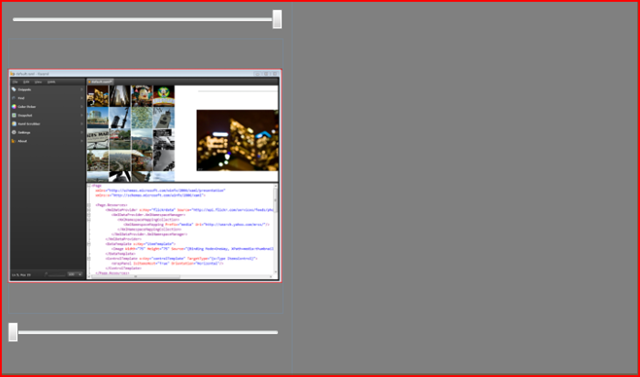
And this is what it looks like in Visual Studio: note the data source is pointed at an image on my blog from my last post. The only real changes to note from last time is that I got rid of the ListBox for displaying images from Flickr and I don't need an XmlDataProvider any more either.
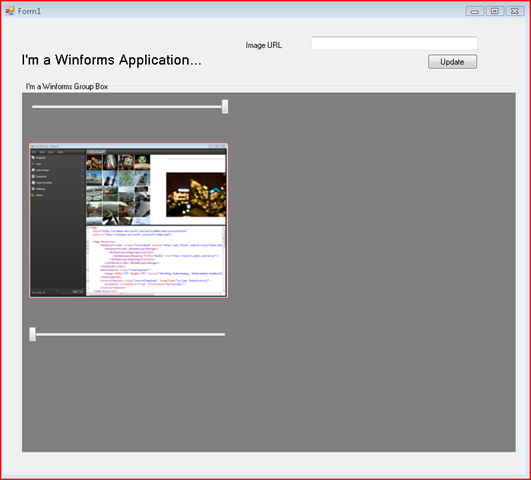
For ease of use the user control exposes one property called ImageLocation simply to make it as easy as possible for users to change the image that's currently being displayed. Add a Windows Forms label, textbox and button and my shiny new GUI looks like:
The event handler for the windows forms button is simply:
1: private void button1_Click(object sender, EventArgs e)
2: {
3: UserControl1 wpfUserControl = elementHost2.Child as UserControl1;
4: wpfUserControl.ImageLocation = textBox1.Text;
5: }
For standard properties such as Margin, Background etc. the ElementHost class exposes a PropertyMap property which gives you control over how setting properties of your windows forms host can affect the hosted WPF user control. Therefore if I want to change my user control's default dark gray background from code I can easily do it via the PropertyMap :
1: // The AddBackColorMapping method adds a new property mapping
2: // for the BackColor property.
3: private void AddBackColorMapping()
4: {
5: elementHost2.PropertyMap.Remove("BackColor");
6: elementHost2.PropertyMap.Add(
7: "BackColor",
8: new PropertyTranslator(OnBackColorChange));
9: }
10: // The OnBackColorChange method implements the mapping
11: // from the Windows Forms BackColor property to the
12: // Windows Presentation Foundation Background property.
13: private void OnBackColorChange(object h, String propertyName, object value)
14: {
15: ElementHost host = h as ElementHost;
16: System.Drawing.Color col = (System.Drawing.Color)value;
17: SolidColorBrush brush = new SolidColorBrush(System.Windows.Media.Color.FromRgb(
18: col.R, col.G, col.B));
19: UserControl1 wpfUserControl = host.Child as UserControl1;
20: wpfUserControl.Background = brush;
21: }
22:
The above is the plumbing. The nice bit is that now if I change the background color of my windows form as shown below then my WPF user control's background color will also change automagically:
1: private void checkBox1_CheckedChanged(object sender, EventArgs e)
2: {
3: this.BackColor = System.Drawing.Color.Yellow;
4: }
Meaning my GUI can now look like:
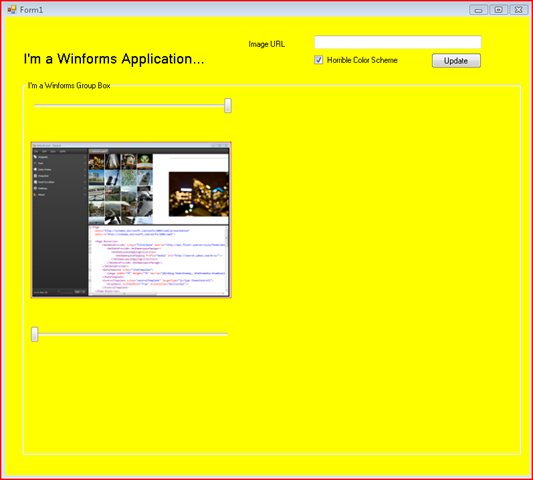
Hey, nobody said it was going to be pretty! But you get the idea - there's lots of control over the WPF that you pull into your Windows Forms app.
Cross posted from Ronan's blog