Windows Azure Command-Line Tool for Mac and Linux
Yesterday, Bill Laing of the Windows Azure team announced support for virtual machines running the Windows Server operating system as well as Linux distros such as Ubuntu, CentOS, and OpenSUSE. Now you can run existing Linux payloads on Windows Azure virtual machines, with no need to change any of your code. This capability makes Windows Azure a great platform for IaaS deployment of applications that run on Windows or Linux servers. You can find more information about what's new in Windows Azure on Scott Guthrie's blog post today and the MeetWindowsAzure event that he'll be kicking off this afternoon.
There are two ways to work with the new virtual machine and web site capabilities of Windows Azure: through the management portal, or at the command line. This article covers the concepts behind the command-line tool, but those who prefer to use a GUI can also provision web sites and deploy Windows or Linux virtual machines from the Windows Azure portal. An easy-to-use GUI takes you through every step of the process.
Many developers prefer the power and flexibility of command-line tools, however, which can be automated via a scripting language. If you’re working exclusively on Windows machines, the Windows PowerShell cmdlets are your best option, but for mixed environments, the Windows Azure command-line tool for Mac and Linux provides a consistent experience across Linux, Mac OS, and Windows desktops.
 Installation of the command line tool is very simple. If you’re working on a Mac OS X machine, you can use the Mac installer, and for Windows or Linux you’ll just need to install the latest version of Node.js and then type this command.
npm install azure --global
That will install the Windows Azure SDK for Node.js, which includes the command-line tool. Alternatively, you can download the command line tools or the Windows PowerShell cmdlets from this download page.
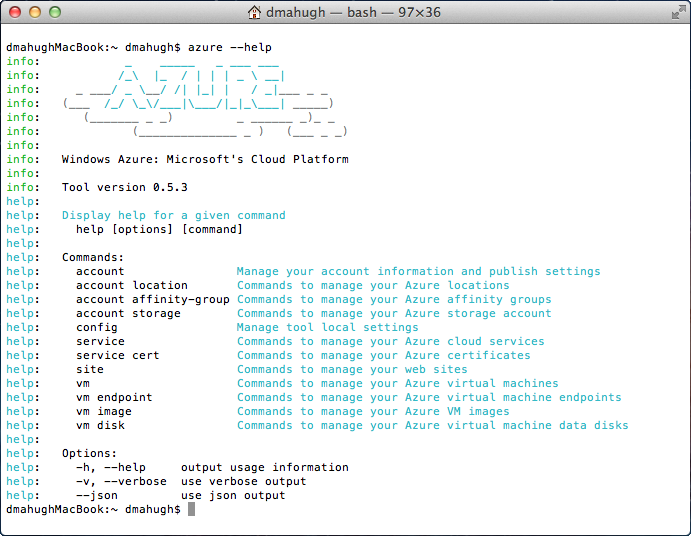
To verify that you have the tool installed and ready to use, type the command azure --help and you‘ll see the output shown to the right. This screen tells you which version of the tool you’re using, and how to get information about each of the commands.
The first thing to understand is the basic structure of the commands. In general terms, you type azure followed by a topic (what you’re working with), a verb (what to do), and various optional parameters to provide additional information. Here’s a diagram that provides a general framework for understanding the command-line syntax.
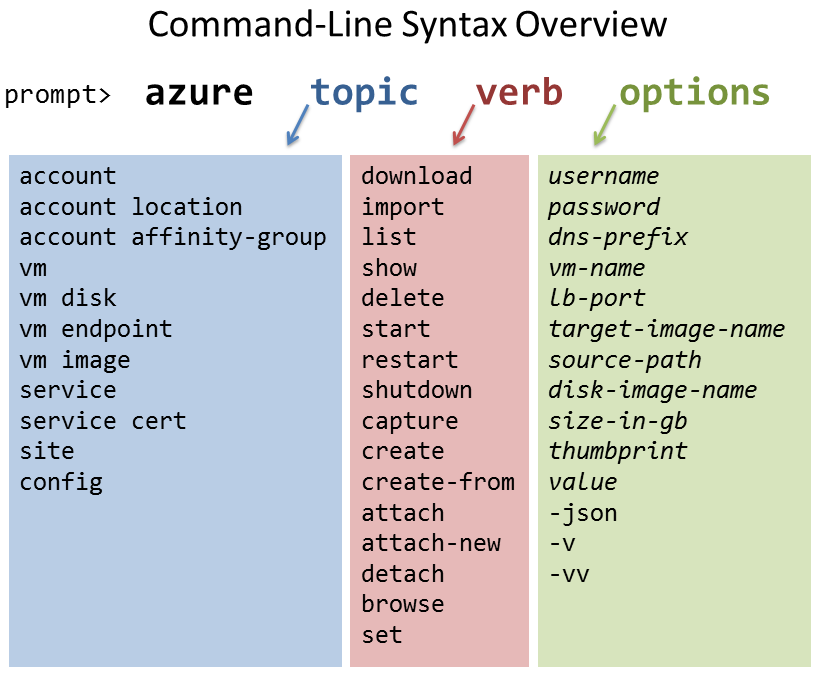
Some commands have other required command-line parameters in addition to what’s shown here. For more information about specific command syntax, see the reference documentation.
The command-line tool allows you to provision new web sites and virtual machines, and that activity needs to be associated with a Windows Azure subscription. So before you start using the tool, you’ll need to download a publish settings file from the Windows Azure portal and then import it as a local configuration setting. For more information about how to do this, see the how-to guide How to use the Windows Azure Command-Line Tools for Mac and Linux, which also covers the basics of deploying web sites and virtual machines.
Let’s take a look at some of the other things you can do with the command-line tool …
Locations and affinity groups. When you deploy a virtual machine, you must tell Windows Azure the location where you’d like for your virtual machine to be deployed – North Central US, for example. The azure vm location list command provides a list of available locations that you can use.
You can also use an affinity group to specify the location. You can create your own affinity groups (here’s how) and then use an affinity group instead of a location when you deploy a virtual machine, cloud service, or storage account. The use of an affinity group tells Windows Azure “please host these services as close together as possible,” with a goal of reducing network latency. The azure account affinity-group list command lists your available affinity groups.
Cloning a customized virtual machine. After you’ve deployed a virtual machine and customized it by installing and configuring software via SSH or other means, you may want to deploy additional instances of that virtual machine that will include your customizations. To do this, stop the virtual machine and use the vm capture <vm-name> <target-image-name> command to capture a cloned copy of it. Then you can deploy new instances of your customized virtual machine through the vm create command.
Virtual machine data disks. When you deploy a virtual machine, you may want to attach a separate data disk, which is a .vhd file in Windows Azure blob storage that provides additional storage for a virtual machine. The azure vm disk command provides options for creating data disks and attaching them to virtual machines. Use the azure help vm disk command to list the available options.
Virtual machine endpoints. When you deploy multiple instances of a virtual machine, you need to set up port mapping between the virtual machines and the load balancer. The load balancer uses an internal IP address to route traffic to each virtual machine, and these mappings are defined through the azure vm endpoint create command. In a blog post later this month, we’ll take a hands-on look at the details of configuring multiple virtual machines behind a load balancer.
Windows Azure cloud services. Although the main focus of the command-line tool is working with virtual machines and web sites (IaaS scenarios), it can also be used to view the cloud services that you have deployed through web roles and worker roles. The azure service list command lists your cloud services, and the azure service delete command deletes a cloud service.
Working with Linux virtual machines. The command-line tool supports both Linux and Windows operating systems for deployment on virtual machines, and for most of the commands there is no difference between working with Windows and working with Linux. Some differences are inherent in the operating system itself, however. For example, Windows uses RDP whereas Linux uses SSH. The article An Introduction to Linux on Windows Azure provides an overview of what you need to know to take full advantage of Linux virtual machines on Windows Azure.
Write custom service management tools and workflows in Node.js. You can provision and manage virtual machines from your own code, through the new iassClient module that provides access to the service management API from Node.js. For more information, see the reference documentation.
As you can see, the Windows Azure command-line tool for Mac and Linux opens a whole new world of possibilities for developers. Working from a Linux or Mac desktop, you can now deploy and manage virtual machines and web sites on Windows Azure. You can also migrate an existing Linux application to Windows Azure without changing a line of code, and then begin taking advantage of powerful Windows Azure services at any time. It’s all about developer choice: your choice of client operating system, server operating system, programming language, frameworks, and tools – all supported by Windows Azure!
Doug Mahugh
Senior Technical Evangelist
Microsoft Open Technologies, Inc.
A subsidiary of Microsoft Corporation