Getting started with PHP on Windows Azure Tools for Eclipse
 Recently I’ve been chatting with quite a few developers out there who are looking to get their PHP applications working on the Cloud. Many are exploring different options and trying to navigate all the offerings available. One of your choices may be Windows Azure. Our team, all who actively blog here, in partnership with the product team is working very hard to make Windows Azure the most interoperable cloud platform yet.
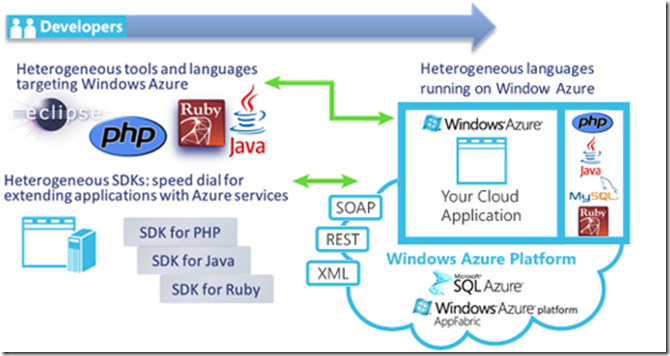
Microsoft has built Windows Azure as an open platform which offers choice for developers. You can run multiple languages including .NET, Ruby, Python, Java, or for the purposes of this post, PHP! You also have the option of running tools like Microsoft's Visual Studio or the Open Source based IDE, Eclipse,that simplifies the life of the developer. You can build applications which can run and consume any of the Windows Azure platform offerings and even those from other clouds. There is also the ability to connect to servers that you run yourself, whether under your desk, nearby offices or your datacenter as part of the composite applications built. Windows Azure is standards based, interoperable and supports all the commonly used internet protocols such as HTTP, XML, SOAP and REST. Using these popular protocols we have a commitment to users and their information so as to make data portability real. The image below provides a glimpse of all the parts working together in helping make this real
If you use Eclipse, you’re already most of the way there and I am going to illustrate how you can get some simple PHP code up on the Cloud using the Windows Azure Tools for Eclipse project which was developed with the partnership of Soyatec, an active contributor to the Eclipse community. This project is a feature rich open source PHP application development environment in Eclipse that enables development and deployment of PHP applications to Windows Azure. The windowsazure4e plug-in builds upon the PHP Development Toolkit (PDT) and integrates Web Tools Platform (WTP) to provide a complete toolkit for Windows Azure Web Application development.
Simply the project does a few things that accelerates getting a cloud based project up …
- Project Creation & Migration: The New Project Wizard creates a new PHP Web Application targeting Windows Azure. Existing PHP projects can be converted to Windows Azure projects (or vice-versa) using the migration tool.
- Azure Project Structure & Management: The windowsazure4e plug-in creates the project artifacts that Windows Azure expects, including a Windows Azure Service project and a Web-role Project, as well as Windows Azure configuration and definition files. Project and Windows Azure settings are exposed via the properties window in Eclipse
- Storage Explorer: As part of the plug-in, a Windows Azure Storage Explorer is provided within the Eclipse environment. The Storage Explorer allows easy management of Windows Azure Storage Accounts. In addition, it also provides a friendly user-interface for performing Create, Read, Update, and Delete (CRUD) operations on Blobs, Queues, and Tables. The Storage Explorer it built using the Windows Azure SDK for JavaTM.
- Azure Project Deployment: Once the PHP application for Windows Azure had been developed and tested locally on the Windows Azure Development Fabric, the application can be packaged up for Windows Azure deployment with a right-clicking on the target project from within Eclipse.
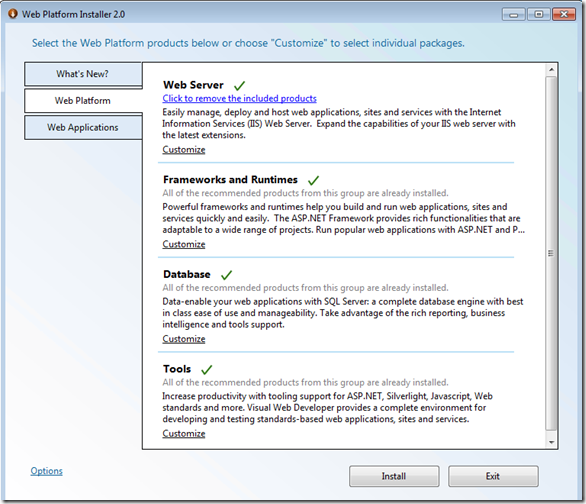
First, make sure you have the prerequisites detailed in this web page which are all publicly available . I would recommend using the the Web Platform Installer to get the free versions of SQL Server 2008 Express and Microsoft Visual Web Developer 2008 Express Edition with SP1. You can find these as choices in the Web Platform tab under Database and Tools in the installer. It’s quick, easy and again free!
These versions will work with the Windows Azure Tools for Microsoft Visual Studio 1.1 (February 2010) and will provide the necessary hooks so that your Eclipse IDE can take advantage of the cloud. The same download link also has instructions for making sure you have the right settings for your development system including turning on features usually off by default. There is also a handy MSDN page for getting started with the Windows Azure SDK if you are looking for more details and want to review the documentation. If you plan on deploying on the cloud then you will want to go to the Windows Azure Getting Started page and find the best option for you. 
Once you have these in place you can get started with your Eclipse setup. If you haven’t downloaded Eclipse already and since the IDE is built with Java, you will first need to get a current version of the Java Development Kit (JDK) or Java Runtime Engine (JRE), available at the Java download site. Anything v1.5 and above will suffice. Then you can go ahead and download Eclipse. I have had good success with the Galileo version aka PDT 2.1 SR-1 All In Ones / Eclipse PHP Package, available at this link. Test the IDE to make sure it launches and also make sure you have a connection to the internet. If you can hit a web page, you’re pretty much good to go!
Okay, let’s launch the Eclipse IDE and head to the Help menu item and select “Install New Software” as with the image here, 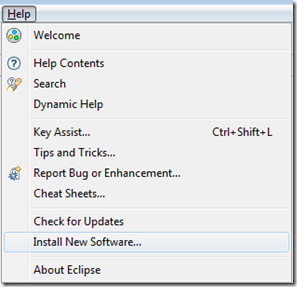
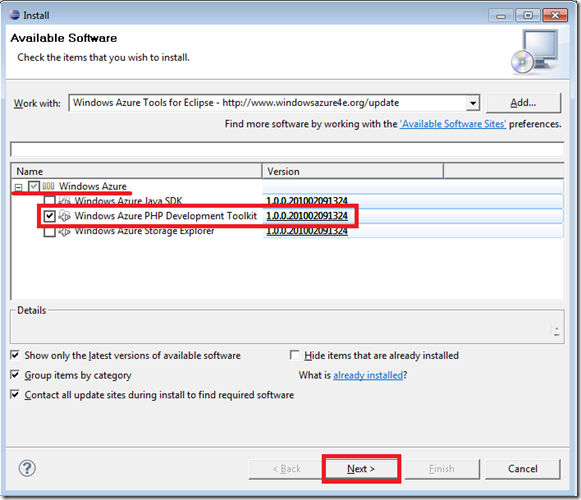
In the Available Software, Click Add... button, this will bring up a pop-up dialog, use http://www.windowsazure4e.org/update for the location and you can enter something descriptive of your choice in the Name field, Windows Azure Tools for Eclipse is used here.
Select All available sites. If the list of categories doesn't contain the entry Windows Azure, you need to restart eclipse. Select Windows Azure PHP Development Toolkit and click Next button.You may also want to select the other check marks if you are interested or you may add them later from the same menus.
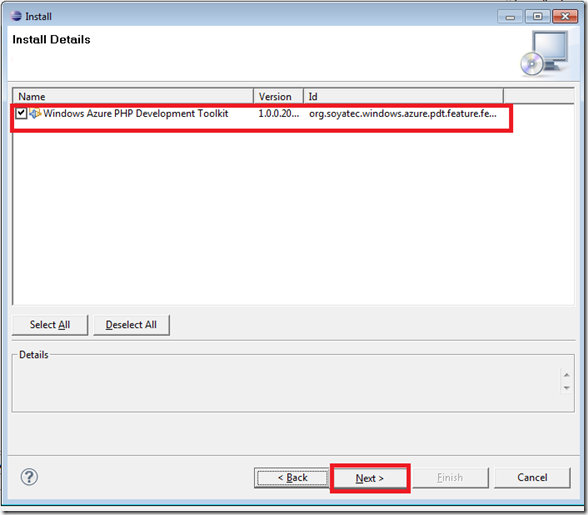
In the next dialog, check Windows Azure PHP Development Toolkit and click Next button.
Then read carefully the license agreement. If you accept all conditions, select I accept... option and click Finish button. The IDE will then do some thinking and shortly will start downloading and installing the required jar package. When finished installing, it will pop-up a dialog, click Yes button to restart your Eclipse for the changes to take effect.
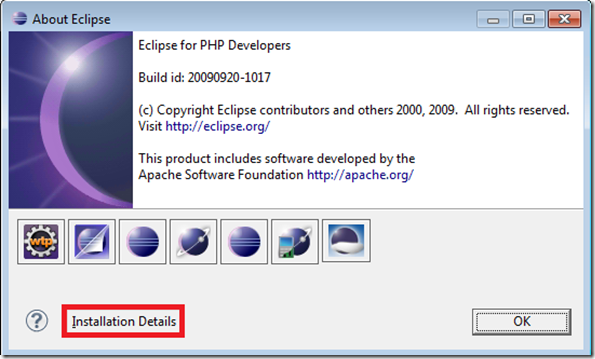
To check the plugin installation is successful, you can select Help->About Eclipse. This window will verify that you have the right build of Eclipse for PHP Developers and the Build version you installed with. In the next dialog box, click Installation Details,
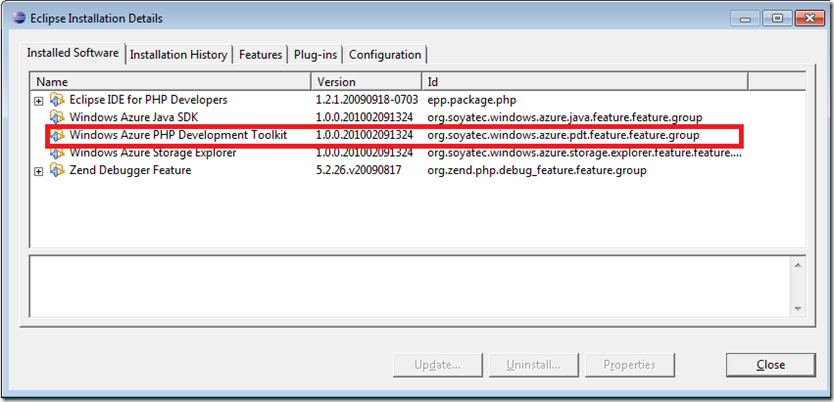
select Installed Software option, you will see Windows Azure PHP Development Toolkit in the Name list along with any other options you may have chosen before. See the screenshot below.
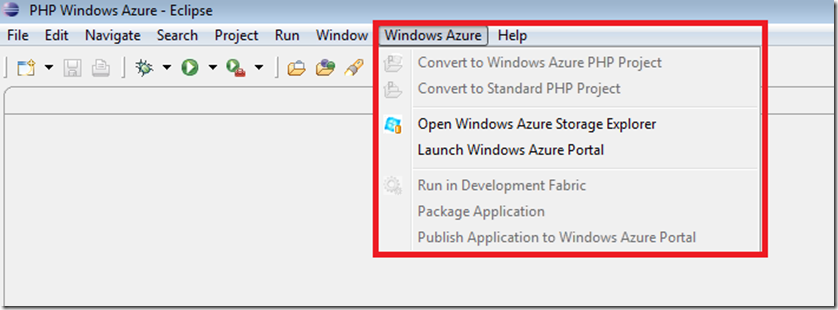
Another way to verify this is that there will be Windows Azure menu item, right next to Help, with some tools that help in working with Windows Azure in PHP.
Congratulations you’ve just installed Windows Azure Tools for Eclipse! Now let’s write a PHP application and get it running on the Cloud.
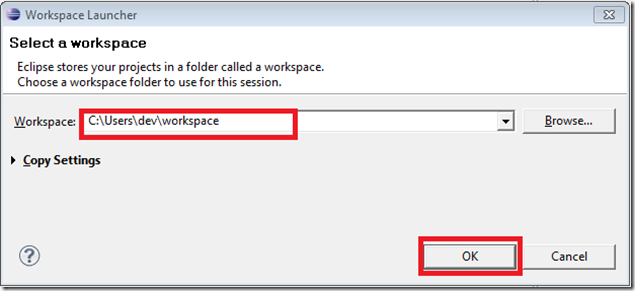
If you haven’t already Created or Assigned a workspace folder for Eclipse do so now. I have created a folder in my user dev hierachy but it can be anywhere on your machine where you have space for your projects.
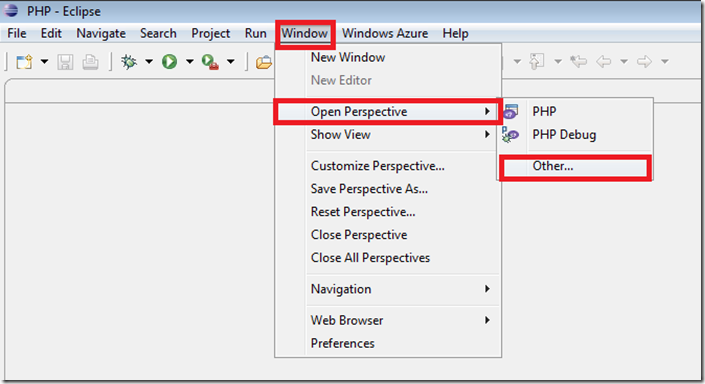
Now you will want to change the perspective to PHP Windows Azure, by going to Window menu bar itemand then selecting Open Perspective and Other sub item. The PHP perspective is usually set as default and also available from the same menu item. For now just click on Other ….
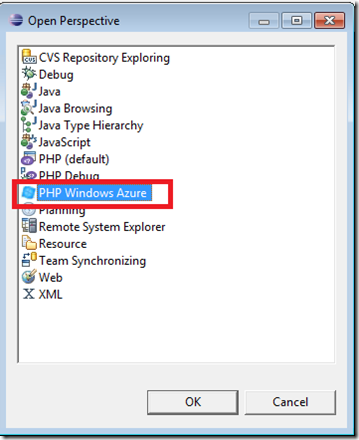
In Open Perspective panel, select PHP Windows Azure
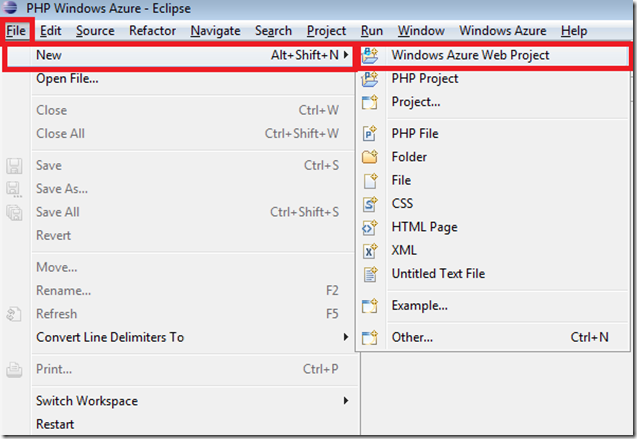
In the PHP Windows Azure perspective, Create a new PHP Windows Azure Project. By selecting the File from the menu bar and then New, and Windows Azure Web Project
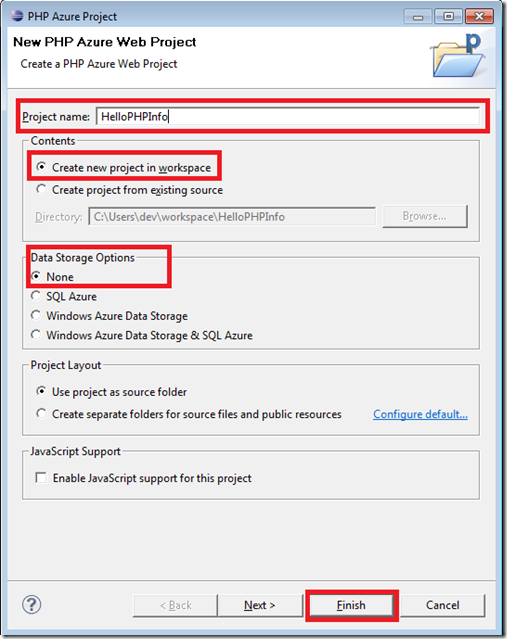
This will launch a new window title PHP Azure Project where you will be able to create and title your new project. Provide a Project Name, I’ve titled mine HelloPHPInfo, as PHP developers you probably know where we’re going with this. You will also want to click the Create new project in workspace dialog button if you haven’t already and make sure the Data Storage Options dialog button is set to None as we’ll not be calling any storage for this example. Then click Finish, if you hit next don’t worry you’ll get some additional info, you can just click Finish or Back.
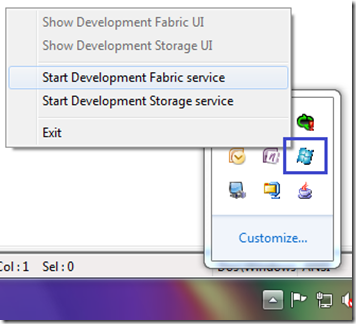
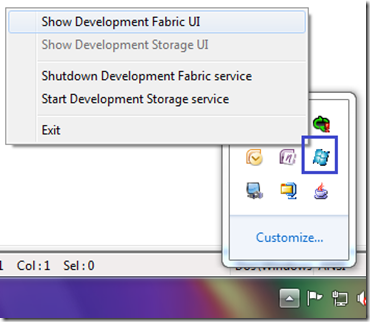
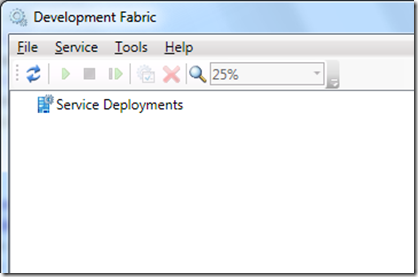
Before we go on we’ll need to start the Development Fabric if it isn’t already running, right-click its icon in the system tray and select Start Development Fabric Service. To view Development Fabric UI, right-click its icon in the system tray and select Show Development Fabric UI
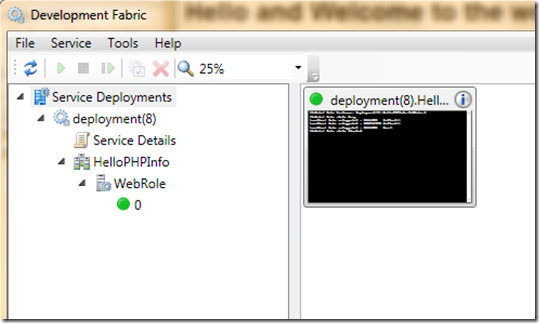
There should be no WebRole(s) deployed within Development Fabric.
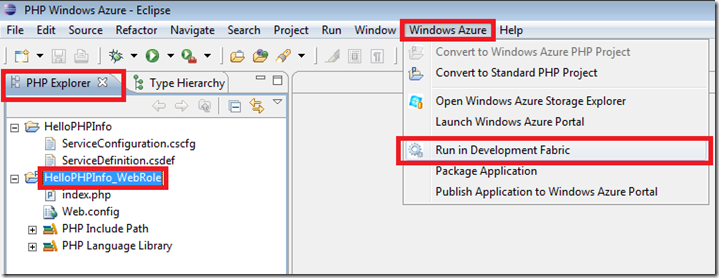
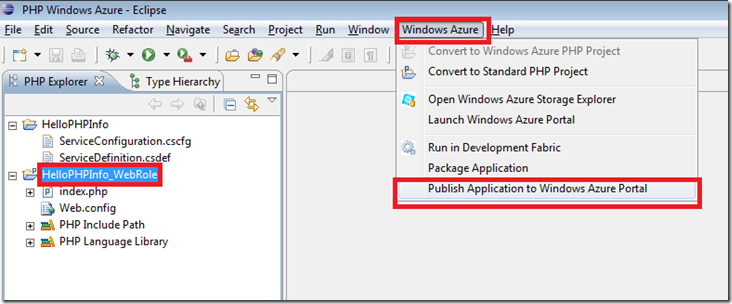
We will now go back to Eclipse and Web Role in local Development Fabric, from Eclipse menu-bar. First go the PHP Explorer tab, pick either of the projects so they are selected (e.g HelloPHPInfo or HelloPHPInfo_WebRole, I picked the latter) and then select the Windows Azure menu bar and the Run in Development Fabric menu item.
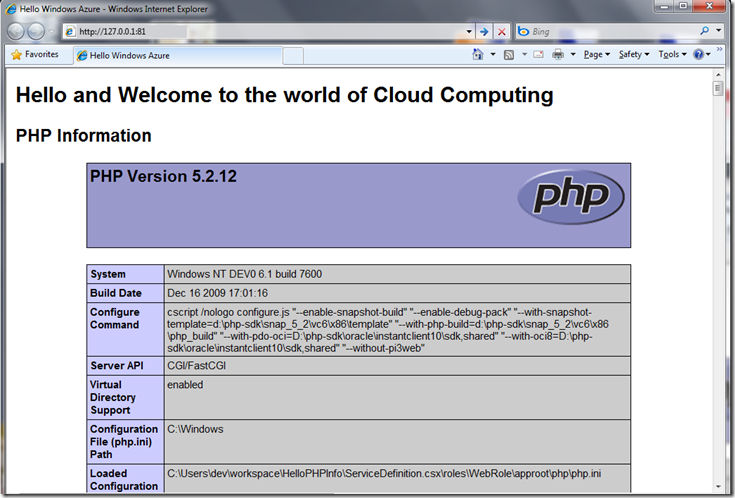
The service will then start with a Progress Information/Project in Progress window will show up with some information and then it will launch you default web browser and present the default document index.php on the next available port. By default it will be the URL http://127.0.0.1:81/index.php . It will also open an explorer window for the project you created, in this case HelloPHPInfo. I went into the index.php file in the HelloPHPInfo_WebRole folder and modified the automatically generated file’s <H1> tag and included Hello just to make sure that it’s my version. You can do something familiar. It also runs the phpinfo() command too as you would typically do when checking to see if your PHP installation is configured properly and information like version, the location of your php.ini, as you can see it’s in your Eclipse workspace directory as the other files such as the service definition which we will get a little into later.
If you open the Development Fabric UI from the Windows Azure icon in the systems tray you will find that the tree on the left panel will have Web Role deployment instances set within ServiceConfiguration.csfg showing everything running using the local development fabric on your machine.
Okay we now have our PHP application running on our local developer fabric. Let’s deploy it to the cloud and run this PHP application and service remotely using Windows Azure Storage Account. This is where the Window Azure account you set up comes in. First you will need to create a Windows Azure Service Package. Again go to your project and pick either the project or the webrole (HelloPHPInfo or HelloPHPInfo_WebRole) and then pick the Windows Azure menu, and select Publish Application to Windows Azure Portal menu-item. This action will open a portal to Windows Azure.
We’ll still have the Development Fabric running and it is necessary to cleanup to create a Windows Azure Service Package, select OK button to proceed.
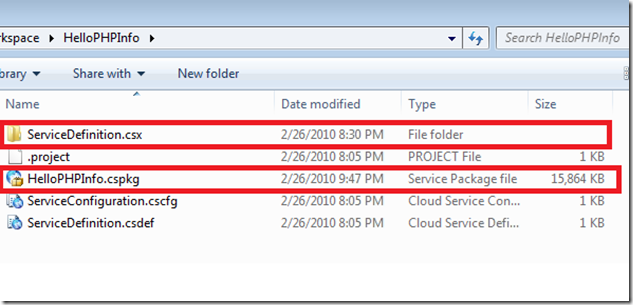
and you soon have a Service Package created with the build results and a Windows Explorer will open the HelloPHPInfo workspace folder and you will see two new additions to the project. The first is a ServiceDefinition.csx folder and the other is a HelloPHPInfo.cspkg service package file.
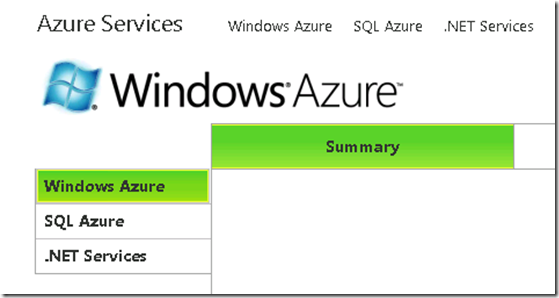
the tool then opens your default web browser to Windows Live Sign-In in order to access your Windows Azure account. You will want to sign in with the credentials you have created and it will direct you to the Windows Azure Portal.
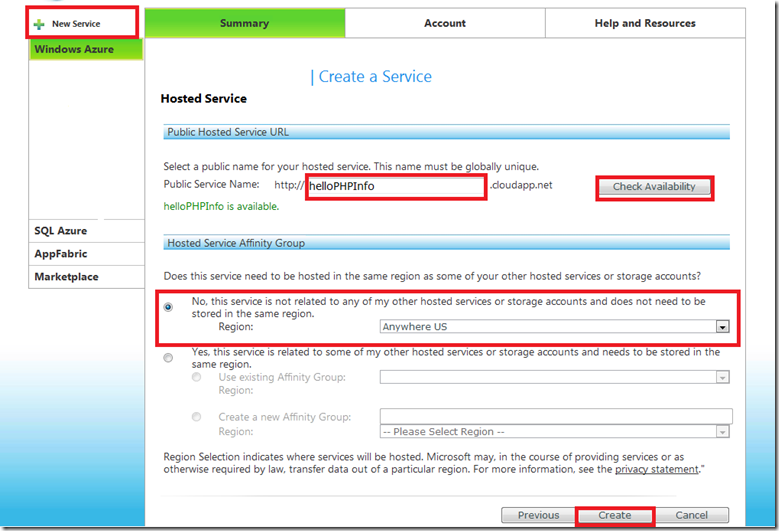
If you then click the Windows Azure link on the left navigation pane it’ll will expand to give you a + New Service, which when click will allow you to Create a Service. Here you can setup a public service name, I picked HelloPHPInfo, and a Check Availability to see if the name is available. I also selected the first dialog button since I don’t have any hosted services or storage accounts for this project. You may want to do this if you have them and things like custom domains etc. I also selected the Region, to be Anywhere US. You can pick the one that is most applicable to you. All you then have to do is click the Create button on the bottom of the page.
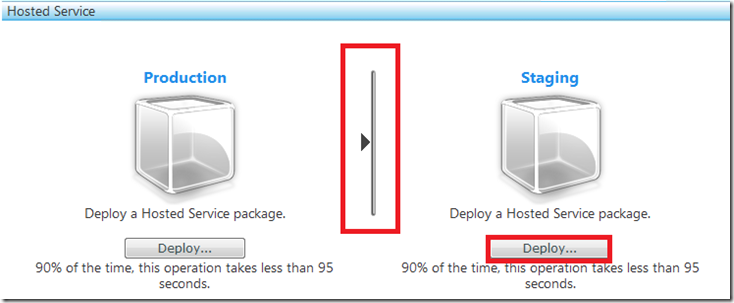
The section of the next page that you will be interested is Hosted Service and you will want to select Deploy to Staging. If you only see the Deploy button for Production, then you want to click on the middle separator bar with the arrow highlighted below.
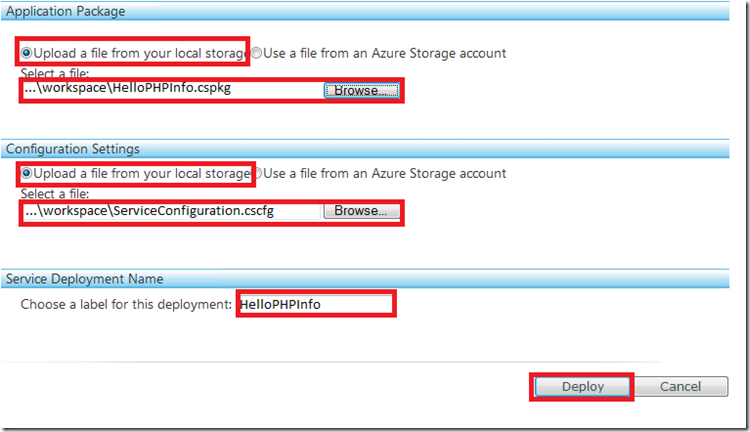
The next page Staging Deployment, will ask you for the two packages mentioned earlier, you will want to pick the Upload a file from local storage dialog buttons for the Application Package, in this example, HelloPHPInfo.cspkg and for Configuration Settings, ServiceConfiguration.csfg which can both be picked from the workspace folder you set for the project with the Browse buttons. Then set the Service Deployment Name with a label. I have called it HelloPHPInfo. Click Deploy to start the process of copying your files up for deployment on the Windows Azure Cloud.
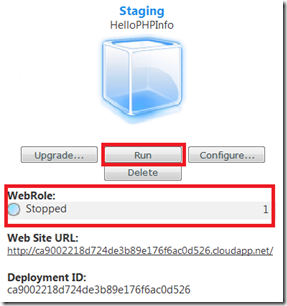
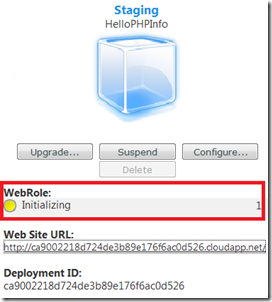
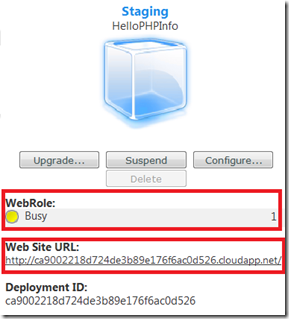
Wait for a few minutes for the deployment to complete where it may take you to a blank page with something like a button that states “Processing, Please Wait”. Click the Run button on the next page and the WebRole status will change from Stopped to Initializing to Busy.
When the WebRole status is Busy, then the Web Site URL is clickable , if clicked before, it will give a web page that cannot be displayed. The service has also got a unique address for the URL and the Deployment ID. When moved to Production, you will find that the handy or friendly name that you selected earlier is used. In this example the final production URL will be http://HelloPHPInfo.cloudapp.net.
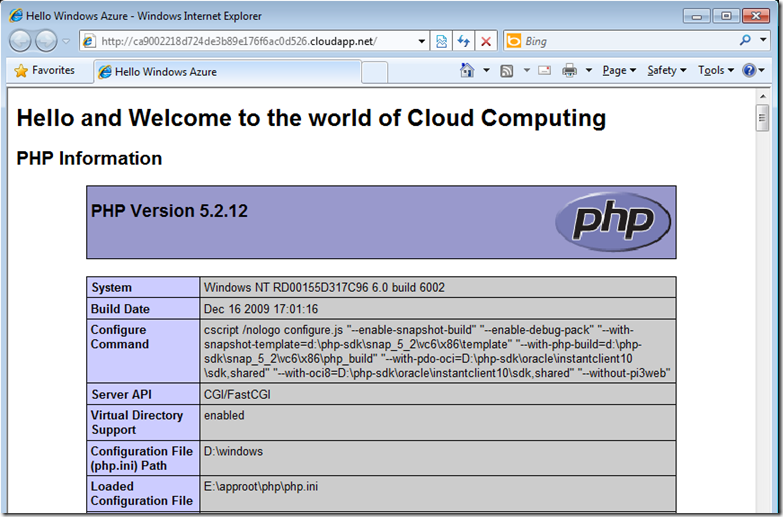
Clicking on the Web Site URL gives the following page which renders exactly as the example we did using the local Development Fabric. There are some noticeable differences though such as the path of the php.ini compared to the local deployment.
Congratulations you are Cloud Computing!
Now you can pretty much deploy any PHP application up to the Window Azure Cloud as in this tutorial. We created a simple PHP Windows Azure Web Project. Built and Ran PHP Windows Azure Web Project within the Development Fabric on our local machine and then we went on to deploy and Run PHP Windows Azure Web Project within the Windows Azure Cloud.
I hope you found this helpful and we look forward to hearing from you on your experiences. Please send feedback!
Jas Sandhu , @jassand
