Transforming InfoPath Rich Text to Word
This article applies to InfoPath 2003 and Word 2003.
Summary
InfoPath is great for capturing structured data. A common scenario is that you need to output that data in a Word document. It is quite easy to create an XSLT transformation that will take the XML generated by InfoPath as input and generate WordprocessingML tags. For example, to output the value of the EmployeeName form field in a word document’s paragraph you would use the following XSLT fragment:
…
<w:p><w:r><w:t>
<xsl:value-of select=”my:EmployeeName”/>
</w:t></w:r></w:p>
…
Most mappings will be quite similar, in that they end up in a <w:t> tag, which Word uses to contain, well euh… text. There is one exception to this, namely when you use rich text fields in your form. A rich text field can contain formatted text, images, hyperlinks, tables, etcetera and although the XHTML format that is used to represent the contents is similar to WordprocessingML, there are important differences. This article provides a reusable solution for dealing with those differences.
Downloads: XSLT transformation source code and sample input files are all bundled in the attached archive.
Details
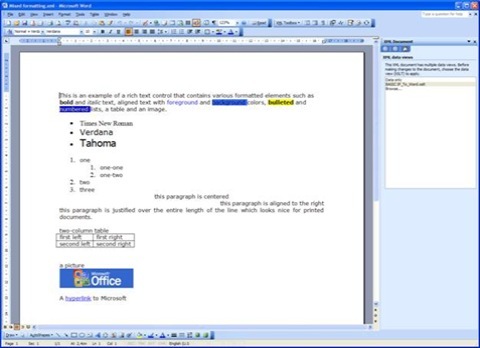
To illustrate the capabilities of a rich text field I created the form below, which contains a single rich text field. I created an instance of it with some sample formatted content:

The contents of the field itself is structured using the XHTML standard, that looks like this:
...
<div xmlns="http://www.w3.org/1999/xhtml">This is an example of a rich text control that contains various formatted elements such as <strong>bold </strong>and <em>italic </em>text, aligned text with <font color="#0000ff">foreground </font>and <font style="BACKGROUND-COLOR: #3366ff">background </font>colors, <font style="BACKGROUND-COLOR: #ffff00"><strong>bulleted</strong></font> and <font style="BACKGROUND-COLOR: #0000ff" color="#ffff00">numbered </font>lists, a table and an image.</div>
...
Should you try to insert this as such in a <w:t> tag, you would end up with an invalid Word document. You have to take each individual XHTML tag and transform it to its WordprocessingML counterpart. For some tags (strong, font, …) this is quite straightforward, but for others this can be quite a challenge.
What you will find in the download accompanying this article, is an XSLT template that you can include as is in your own XSLT stylesheets and that will result in a visually equivalent word document. The result of transforming the above form to word using this template looks like this:
Beware that this is a work in progress. The template is suitable for most basic formatting (things you hand-type in the form), but will most probably fail when you cut/paste content from the web with heavily nested table formatting. If you have that requirement, you’ll have to resort to coding techniques rather than transformation.
The input files
The download contains a number of xml documents generated with Infopath. To test these with the transformation, right-click the file and choose Open With… Word. In the XML task pane, browse to the “BASIC IP_To_Word.xslt” to transform.
The transformation file
The first part of the “BASIC IP_To_Word.xslt” file is simply a blank word document saved as xml and then turned into a stylesheet. This can be done in a few easy steps:
- Wrap the entire document in <xsl:stylesheet version=”1.0”> tags
- Remove the <?mso-application …> processing instruction
- Move all the namespace definitions in the wordDocument tag to the stylesheet tag
- Add the xsl namespace as xmlns:xsl=”<http://www.w3.org/1999/XSL/Transform”>
- Add the namespace of the source xml file, for example: xmlns:ns0=”http://YourCompany/YourXMLRootNode”
- Move the closing </w:body> and <w:wordDocument> from the end to right after the <w:body> opening tag
- Wrap the <w:wordDocument> node in an <xsl:template match=”/”> node
- Right before the <w:wordDocument> node, add
<xsl:processing-instruction name="mso-application">
<xsl:text>progid="Word.Document"</xsl:text>
</xsl:processing-instruction> - In the <w:body> node, add <xsl:apply-templates select=”/ns0:YourXMLRootNode”/>
- Wrap the remainder of the body in a node <xsl:template match=”ns0:YourXMLRootNode”/>
- Add <xsl:value-of select=”ns0:YourNode”/> instructions where needed
- If you have repeating nodes, you can add these with an <xsl:for-each select=”...”> construct
The interesting stuff is where the rich text field IPRT is passed to a template named “infopath rich text”. Everything below it can be copied to your own stylesheet. Then you can use the following construct to render any rich text field anywhere in the word document:
<xsl:template match=”my:YourFieldHere”>
<xsl:call-template name=”infopath-rich-text”/>
</xsl:template>
You can also add the following parameters to the call template instruction:
pPr_Default: A list of paragraph formatting properties that need to be set on each paragraph transformed from the rich text
rPr_Default: A list of character formatting properties that need to be applied on all the text (for example the default font)
Stephane Bouillon
Senior Consultant
Microsoft Consulting Services
Thanks goes to David Gerhardt for his articles.